
Are you looking to create a striking European mount deer display? Making a euro mount deer involves several key steps, from initial preparation to the final whitening and finishing touches, and eurodripusa.net can help you achieve the best results. This guide will provide you with a thorough walkthrough, ensuring your trophy is preserved beautifully while maximizing the value of the mount using expert techniques.
1. Understanding the Basics of Euro Mount Deer
A euro mount deer, also known as a European skull mount, is a method of preserving a deer’s skull and antlers as a display piece. It involves cleaning the skull of all soft tissue, whitening the bone, and presenting it in a natural, aesthetically pleasing way. This method is popular among hunters for its affordability, simplicity, and the unique way it showcases the animal’s antlers and skull structure.
1.1. Why Choose a Euro Mount?
Choosing a euro mount deer offers several benefits:
- Cost-Effective: Compared to traditional taxidermy, a euro mount is much more affordable.
- DIY-Friendly: With the right tools and guidance, you can complete the entire process yourself.
- Space-Saving: Euro mounts take up less space than full-body or shoulder mounts.
- Aesthetic Appeal: The clean, natural look of a euro mount complements various interior styles.
- Preservation: It’s an excellent way to honor and preserve your hunting trophy for years to come.
1.2. Tools and Materials Needed
Before you begin, gather the necessary tools and materials:
- Knife: A sharp, replaceable blade knife or scalpel for skinning and removing tissue.
- Saw: A saw or sawzall for removing the skull from the deer’s carcass.
- Pot: A large pot for boiling or simmering the skull.
- Heat Source: An outdoor burner, turkey fryer, or propane stove to heat the water.
- Hydrogen Peroxide: 3% hydrogen peroxide for whitening the skull.
- Degreaser: Dawn dish soap or similar degreasing agent.
- Plastic Container: A water-tight plastic container for maceration.
- Fish Tank Heater: A stainless steel fish tank heater to maintain water temperature.
- Plastic Wrap and Electrical Tape: To protect the bases of the antlers during maceration.
- Drill: A drill with a 5/8” flat spade wood bit for brain removal.
- Pressure Washer or Water Hose: For rinsing and removing brain matter.
- Gloves and Eye Protection: For safety during handling and cleaning.
- Super Glue: Fast-drying clear super glue for reattaching loose teeth or bones.
- Minwax Wood Stain: Provincial wood stain for touching up antler bases.
- Mop & Glo: For sealing the bone and preventing dust accumulation.
- Flat Head Screwdriver: To pry the hide from around the antler burs.
2. Initial Preparation: Head Removal and Skinning
The first steps in creating a euro mount deer are head removal and skinning. These steps are crucial for preserving the skull and simplifying the cleaning process.
2.1. Removing the Head
If you’re successful in your hunting endeavor and want to preserve your trophy by euro mounting it, the work starts when the animal hits the ground. To begin, remove the head at the atlas joint, where the base of the skull connects to the neck. This reduces meat wastage and streamlines the skull cleaning process. Using a saw or a sharp knife, carefully detach the head from the carcass.
2.2. Skinning the Skull
Whether you should skin the skull immediately depends on your circumstances. If you’re hunting in your home state and don’t need to clean the skull to cross state lines, it’s best to leave the hide on. This prevents the meat from drying out, which can cause issues during whitening.
However, if you need to prep the skull for transport across state lines, follow these steps:
- Incision: Start with an incision from the back of the head/neck area and run the spine of the knife blade across the top of the skull, between the eyes, all the way down to the snout.
- Skin Removal: Keep the edge of the knife blade pointed away from the bone to avoid unwanted knife marks. For skulls with antlers, use a flat head screwdriver to pry the hide from around the antler burs to avoid scoring the bone.
- Detailed Work: Carefully work the hide off the skull down each side, around the eyes, and tear ducts. Cut the ears off at the base of the skull and proceed toward the bottom jaw.
- Nose Area: Take special care around the nose to avoid removing any bone or cartilage with the knife.
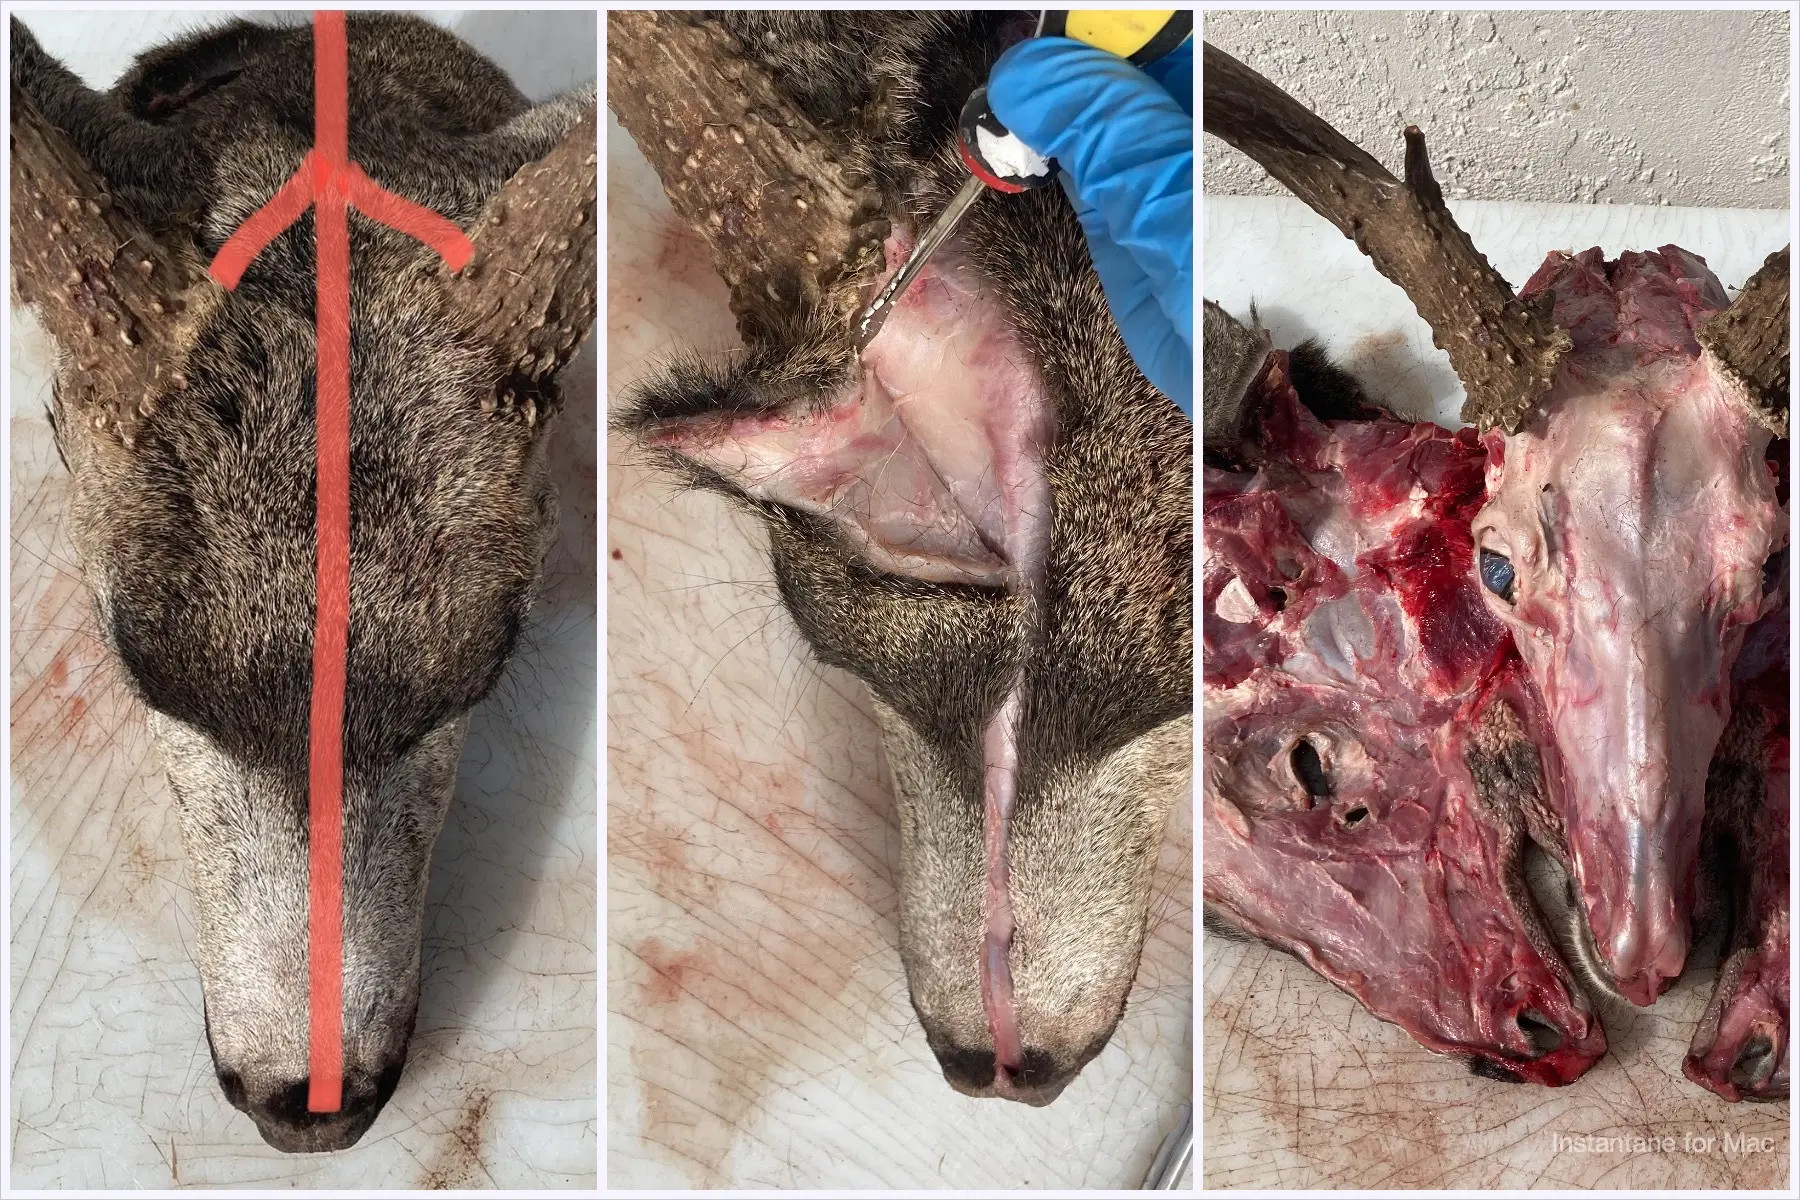 Skinning a deer skull for a euro mount
3. Removing the Lower Jaw and Eyes
Once the skull is skinned, the next steps involve removing the lower jaw and eyes. These actions prevent decay and facilitate thorough cleaning.
3.1. Removing the Lower Jaw
- Incisions: Make two incisions along the outside of the jaw bone from the back of the jaw toward the mouth on both sides of the skull to free up the muscle holding the jaw bone in place.
- Detachment: Grab the snout in one hand and the lower jaw in the other, open the mouth, and continue to open until the lower jaw hyperextends to the back of the head and detaches itself.
- Final Cuts: Use your knife to cut the lower jaw free, as it will only be attached by a small amount of muscle and connective tissue.
3.2. Removing the Eyes
- Circumferential Incision: Make an incision around the entire circumference of the eyeball, freeing up all of the connective tissue around the eye.
- Back of Socket Incision: Flip the skull upside down and insert your knife into the back of the eye socket between the skull and orbital bone.
- Cut Connective Tissue: Cut the remainder of the connective tissue behind the eye.
- Removal: Pull the eye from the eye socket and cut it free with very little resistance.
- Meat Removal: Remove as much meat from the outside of the skull as possible to expedite the cleaning process.
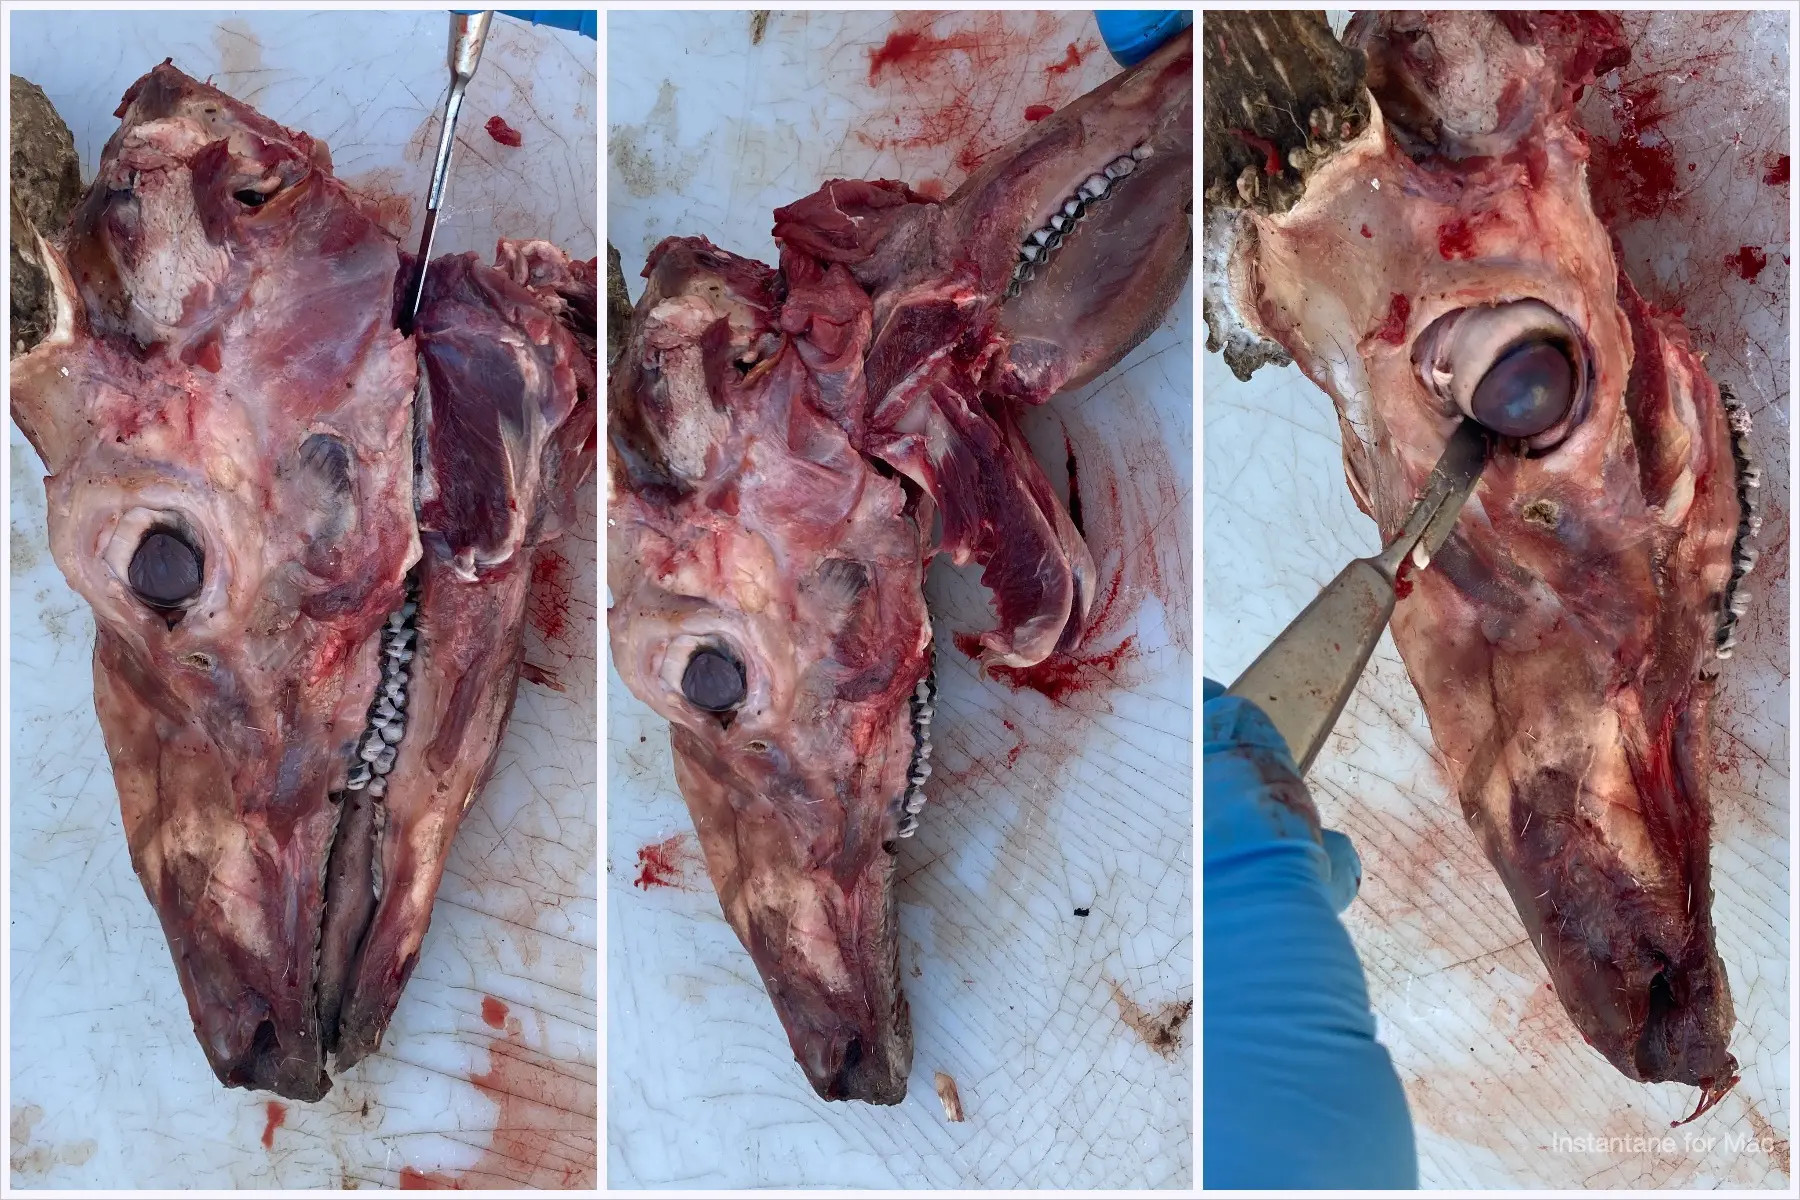 Removing the lower jaw and eyes of a deer skull
4. Brain Removal: A Critical Step
Removing the brain is essential to prevent decomposition and odors.
4.1. Scrambling the Brains
Use a drill and a 5/8” flat spade wood bit to scramble the brains inside the skull. Insert the drill bit into the hole on the back of the skull at the atlas joint where the last vertebrae were connected. Pull the trigger and scramble the brains until they are in liquid form. A screwdriver or strong stick can also achieve the same result.
4.2. Rinsing the Skull
Once the brains are liquified, use a pressure washer or water hose to remove them. Stand back a few feet and insert the hose into the same hole you used to scramble the brains. Spray water into the skull until all brain matter has been removed and rinse thoroughly.
If you’re in the field and don’t have access to a water hose, use a self-service car wash with a pressure washer to complete this step.
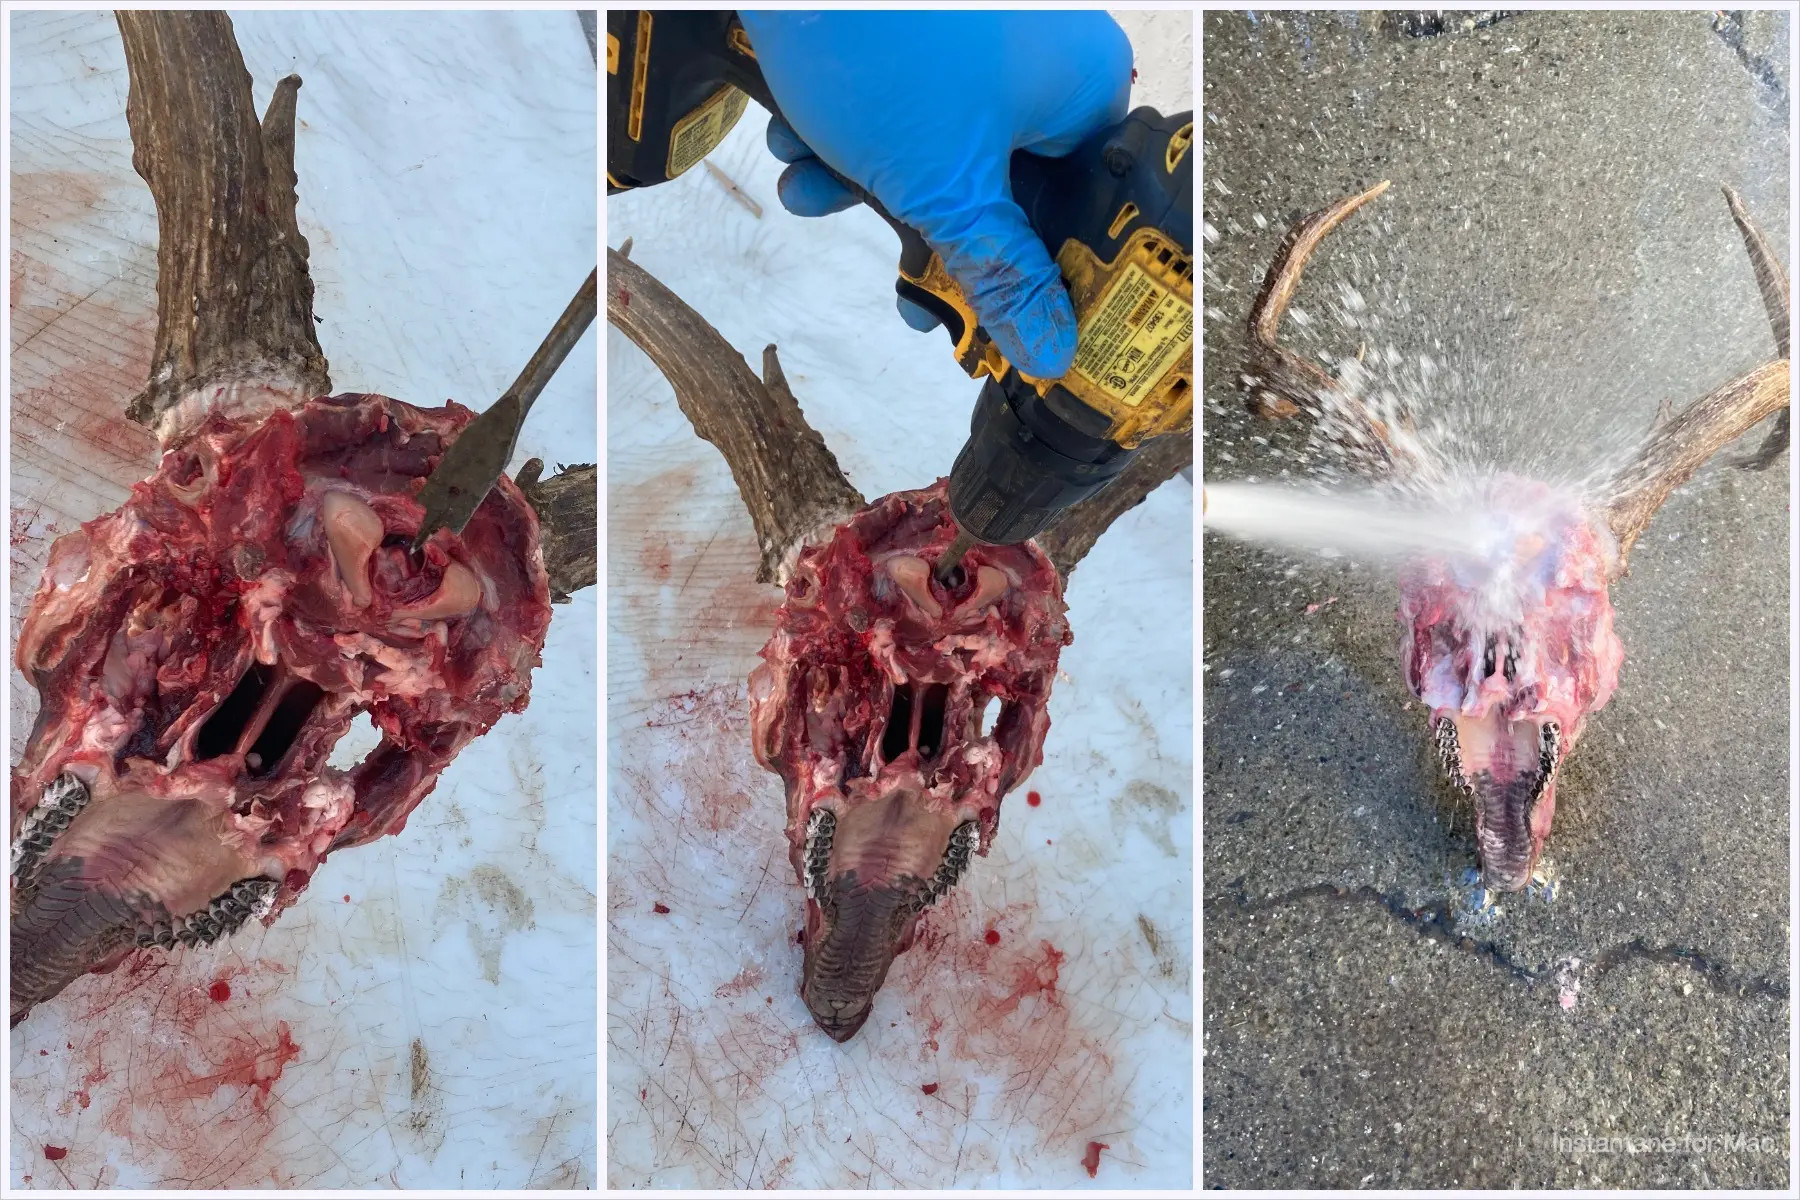 Removing the brain from a deer skull
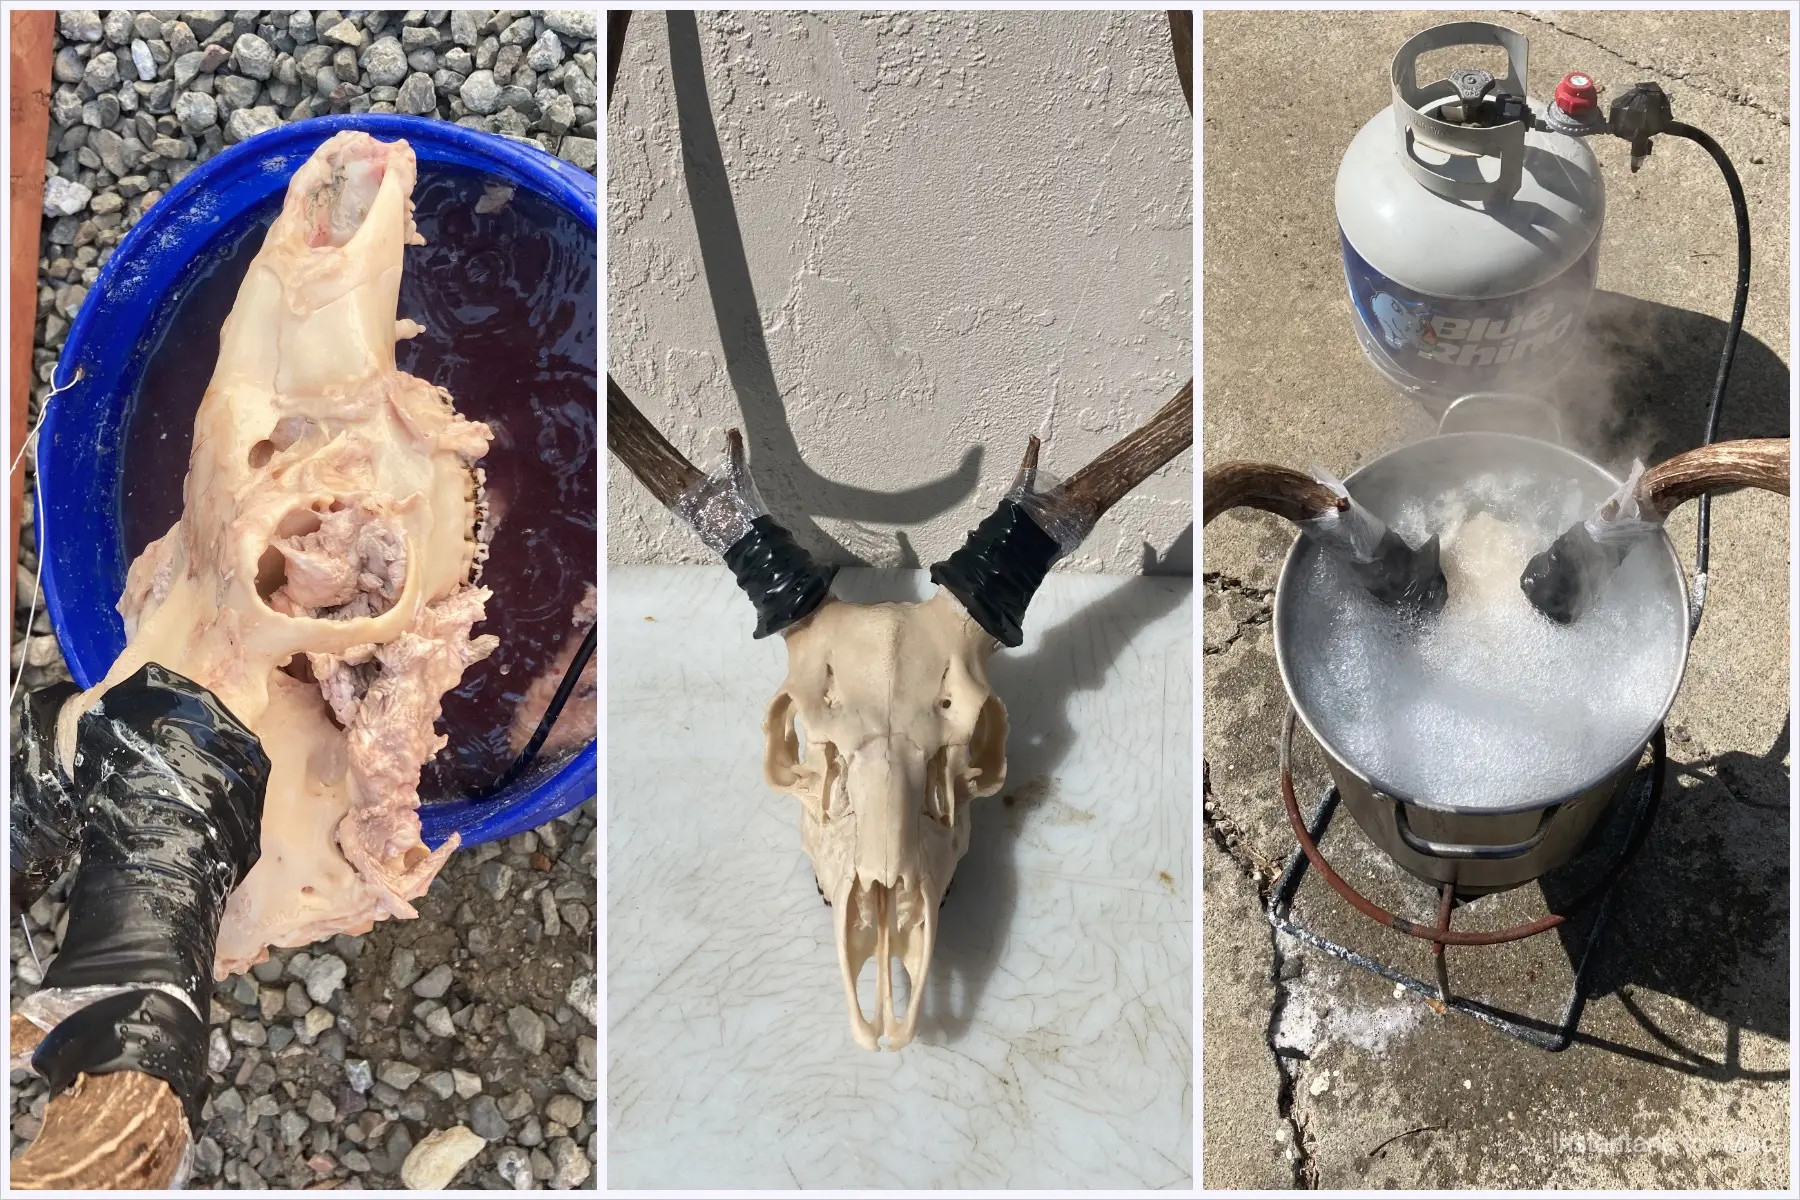
5. Maceration: The Preferred Cleaning Method
Maceration involves soaking the skull in water at a sustained temperature to promote bacteria growth. This method preserves small, intricate bones that can be lost during boiling.
5.1. Setting Up the Maceration Container
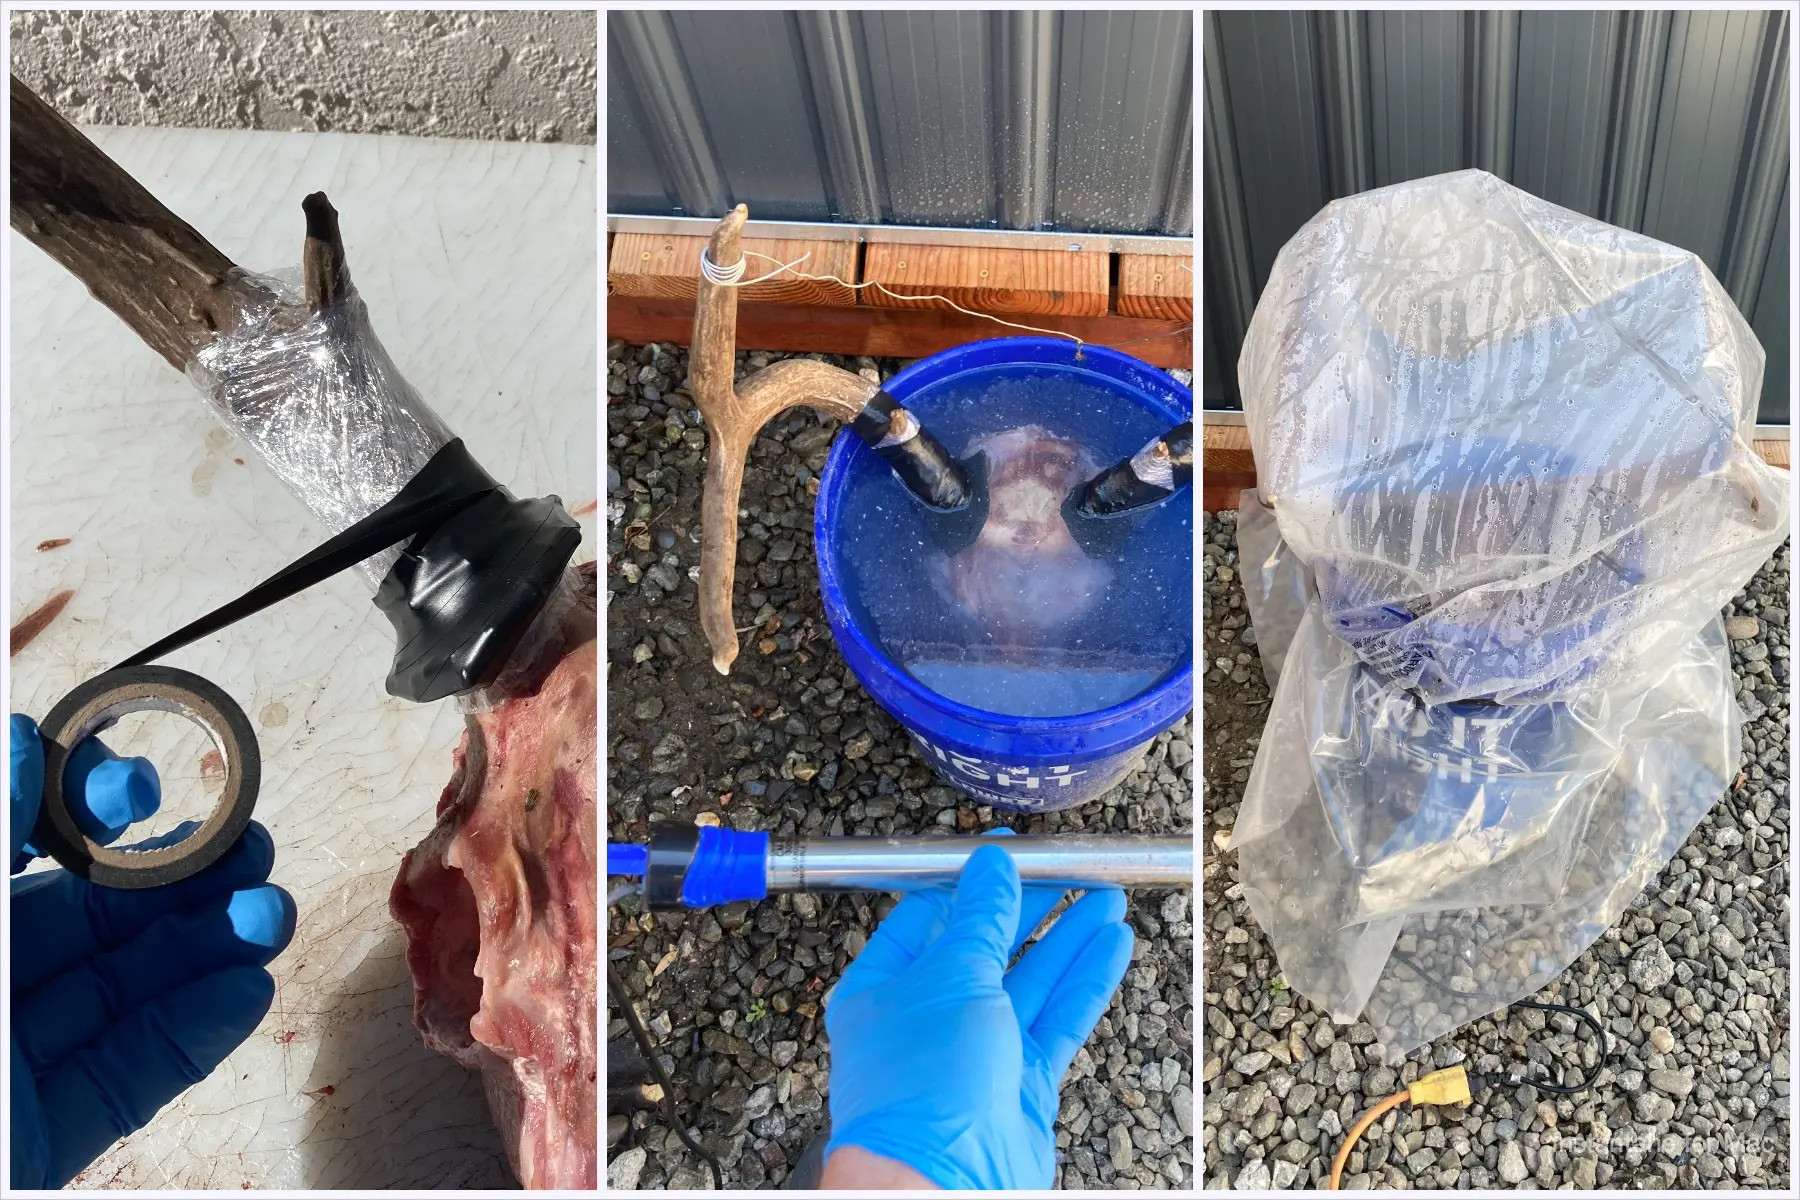
- Container Choice: Use a water-tight plastic container large enough to completely submerge the skull. Avoid metal containers as they can rust and discolor the skull.
- Heater Installation: Place a stainless steel fish tank heater in the container and set it to 80-90°F to maintain optimal water temperatures for bacteria growth.
- Antler Protection: Wrap the antlers from the base near the skull up about 6 to 8” with clear plastic wrap, then cover the plastic wrap with black electrical tape to create a water-tight seal. This prevents antler color loss during maceration.
5.2. The Maceration Process
- Location: Choose a location for the maceration container where animals can’t access it and the smell won’t bother anyone. Ensure you can run electricity to the container.
- Submersion: Place the skull in the container and fill it with water until it completely covers the skull. If your skull has antlers, fill about 1” above the antler burrs.
- Temperature Maintenance: Plug in your tank heater and ensure it remains completely submerged to prevent overheating.
- Covering the Container: If possible, place a lid on the container to reduce evaporation and contain the smell. Alternatively, use a large plastic garbage bag and secure it with a bungee cord.
- Duration: For a deer-sized animal, the process usually takes four to six days. Check the water level every two days and add water as needed to keep the skull submerged.
5.3. Completing the Maceration
After four to six days, you’ll notice the meat and connective tissue have rotted and are falling off the skull. Once roughly 90% of the meat has rotted off, remove the skull from the water and rinse it thoroughly. Be careful around the teeth, nasal passages, and sinus bones as they will be soft and easily damaged at this point. A simple rinse with a garden hose will remove the remaining meat and tissue.
 Macerating a deer skull in a plastic container
6. Skull Whitening: Achieving the Desired Look
After cleaning, the next step is whitening the skull to achieve a pristine, aesthetically pleasing appearance.
6.1. Preparing the Whitening Solution
- Heat Source and Pot: Set up an outdoor burner (such as a turkey fryer or high-output BBQ burner) and a large pot that can hold the whitening solution and completely cover the skull.
- Solution Mixture: Use a mixture of hydrogen peroxide and water. Regular 3% hydrogen peroxide from your local store works well. Fill the pot 50 percent full with hydrogen peroxide, then place the skull inside, and fill the rest of the pot with water until it completely covers the skull.
- Antler Protection: Ensure that the antlers are still covered in tape and plastic to prevent the whitening solution from contacting them.
6.2. Boiling the Skull
- Heating the Solution: Remove the skull and bring the solution to a rolling boil.
- Submerge and Boil: Submerge the skull in the boiling solution for 5-10 minutes. Ensure the solution never touches the uncovered parts of the antlers, as it will whiten anything it contacts.
- Monitoring: Periodically remove the skull to check for bone deterioration and desired color. The skull will whiten further as it dries, so don’t worry if it doesn’t look as white as you want when it first comes out of the pot.
- Loose Bones: Follow the same process for any teeth or nasal bones that may have fallen off during the maceration process.
 Whitening a deer skull with hydrogen peroxide
7. Drying and Finishing Touches
The final steps involve drying the skull, reassembling any loose parts, and applying finishing touches to protect and enhance the mount.
7.1. Drying the Skull
- Reassembly: Fit any nasal bones in place while the bone is still wet and secure them with a rubber band. This helps prevent separation as the skull dries.
- Drying Options: If possible, place the skull in direct sunlight for drying. If the weather isn’t cooperating, use a space heater.
- Drying Process: Place the skull in front of a space heater until it is completely dry and no bones feel loose.
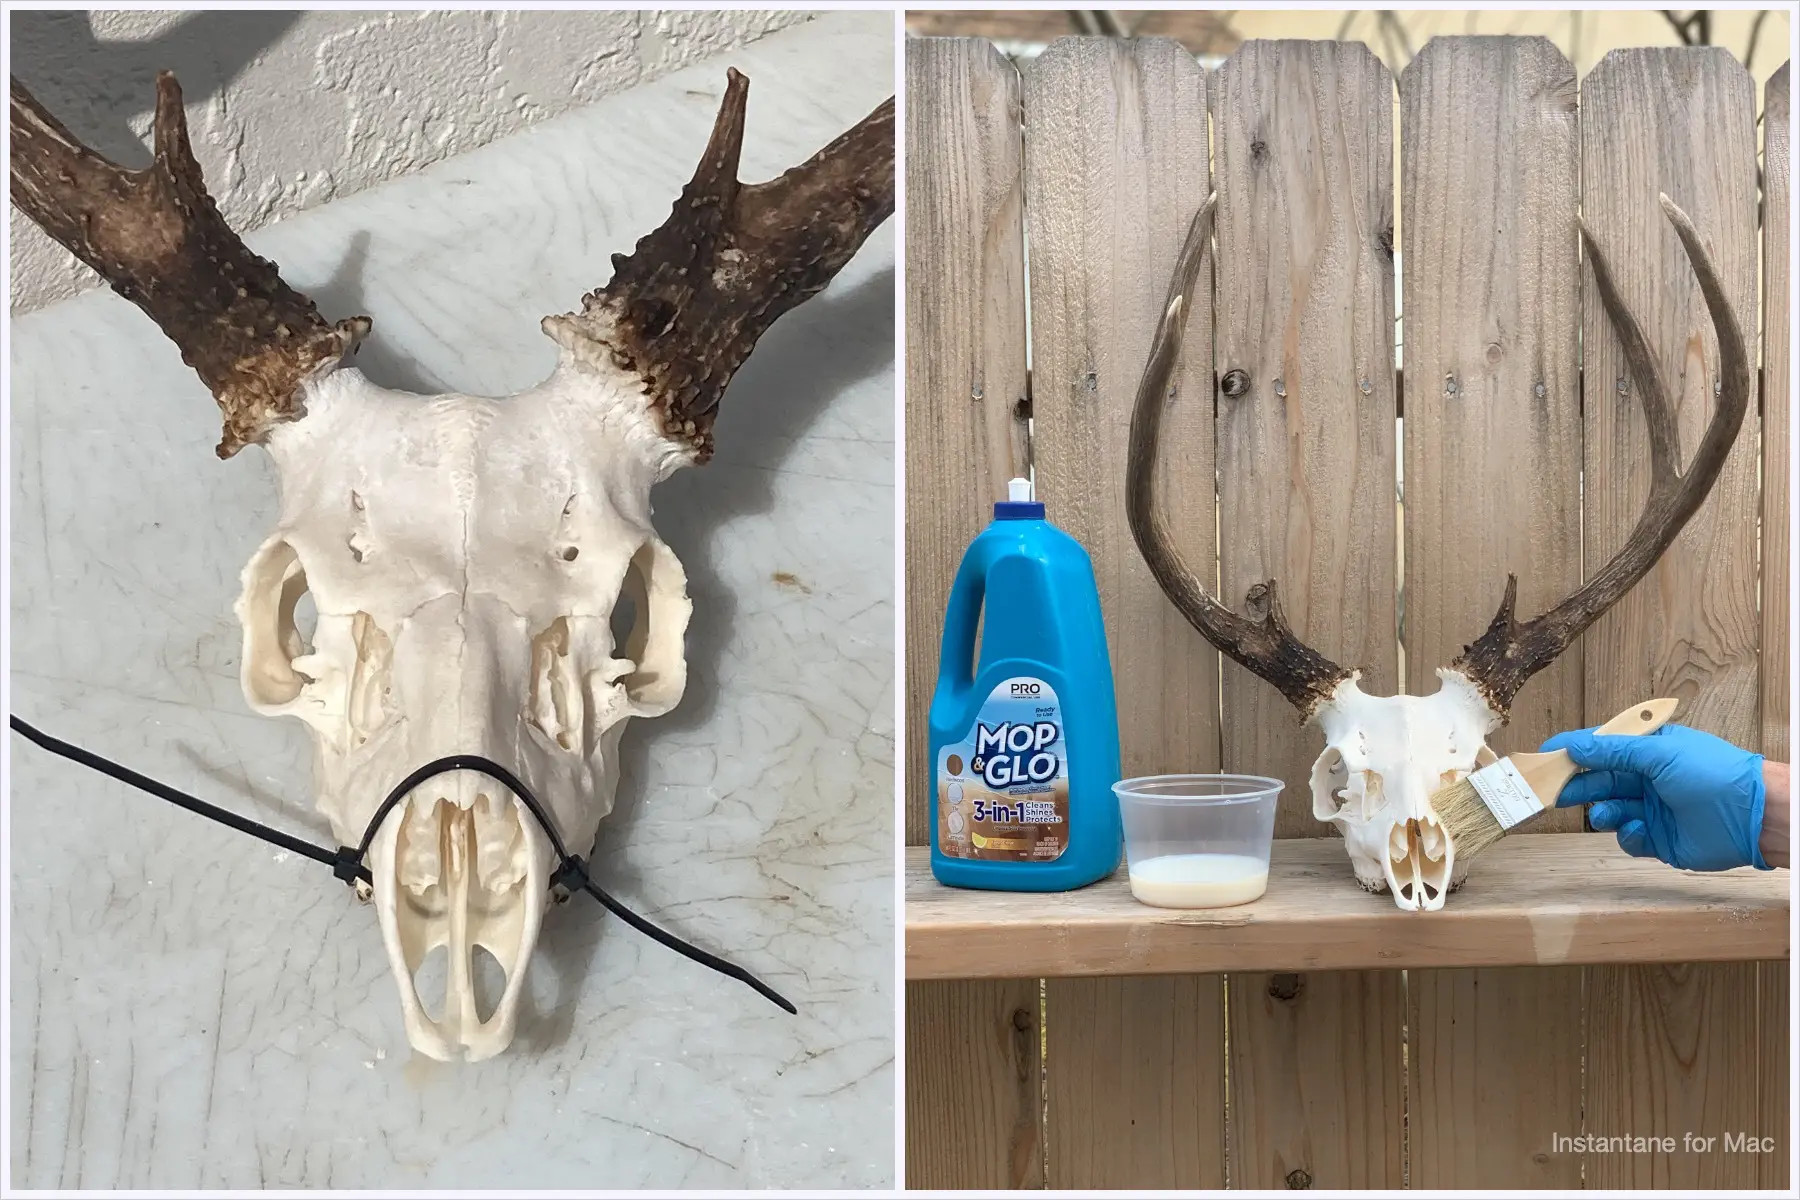
7.2. Final Assembly and Finishing
- Gluing: Once the skull is dry, glue any teeth or nasal bones back in place that didn’t stick during the drying process using fast-drying clear super glue.
- Antler Touch-Up: Remove the plastic and tape from the antler bases. If any horn was whitened during the process, touch them up with Minwax provincial wood stain, applying it lightly with a Q-tip until the desired color is achieved.
- Sealing: For the final touch, coat the finished skull with a thin layer of Mop & Glo from the cleaning supply aisle. This seals the bone, prevents dust and dirt accumulation, and gives the skull a pleasant smell.
 Drying and finishing a deer skull euro mount
8. Displaying Your Euro Mount Deer
Once your euro mount deer is complete, it’s time to display your trophy. Choose a location that highlights the skull and antlers, such as a living room, study, or hunting-themed room. Ensure the mount is securely attached to the wall or display stand to prevent accidents.
8.1. Mounting Options
- Wall Mounts: Several commercial wall mounts are available that securely hold the skull and allow for easy installation.
- Tabletop Displays: For a non-permanent option, consider a tabletop display stand that showcases the skull on a shelf or table.
- Custom Displays: For a unique touch, create a custom display using wood, metal, or other materials that complement your décor.
8.2. Lighting
Proper lighting can enhance the visual appeal of your euro mount deer. Consider installing spotlights or accent lights to highlight the skull and antlers, creating a dramatic effect.
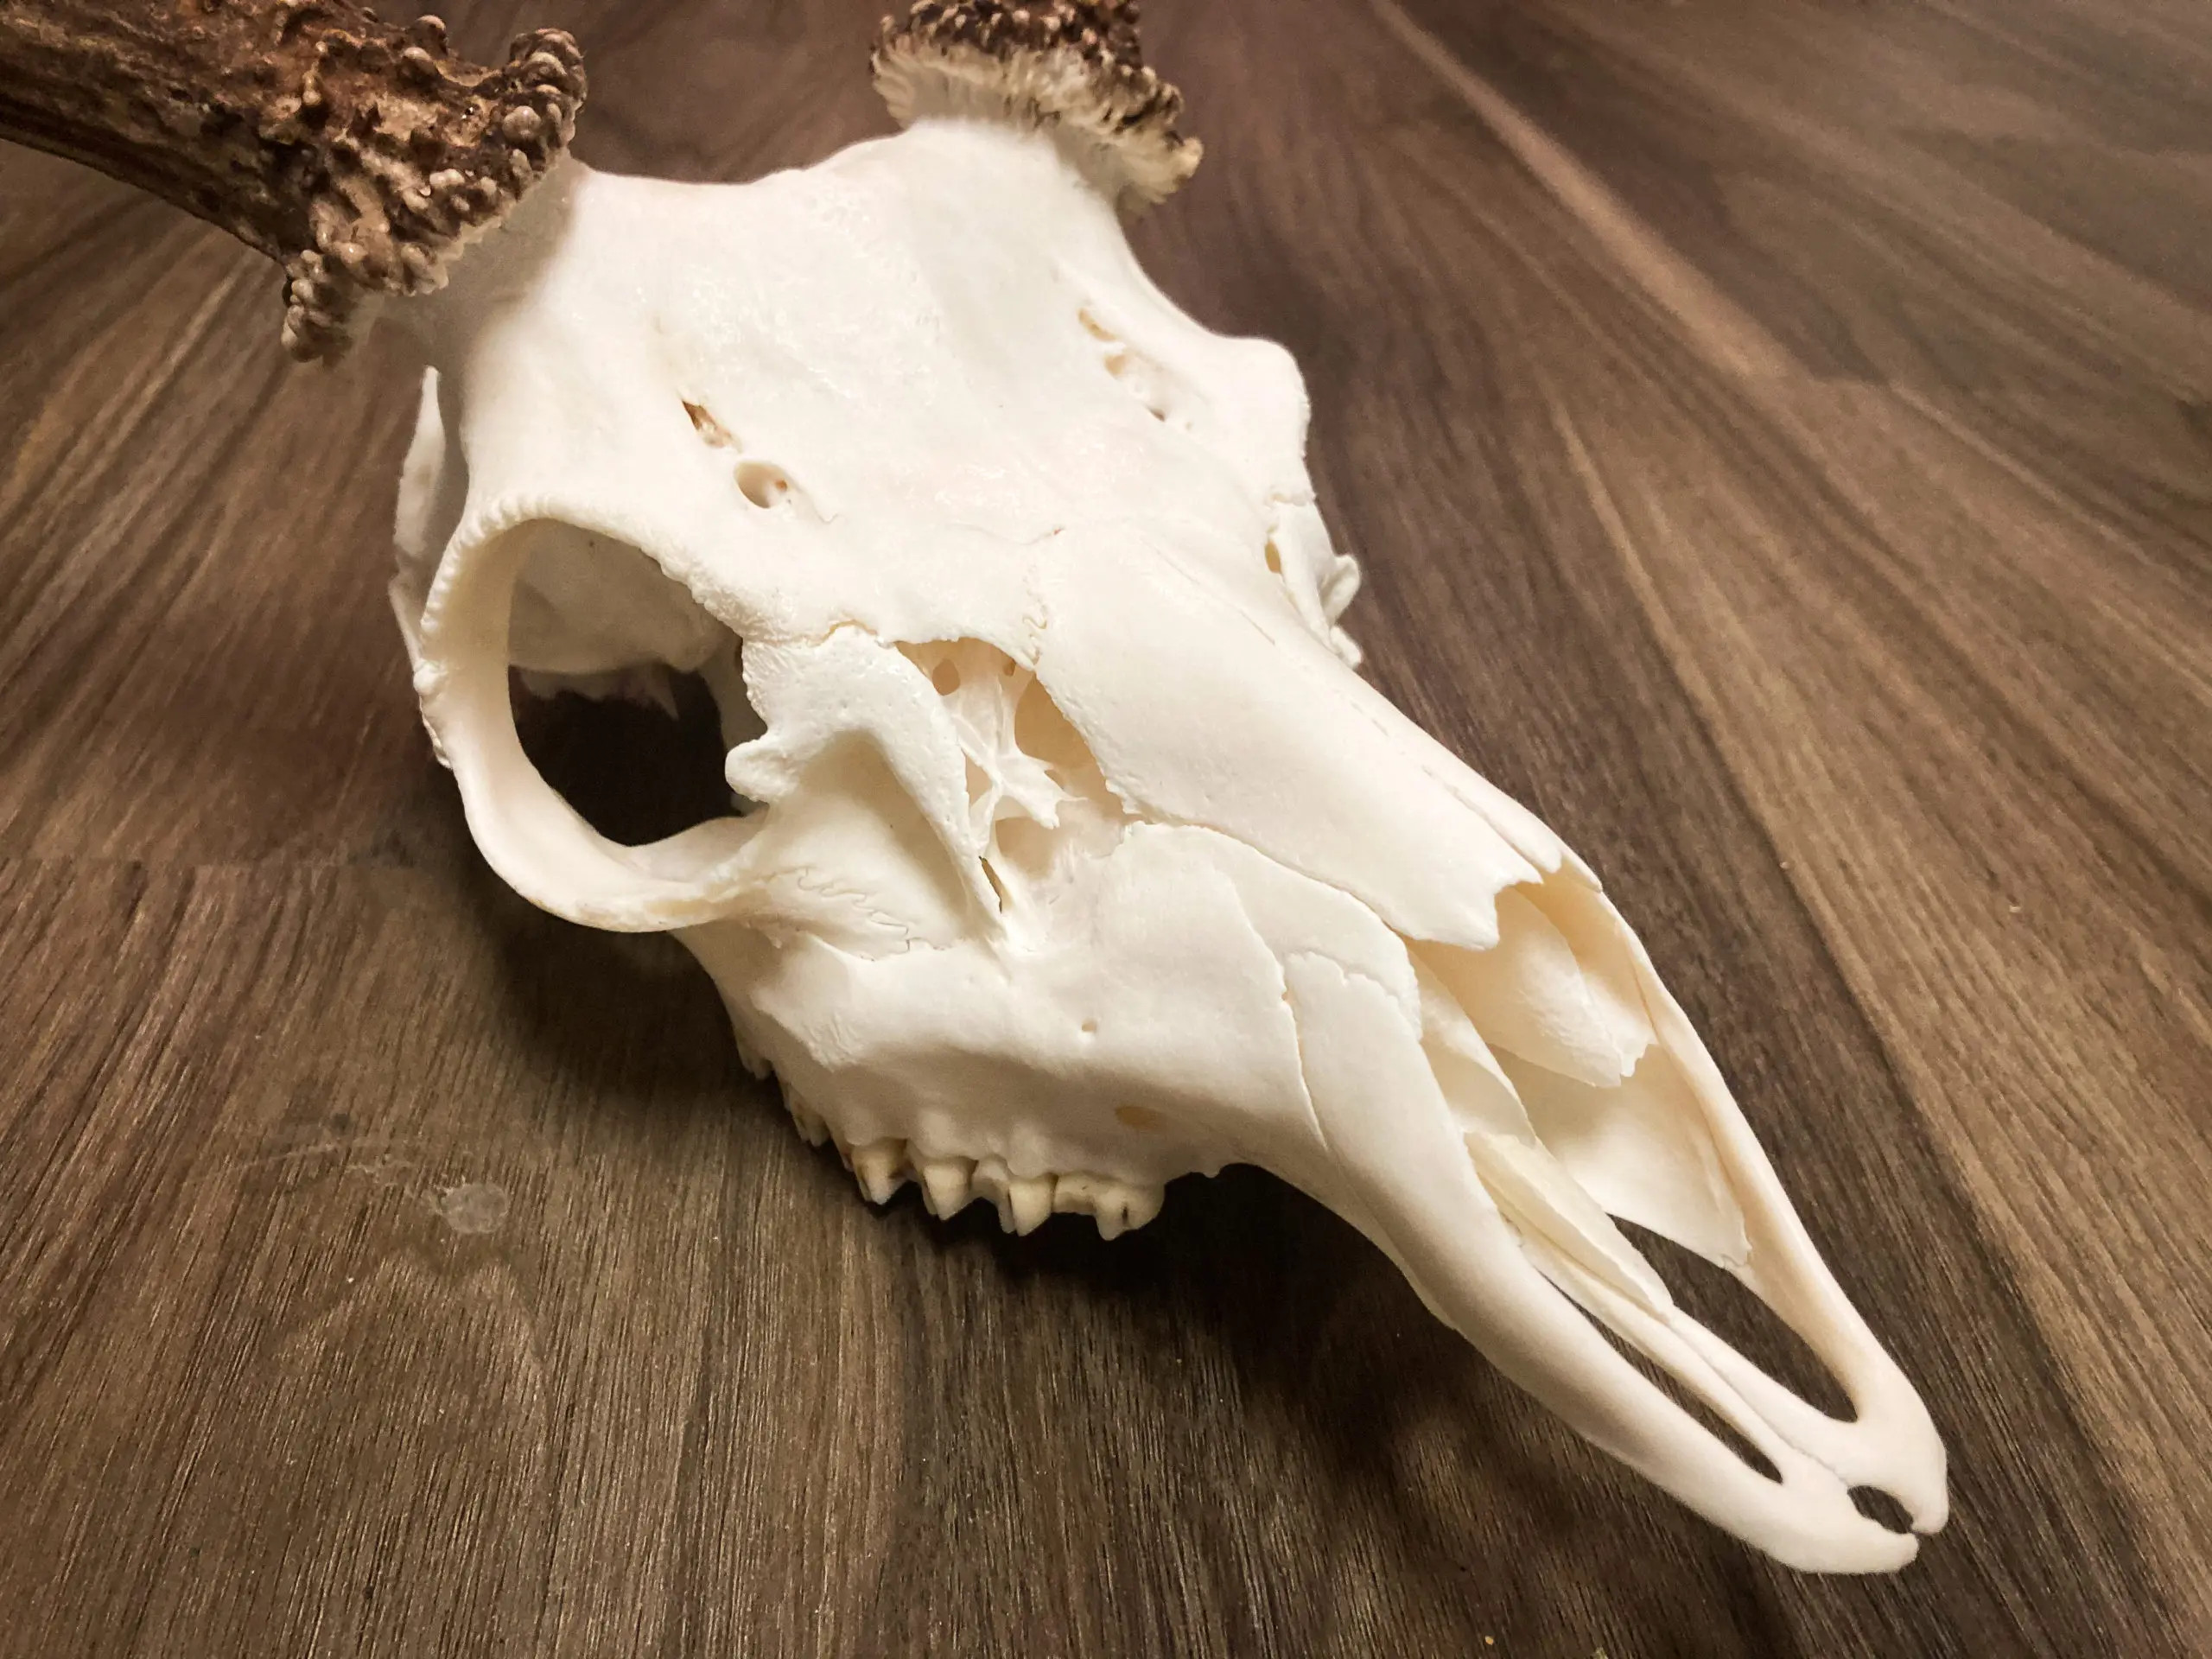 Completed Euro Mount Deer
9. Common Mistakes to Avoid When Making a Euro Mount Deer
Creating a euro mount deer can be a rewarding experience, but it’s essential to avoid common mistakes that can compromise the quality of your mount.
9.1. Inadequate Cleaning
One of the most common mistakes is not thoroughly cleaning the skull. Residual tissue and meat can attract pests and cause unpleasant odors. Ensure you remove all soft tissue, brain matter, and membranes before proceeding to the whitening stage.
9.2. Over-Boiling
Boiling the skull for too long can weaken the bone and cause it to become brittle. It can also damage the antlers and cause them to crack. Follow the recommended boiling times and monitor the skull closely.
9.3. Using Bleach
Avoid using bleach to whiten the skull, as it can damage the bone and cause it to deteriorate over time. Hydrogen peroxide is a safer and more effective alternative.
9.4. Neglecting Antler Protection
Failing to protect the antlers during maceration and whitening can cause them to lose color or become damaged. Always wrap the antlers with plastic wrap and electrical tape before submerging the skull in water or whitening solution.
9.5. Rushing the Drying Process
Rushing the drying process can cause the skull to warp or crack. Allow the skull to dry naturally in a well-ventilated area or use a space heater to expedite the process without causing damage.
10. Addressing Customer Challenges with Eurodrip USA
Many customers face challenges in finding reliable and efficient irrigation systems. Eurodrip USA addresses these challenges by providing high-quality drip irrigation products sourced from Europe.
10.1. Providing Detailed Product Information
Eurodrip USA offers comprehensive details on its European drip irrigation products, ensuring customers have all the information they need to make informed decisions.
10.2. Guiding System Selection
Eurodrip USA helps customers select the most suitable drip irrigation system based on their specific crop types and geographical conditions, optimizing water use and plant health.
10.3. Offering Installation and Maintenance Guides
Step-by-step guides for installing and maintaining drip irrigation systems are readily available, ensuring systems operate efficiently and have a long lifespan.
10.4. Sharing Optimization Tips
Customers receive expert tips on optimizing irrigation efficiency, reducing water costs, and promoting sustainable practices.
10.5. Presenting the Latest European Technologies
Eurodrip USA keeps customers updated with the newest irrigation technologies from Europe, enhancing their farming practices with cutting-edge solutions.
11. Benefits of Choosing Eurodrip USA
Eurodrip USA stands out by offering several key advantages:
11.1. High-Quality European Products
Sourced directly from Europe, our drip irrigation systems are known for their durability, efficiency, and innovative design.
11.2. Customized Irrigation Solutions
We provide tailored systems that meet the unique needs of each customer, ensuring optimal performance and water conservation.
11.3. Expert Support and Guidance
Our team of irrigation specialists offers expert advice and support, helping customers choose, install, and maintain their systems effectively.
11.4. Commitment to Sustainability
Eurodrip USA is dedicated to promoting sustainable irrigation practices, helping customers reduce their environmental impact and conserve water resources.
12. Intent of search of the User
- Detailed Steps: Users want a comprehensive, step-by-step guide on how to perform each stage of creating a euro mount deer.
- Best Practices: They seek expert tips and techniques to achieve professional-quality results.
- Troubleshooting: Users look for solutions to common problems encountered during the process.
- Product Recommendations: They want recommendations for the best tools and materials to use.
- Display Ideas: Users need inspiration on how to display their finished euro mount deer attractively.
13. FAQ
1. What is a euro mount deer?
A euro mount deer, also known as a European skull mount, is a method of preserving a deer’s skull and antlers as a display piece by cleaning the skull of all soft tissue, whitening the bone, and presenting it in a natural way.
2. Why should I choose a euro mount over traditional taxidermy?
A euro mount is more affordable, DIY-friendly, space-saving, and offers a clean, natural aesthetic appeal, providing an excellent way to preserve your hunting trophy.
3. What tools and materials do I need to create a euro mount deer?
You’ll need a knife, saw, pot, heat source, hydrogen peroxide, degreaser, plastic container, fish tank heater, plastic wrap, electrical tape, drill, pressure washer, gloves, super glue, wood stain, and Mop & Glo.
4. How do I remove the head from the deer carcass?
Remove the head at the atlas joint, where the base of the skull connects to the neck, using a saw or sharp knife to carefully detach the head.
5. Should I skin the skull immediately after removing the head?
If you are hunting in your home state and do not need to transport the skull across state lines, it is best to leave the hide on to prevent the meat from drying out; otherwise, skin the skull for transport.
6. What is the maceration process, and why is it preferred?
Maceration involves soaking the skull in water at a sustained temperature of 80-90°F to promote bacteria growth, preserving small bones that might be lost during boiling.
7. How do I protect the antlers during maceration and whitening?
Wrap the antlers with clear plastic wrap and then cover with black electrical tape from the base to about 6-8 inches up to create a water-tight seal.
8. What is the best way to whiten the skull?
Use a mixture of 3% hydrogen peroxide and water, bringing the solution to a rolling boil and submerging the skull for 5-10 minutes, ensuring the solution does not touch the antlers.
9. How do I dry the skull properly after whitening?
Place the skull in direct sunlight or use a space heater until it is completely dry and no bones feel loose, and secure any nasal bones with a rubber band while drying.
10. What are some common mistakes to avoid when making a euro mount deer?
Avoid inadequate cleaning, over-boiling, using bleach, neglecting antler protection, and rushing the drying process.
11. How can Eurodrip USA help with my irrigation needs?
Eurodrip USA provides detailed product information, guides system selection, offers installation and maintenance guides, shares optimization tips, and presents the latest European irrigation technologies.
12. What makes Eurodrip USA stand out from other irrigation suppliers?
Eurodrip USA offers high-quality European products, customized irrigation solutions, expert support and guidance, and a commitment to sustainability.
14. Conclusion
Creating a euro mount deer is a rewarding way to preserve your hunting trophy. By following these steps and avoiding common mistakes, you can create a stunning display that honors your hunting success for years to come. Remember, high-quality tools and materials, along with careful execution, are key to achieving the best results.
If you’re looking for efficient, reliable irrigation solutions to support your land, visit eurodripusa.net to explore our wide range of European drip irrigation products. Contact us today for expert advice and customized solutions tailored to your specific needs. Our Address is 1 Shields Ave, Davis, CA 95616, United States and our Phone is +1 (530) 752-1011.