
Bleaching a Euro mount is a great way to showcase your hunting trophy with a clean, professional look. This guide from eurodripusa.net provides a detailed, step-by-step approach to achieving a brilliant white finish on your European mount, using quality techniques and products. Elevate your trophy display with our expert advice and European-quality standards.
1. What is a Euro Mount and Why Bleach It?
A Euro mount, or European skull mount, involves cleaning and preserving the skull of an animal, typically a game animal like deer, elk, or wild boar. Unlike traditional taxidermy that includes the hide, a Euro mount displays the bare skull and antlers or horns. Bleaching is a crucial step in this process, as it not only sanitizes the skull but also gives it a pristine, aesthetically pleasing white appearance.
1.1 Benefits of Bleaching Your Euro Mount
- Enhanced Aesthetics: Bleaching significantly improves the visual appeal of the mount, giving it a clean, polished look that highlights the natural bone structure.
- Sanitization: The bleaching process effectively kills any remaining bacteria or organic material, ensuring the skull is safe to handle and display.
- Preservation: Bleaching helps to preserve the bone, preventing it from deteriorating over time.
- Professional Finish: A properly bleached Euro mount looks professional and adds value to your trophy display.
- Odor Elimination: Bleaching removes any lingering odors, ensuring a fresh and clean display.
1.2 Tools and Materials Needed
Before diving into the bleaching process, ensure you have all the necessary tools and materials. Having everything prepared will make the process smoother and more efficient.
- Safety Gear: Gloves, safety glasses, and a respirator mask.
- Hydrogen Peroxide: 3% or higher concentration for effective bleaching.
- Large Container: A plastic container large enough to fully submerge the skull.
- Heat Source: An outdoor burner or a stovetop for heating the peroxide solution.
- Pot: A stainless steel or enamel pot large enough to hold the skull.
- Degreaser: Dawn dish soap or a specialized degreasing solution.
- Soft Brush: A toothbrush or similar brush for cleaning.
- Plastic Wrap and Tape: To protect antlers or horns.
- Super Glue: For reattaching any loose teeth or bones.
- Q-tips: For applying touch-up stain to antlers if needed.
- Minwax Wood Stain: Provincial color for touching up antlers.
2. Understanding the Maceration Process
Maceration is a biological cleaning method that uses bacteria to break down soft tissues attached to the skull. This process is crucial for thoroughly cleaning the skull before bleaching.
2.1 Setting Up Your Maceration Container
- Choose the Right Container: Select a watertight plastic container large enough to fully submerge the skull. Avoid metal containers, as they can rust and discolor the bone.
- Temperature Control: Use a stainless steel fish tank heater to maintain a water temperature of 80-90°F (27-32°C), which is ideal for bacterial growth.
- Antler Protection: Wrap the base of the antlers with plastic wrap and then electrical tape to protect them from discoloration during maceration.
2.2 Performing the Maceration
- Submerge the Skull: Place the skull in the container and fill it with water until it is completely submerged. If the skull has antlers, fill the water about 1 inch (2.5 cm) above the antler burrs.
- Maintain Temperature: Submerge the fish tank heater in the water and set it to 80°F (27°C). Ensure the heater remains fully submerged to prevent overheating.
- Cover the Container: Place a lid on the container to reduce evaporation and contain the odor. If a lid is not available, use a large plastic garbage bag secured with a bungee cord.
- Monitor and Wait: Allow the skull to macerate for four to six days. Check the water level every two days and add water as needed to keep the skull submerged.
- Check for Completion: After four to six days, check if about 90% of the meat and connective tissue has rotted off the skull. If so, proceed to the next step.
2.3 Rinsing and Cleaning Post-Maceration
Once the maceration process is complete, carefully remove the skull from the container and rinse it thoroughly with a garden hose.
- Handle with Care: Be gentle around the teeth, nasal passages, and sinus bones, as they will be soft and easily damaged.
- Remove Remaining Tissue: Use the hose to remove any remaining meat and tissue. You can also use a soft brush to gently scrub away stubborn pieces.
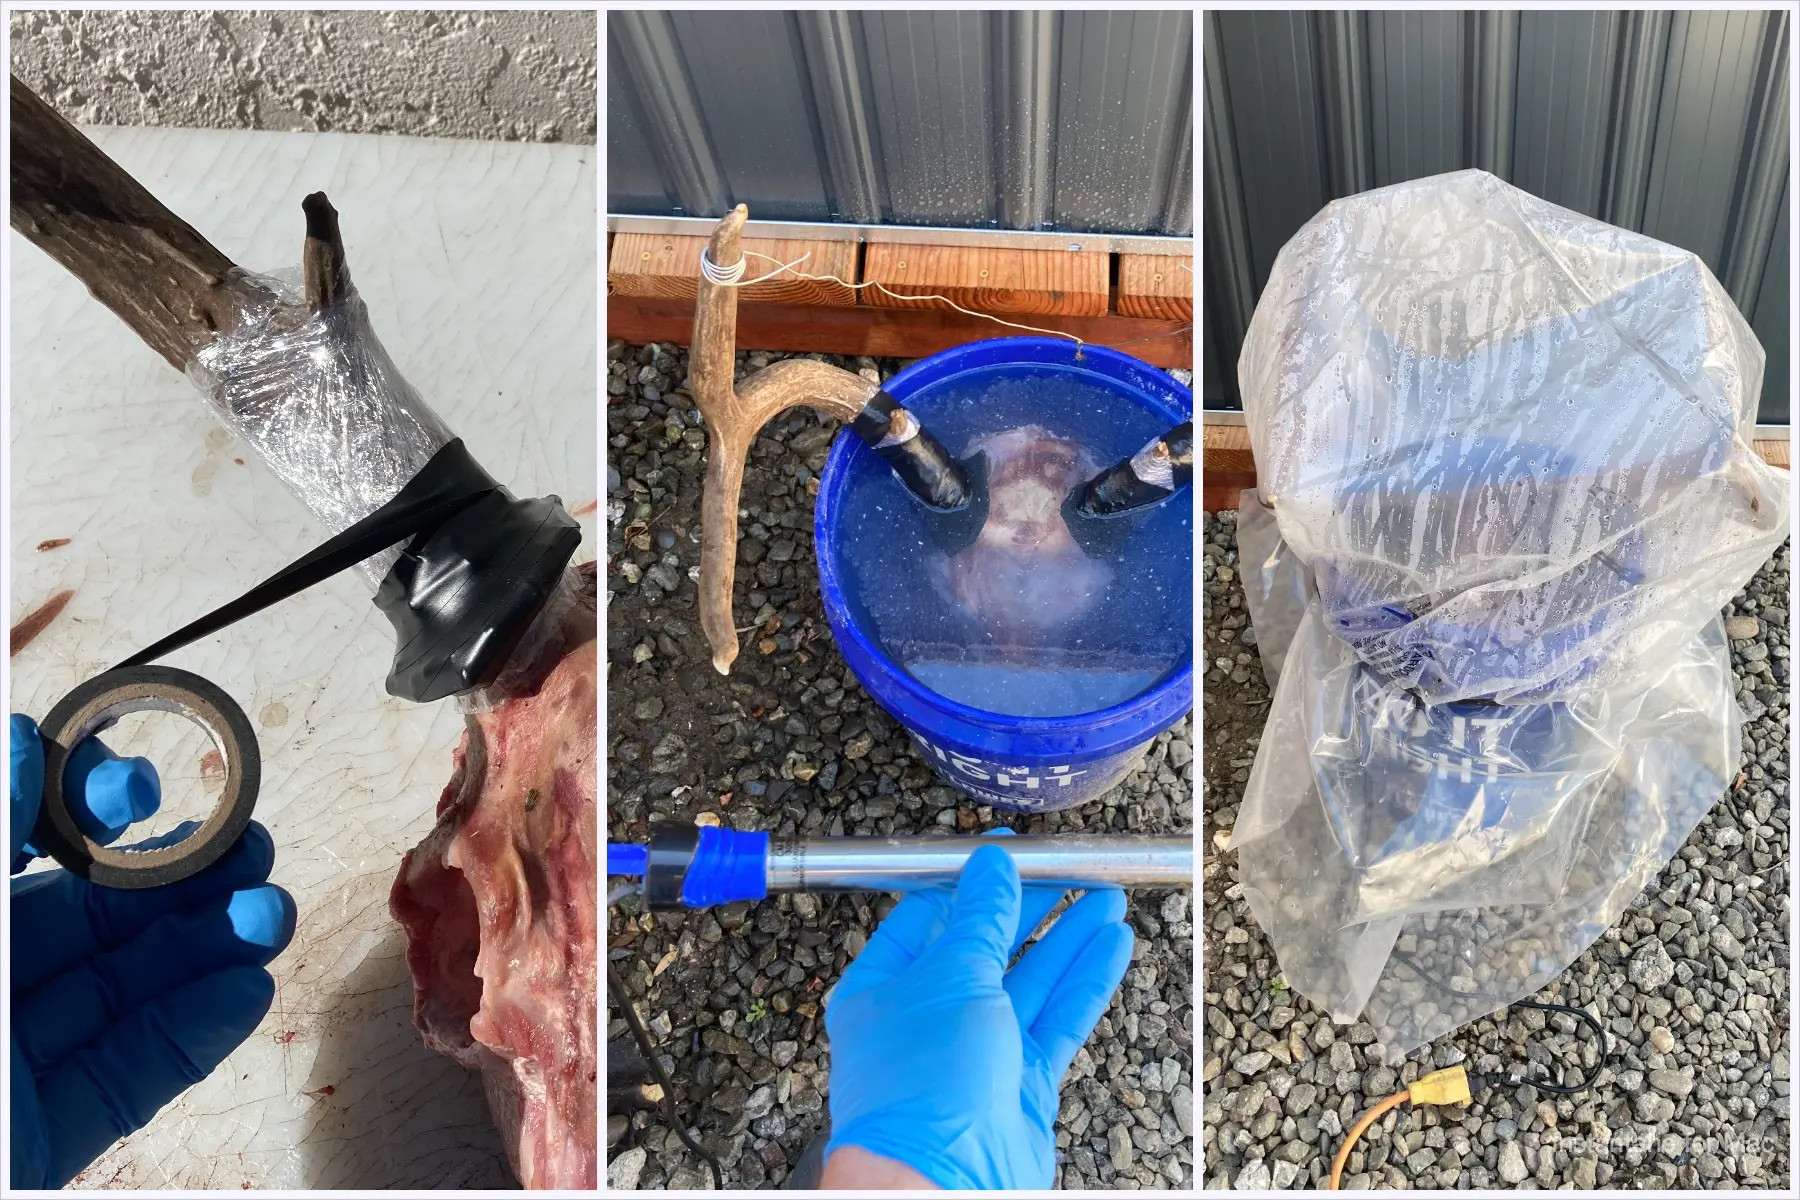 Maceration Process
3. Degreasing the Skull
Degreasing is a critical step to remove fats and oils from the bone, which can prevent proper whitening and cause yellowing over time.
3.1 Why Degreasing is Essential
- Prevents Yellowing: Fats and oils in the bone can oxidize and cause the skull to turn yellow over time.
- Ensures Even Whitening: Degreasing allows the bleaching agent to penetrate the bone evenly, resulting in a uniform white color.
- Long-Term Preservation: Removing fats helps to preserve the bone structure and prevent deterioration.
3.2 Effective Degreasing Methods
There are several effective methods for degreasing a skull:
- Dawn Dish Soap Method:
- Fill a container with warm water and add a generous amount of Dawn dish soap.
- Submerge the skull completely in the soapy water.
- Maintain a water temperature of around 110-120°F (43-49°C) using a submersible heater.
- Soak the skull for several weeks, changing the water and soap every few days.
- Rinse the skull thoroughly with clean water after soaking.
- Ammonia Method:
- Mix household ammonia with water in a ratio of 1 part ammonia to 10 parts water.
- Submerge the skull in the ammonia solution.
- Soak for one to two weeks, checking periodically for bone damage.
- Rinse thoroughly with clean water after soaking.
- Commercial Degreasers:
- Follow the instructions on the commercial degreaser product.
- Ensure the product is safe for bone and will not cause damage.
- Submerge the skull in the degreasing solution.
- Soak for the recommended time.
- Rinse thoroughly with clean water after soaking.
3.3 Monitoring the Degreasing Process
- Check the Water: Regularly check the water for a greasy film. This indicates that fats are being released from the bone.
- Soak Time: The soaking time depends on the size and condition of the skull. Smaller skulls may only need a few weeks, while larger skulls may require several months.
- Bone Condition: Periodically inspect the bone for any signs of damage. If the bone becomes brittle or starts to flake, reduce the soaking time or dilute the degreasing solution.
4. Bleaching the Euro Mount: Step-by-Step Guide
Once the skull is thoroughly degreased, you can proceed with the bleaching process. This involves using hydrogen peroxide to whiten the bone.
4.1 Preparing the Bleaching Solution
- Gather Supplies: Ensure you have all the necessary supplies, including hydrogen peroxide (3% or higher), a large pot, and a heat source.
- Mix the Solution: Fill the pot 50% full with hydrogen peroxide. Add water to completely cover the skull, ensuring the antlers (if present) are protected.
- Protect Antlers: Make sure that the antlers are still covered in tape and plastic to prevent the whitening solution from coming into contact with them.
4.2 The Bleaching Process
- Heat the Solution: Bring the solution to a rolling boil.
- Submerge the Skull: Carefully submerge the skull in the boiling solution for 5-10 minutes.
- Monitor the Color: Periodically remove the skull to check for the desired color. Keep in mind that the skull will whiten further as it dries.
- Handle Loose Pieces: Follow the same process for any teeth or nasal bones that may have fallen off during the maceration process.
4.3 Safety Precautions
- Ventilation: Work in a well-ventilated area to avoid inhaling fumes.
- Protective Gear: Wear gloves and safety glasses to protect your skin and eyes from the hydrogen peroxide.
- Supervision: Never leave the boiling solution unattended.
- Antler Protection: Ensure the solution never comes into contact with the uncovered part of the antlers, as it will whiten them.
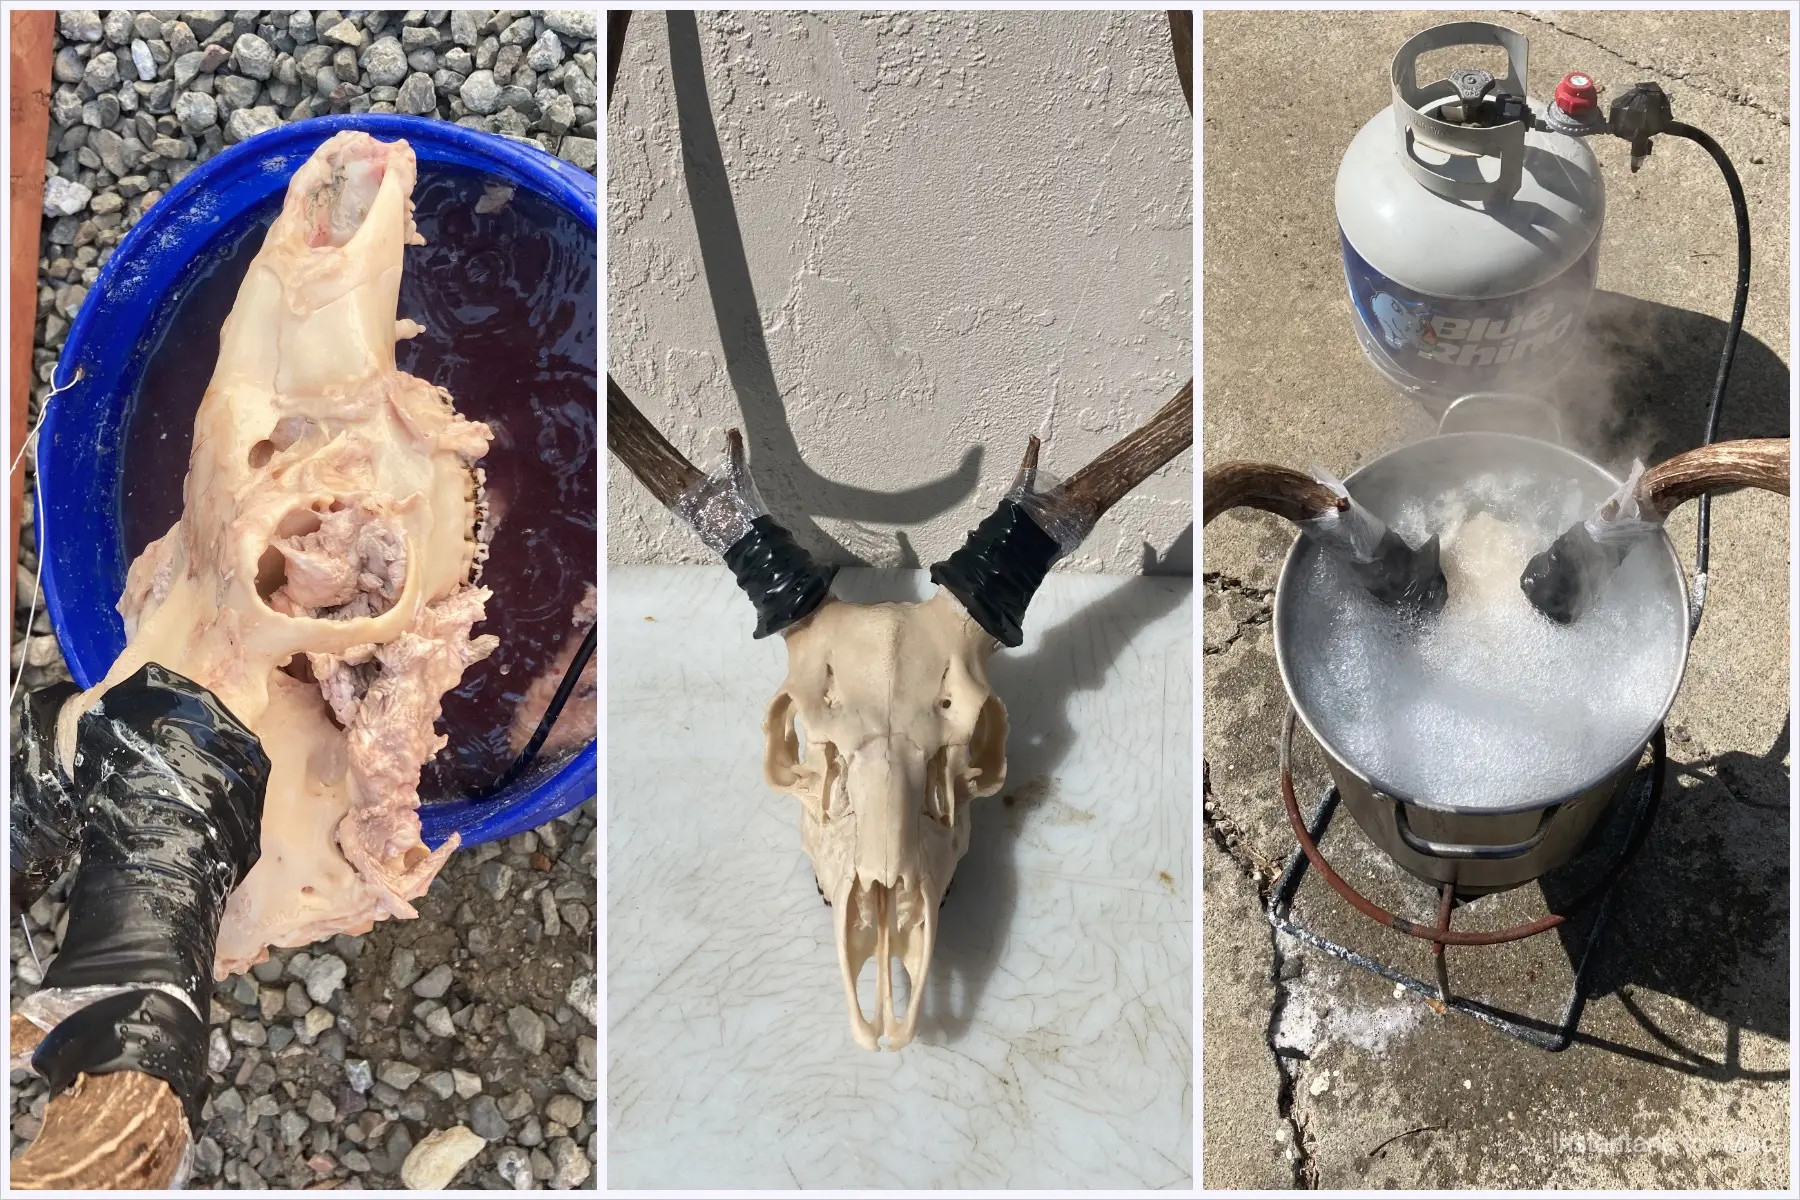 Skull Whitening Process
5. Drying and Finishing Touches
After bleaching, proper drying and finishing touches are essential to ensure the longevity and appearance of your Euro mount.
5.1 Drying the Skull
- Initial Drying: Once you have the skull and any loose pieces whitened, it’s time for drying. Fit any nasal bones in place while the bone is still wet and secure them with a rubber band.
- Secure Loose Bones: Often, the nasal bones will separate as the skull dries, so place a rubber band around the snout to hold everything together.
- Sun or Heat Drying: If possible, place the skull in direct sunlight for drying. If the weather isn’t cooperating, use a space heater. Place the skull in front of a space heater until it is completely dry and no bones feel loose.
5.2 Reassembling Loose Pieces
- Gluing: Once the skull is dry, glue any teeth or nasal bones back in place that didn’t stick during the drying process.
- Super Glue: Use fast-drying clear super glue for this purpose.
5.3 Final Touches
- Antler Base: Remove the plastic and tape from the bases of the antlers.
- Touch-Up Stain: If any of the horn was whitened during the process, touch it up with Minwax provincial wood stain. Apply the stain very lightly with a Q-tip and repeat coats until the desired color is achieved.
- Sealing: For the final touch, consider coating your finished skulls with a thin layer of Mop & Glo from the cleaning supply aisle. This gives the skull a pleasant smell and seals the bone to prevent dust or dirt from settling in the porous bone.
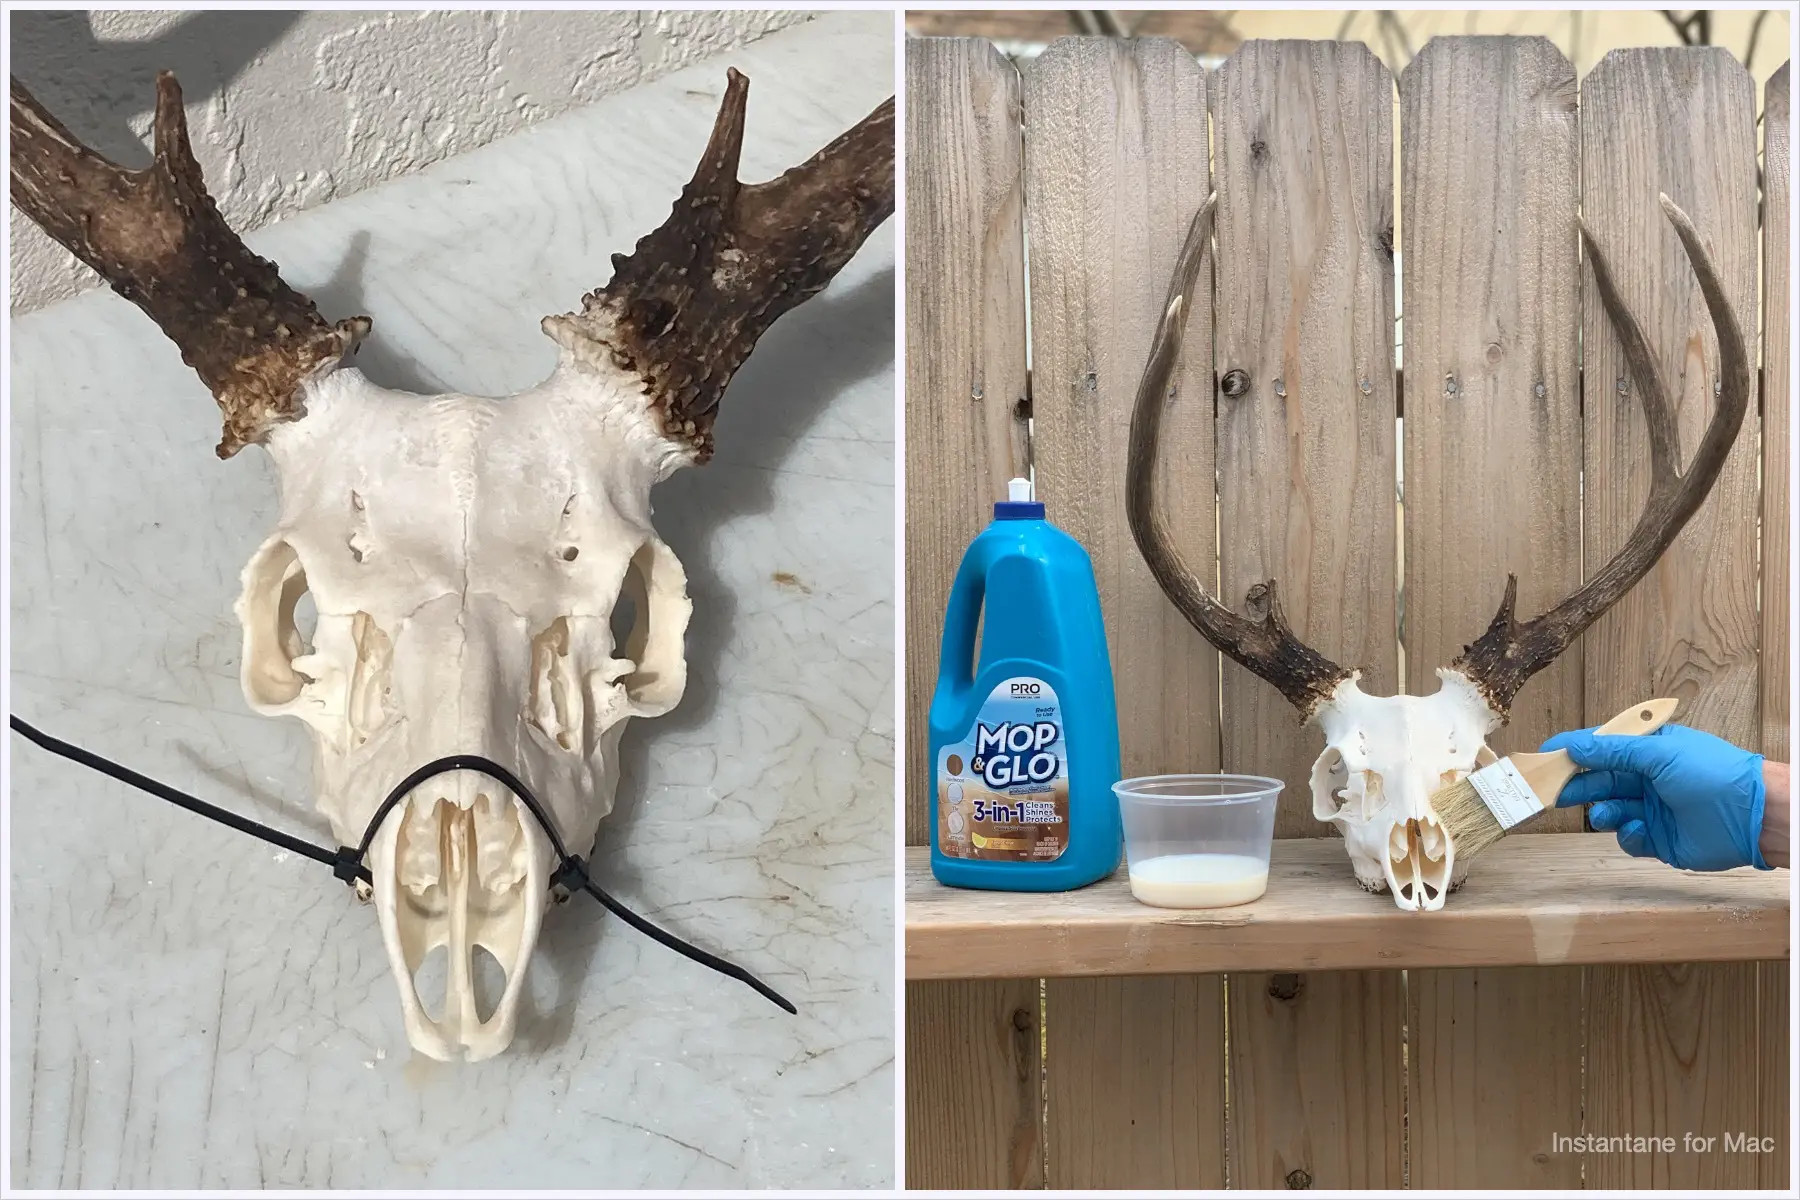 Drying and Finishing Touches
6. Troubleshooting Common Issues
Even with careful preparation, issues can arise during the Euro mount cleaning and bleaching process. Here are some common problems and how to address them:
6.1 Yellowing or Uneven Whitening
- Cause: Insufficient degreasing or uneven application of the bleaching solution.
- Solution:
- Repeat the degreasing process, ensuring the skull is fully submerged and the water is changed regularly.
- Reapply the bleaching solution, making sure to cover all areas evenly.
- Consider using a higher concentration of hydrogen peroxide for stubborn areas.
6.2 Bone Damage or Brittleness
- Cause: Overexposure to high temperatures or harsh chemicals.
- Solution:
- Reduce the soaking time in the bleaching solution.
- Lower the temperature of the degreasing and bleaching solutions.
- Dilute the chemical solutions with more water.
- Apply a bone consolidant to strengthen the bone structure.
6.3 Persistent Odor
- Cause: Incomplete removal of soft tissues or inadequate sanitization.
- Solution:
- Repeat the maceration process to remove any remaining tissues.
- Soak the skull in a solution of water and baking soda to neutralize odors.
- Ensure the skull is thoroughly dried after each cleaning step.
6.4 Antler Discoloration
- Cause: Exposure to bleaching solution or harsh cleaning agents.
- Solution:
- Protect the antlers with plastic wrap and tape before bleaching.
- Use Minwax provincial wood stain to touch up any discolored areas.
- Apply a clear sealant to protect the antlers from future damage.
6.5 Loose Teeth or Bones
- Cause: Damage during the cleaning process or natural separation.
- Solution:
- Carefully glue the loose teeth or bones back into place using super glue.
- Ensure the pieces are properly aligned before the glue dries.
- Use rubber bands or tape to hold the pieces in place while the glue sets.
7. Alternative Bleaching Methods
While hydrogen peroxide is a common and effective bleaching agent, there are alternative methods you can consider:
7.1 Using Salons Hair Developer
- Application: High-volume salon-grade hair developer (hydrogen peroxide) can provide a more concentrated bleaching effect.
- Process:
- Mix the hair developer with a powder activator to form a paste.
- Apply the paste evenly over the skull, avoiding the antlers.
- Cover the skull with plastic wrap to keep the paste moist.
- Allow it to sit for several hours or overnight, depending on the desired level of whitening.
- Rinse thoroughly with water and allow to dry.
7.2 Sun Bleaching
- Application: Natural sunlight can be used to bleach the skull over time.
- Process:
- Place the cleaned and degreased skull in direct sunlight.
- Turn the skull regularly to ensure even exposure.
- Allow the sun to naturally bleach the bone over several days or weeks.
- Monitor the color and protect the skull from extreme weather conditions.
7.3 Borax Paste
- Application: A paste made from borax powder and water can help whiten the skull.
- Process:
- Mix borax powder with water to form a thick paste.
- Apply the paste evenly over the skull, avoiding the antlers.
- Allow the paste to dry completely.
- Rinse the skull thoroughly with water and allow to dry.
8. Sourcing Quality Products from Europe through eurodripusa.net
For those seeking top-quality solutions for their Euro mount cleaning and bleaching needs, eurodripusa.net offers a range of European products designed for superior results.
8.1 Advantages of European Products
- High Standards: European products often adhere to stringent quality control standards, ensuring reliability and effectiveness.
- Innovative Technologies: European manufacturers are known for their innovative approaches to bone cleaning and preservation.
- Eco-Friendly Options: Many European products prioritize environmentally friendly formulations and sustainable practices.
8.2 Products Offered by eurodripusa.net
eurodripusa.net provides a variety of products perfect for achieving a professional-quality Euro mount:
- Specialized Degreasers: Formulated to effectively remove fats and oils from bone without causing damage.
- High-Concentration Hydrogen Peroxide: Ensures optimal whitening with minimal effort.
- Bone Consolidants: Strengthen and protect the bone structure for long-term preservation.
- Protective Coatings: Seal the bone surface to prevent dust, dirt, and discoloration.
- Antler Touch-Up Stains: Specifically designed to restore and enhance the natural color of antlers.
8.3 How to Purchase
To explore the full range of products and make a purchase, visit eurodripusa.net. The website provides detailed product information, user reviews, and expert advice to help you choose the best solutions for your needs.
9. Displaying Your Euro Mount
Once your Euro mount is cleaned, bleached, and finished, it’s time to display your trophy proudly. Here are some ideas for showcasing your Euro mount:
9.1 Mounting Options
- Wall Mounts: Wall mounts are a popular option for displaying Euro mounts. They come in various styles, including wooden plaques, metal brackets, and adjustable systems.
- Tabletop Displays: Tabletop displays are ideal for showcasing smaller skulls on shelves, desks, or mantels.
- Custom Displays: Consider creating a custom display to highlight your Euro mount. This could include incorporating natural elements like wood, stone, or foliage.
9.2 Placement and Lighting
- Focal Point: Position your Euro mount in a location where it will be a focal point, such as above a fireplace, in a trophy room, or in an entryway.
- Lighting: Use strategic lighting to highlight the details of the skull and antlers. Spotlights, track lighting, and ambient lighting can all be used to create a dramatic effect.
- Background: Choose a background that complements the Euro mount. Neutral colors, natural textures, and contrasting tones can all enhance the display.
9.3 Incorporating Other Elements
- Hunting Gear: Incorporate other hunting-related items into the display, such as antlers, sheds, knives, or photographs.
- Natural Elements: Add natural elements like branches, leaves, or stones to create a more organic and visually appealing display.
- Personal Touches: Include personal touches that reflect your hunting experience, such as maps, journals, or commemorative items.
10. Legal Considerations
Before you start the process of creating a Euro mount, it’s essential to be aware of and comply with all applicable laws and regulations.
10.1 State and Federal Regulations
- Hunting Licenses: Ensure you have a valid hunting license and have followed all hunting regulations in your area.
- Tagging Requirements: Properly tag your harvested animal as required by law.
- Transportation Laws: Be aware of any restrictions on transporting animal parts across state lines.
- Endangered Species: Do not attempt to create a Euro mount from an endangered or protected species.
10.2 Ethical Considerations
- Respect for the Animal: Treat the animal and its remains with respect throughout the process.
- Proper Disposal: Dispose of any waste materials properly and in accordance with local regulations.
- Landowner Permission: Obtain permission from the landowner before hunting on private property.
11. Expert Tips for a Perfect Euro Mount
To help you achieve the best possible results, here are some expert tips from experienced Euro mount enthusiasts:
- Start Fresh: Begin the cleaning process as soon as possible after harvesting the animal to prevent decomposition and odor buildup.
- Thorough Cleaning: Take your time to remove all soft tissues and fats from the skull. The more thorough your cleaning, the better the final result.
- Temperature Control: Maintain consistent temperatures during the maceration and degreasing processes for optimal results.
- Patience: Don’t rush the process. Each step takes time, and patience is key to achieving a high-quality Euro mount.
- Research: Continuously research new techniques and products to improve your Euro mount cleaning and bleaching skills.
- Community: Join online forums and communities to share tips, ask questions, and learn from other enthusiasts.
12. eurodripusa.net: Your Partner in Quality Euro Mounts
At eurodripusa.net, we are dedicated to providing you with the highest quality products and resources for creating stunning Euro mounts. Our commitment to excellence ensures that you can achieve professional-level results with ease.
12.1 Why Choose eurodripusa.net?
- Expertise: With years of experience in the industry, we have the knowledge and expertise to guide you through every step of the Euro mount process.
- Quality Products: We offer a curated selection of top-quality products from trusted European manufacturers.
- Customer Support: Our knowledgeable customer support team is available to answer your questions and provide assistance.
- Comprehensive Resources: Our website features detailed guides, tutorials, and videos to help you master the art of Euro mount creation.
- Community: Join our community of Euro mount enthusiasts to share your experiences, learn new tips, and connect with like-minded individuals.
12.2 Visit Us Today
Ready to elevate your trophy display? Visit eurodripusa.net today to explore our range of products and resources. Whether you’re a seasoned hunter or a beginner, we have everything you need to create a Euro mount that you’ll be proud to showcase for years to come.
13. Frequently Asked Questions (FAQs)
13.1 What is the best way to remove meat from a skull for a Euro mount?
Maceration, soaking the skull in warm water to encourage bacterial breakdown, is the most effective method for removing meat and tissues.
13.2 How long does it take to macerate a deer skull?
Typically, maceration takes four to six days for a deer skull, depending on the temperature and the amount of tissue present.
13.3 What temperature should the water be for maceration?
The water temperature should be maintained between 80-90°F (27-32°C) for optimal bacterial growth during maceration.
13.4 How do I degrease a skull properly?
Submerge the skull in warm water with Dawn dish soap or an ammonia solution for several weeks, changing the water regularly.
13.5 What concentration of hydrogen peroxide should I use for bleaching a Euro mount?
A 3% or higher concentration of hydrogen peroxide is recommended for effective bleaching.
13.6 How long should I boil the skull in hydrogen peroxide?
Boil the skull in the hydrogen peroxide solution for 5-10 minutes, checking periodically for the desired color.
13.7 How do I protect the antlers during the bleaching process?
Wrap the base of the antlers with plastic wrap and electrical tape to prevent discoloration from the bleaching solution.
13.8 What should I do if the skull turns yellow after bleaching?
Repeat the degreasing process and reapply the bleaching solution to ensure all fats and oils are removed.
13.9 How can I reattach loose teeth or nasal bones?
Use fast-drying clear super glue to carefully reattach any loose teeth or nasal bones to the skull.
13.10 How do I maintain my Euro mount to prevent dust and dirt buildup?
Coat the finished skull with a thin layer of Mop & Glo to seal the bone and prevent dust or dirt from settling in the porous bone.
14. Call to Action
Ready to create a stunning Euro mount that showcases your hunting achievements? Visit eurodripusa.net today to discover our premium European products and expert guidance. Elevate your trophy display with our trusted solutions and achieve professional-quality results.
Explore our products and start your Euro mount project now at eurodripusa.net. For personalized assistance and expert advice, contact our team in the USA. Let us help you transform your trophy into a masterpiece.
Address: 1 Shields Ave, Davis, CA 95616, United States.
Phone: +1 (530) 752-1011.
Website: eurodripusa.net.