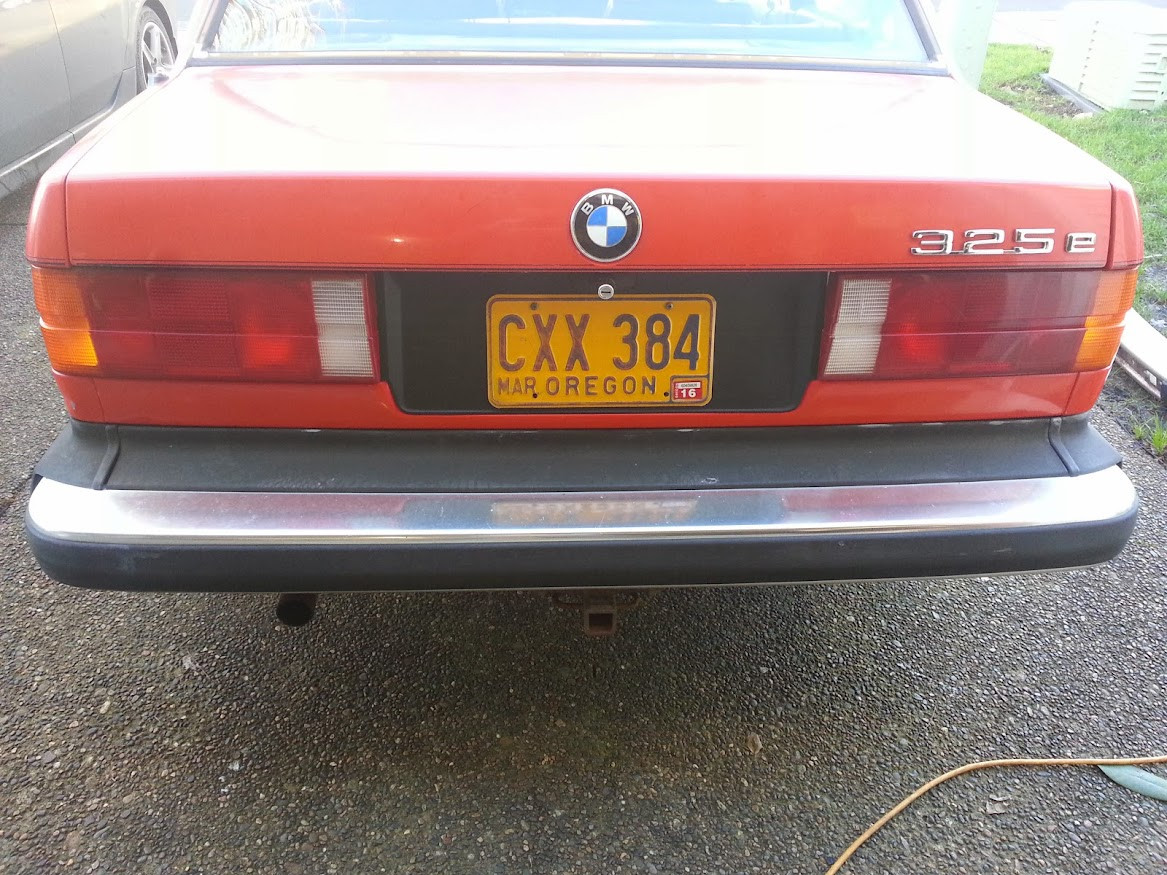
Replacing your bulky US-spec bumpers with sleek European bumpers is a popular and impactful upgrade for any BMW E30. Euro bumpers dramatically enhance the classic lines of the E30, providing a cleaner, more refined aesthetic and even a bit more clearance. This guide will walk you through the rear Euro bumper installation process, offering detailed steps, tips, and tricks to ensure a successful DIY project.
Tools and Hardware You’ll Need
Before starting your Euro bumper transformation, gather the necessary tools and hardware. Having everything prepared will streamline the installation and minimize frustration.
- Socket wrench set with 13mm and 8mm sockets
- Wrench set
- Screwdrivers (Phillips and flathead)
- Dremel or rotary tool with cutting bits
- Drill with drill bits (slightly smaller than Euro bumper mount studs)
- Hardware store supplies:
- 1/2L flat faucet washers (25/32″ O.D.) – pack of 10 recommended
- 1″ nylon hole plugs (black recommended) – 2 pieces
- M5 x 12mm bolts (for center trim holes) – 6 pieces
- M5 nuts and washers (matching the above bolts, if you need replacements)
- Electrical tape
- Epoxy or JB Weld
- Touch-up paint (optional, matching your car’s color)
- Super glue (optional)
- Euro bumper installation hardware kit (recommended, BMW part number if available, or aftermarket kit) – this typically includes:
- Body mounts (“clips”) with rubber
- Bolts for body mounts (green circled in image below)
- Large grey nuts/bolts for bumper assembly and mounting
- Goldish clips for impact strip
- Goldish nut/washers (some are not used)
- Rubber washers (black)
- Black caps for bumper mounts
- Bolts for side caps (blue circled in image below)
Having the correct hardware is crucial for a secure and proper installation. Purchasing a dedicated Euro bumper hardware kit can save time and ensure you have all the necessary components.
Step-by-Step Installation Process
1. Preparation and Initial Disassembly
Begin by preparing your E30 for the rear bumper removal. Access to the bumper mounting points is primarily from inside the trunk.
- Disconnect Tail Light Sockets: Open your trunk and locate the tail light sockets on both the left and right sides. Disconnect these sockets to prevent any electrical issues during the bumper removal.
- Expose Trunk Carpet: Peel back the trunk carpet on both sides, moving it towards the wheel wells. This will reveal the areas where the bumper is attached.
- Battery Removal (for certain models): If you own a non-318 E30 or a convertible, removing the battery is highly recommended. One of the bumper bolts is located behind the battery, and another is to the side. Disconnecting the battery ensures safety while working in this area.
- Remove Inner Trunk Carpet Section: Locate the carpet section that runs between the tail lights on the inside of the trunk. This piece usually slides down and out, allowing for better access.
 Original rear of the E30 before bumper removal
2. Removing the Old US Bumper
Now, proceed to remove the existing US-spec rear bumper and its associated trim pieces.
- Detach the US Bumper: Locate the bumper shocks. On each side, you’ll find two 13mm nuts securing the bumper to the shocks. Using your socket wrench, remove these four nuts (two on each side). Once the nuts are removed, the bumper should pull directly away from the car’s body. If the nuts are in good condition, keep at least three of them, as they might be reused for the Euro bumper installation.
- Remove Center Trim Piece: The rear trim consists of three sections: a center piece and two side pieces. Start with the center trim. It’s secured by eight nuts/bolts. Two are located on the outer edges (these will also hold the side trim), and six are accessible from inside the trunk. These inner bolts are typically 8mm and might be corroded. Remove all eight fasteners. Keep the nuts with attached washers, as you’ll need them later. Also, retain the rubber washers that are likely still around the studs of the center trim.
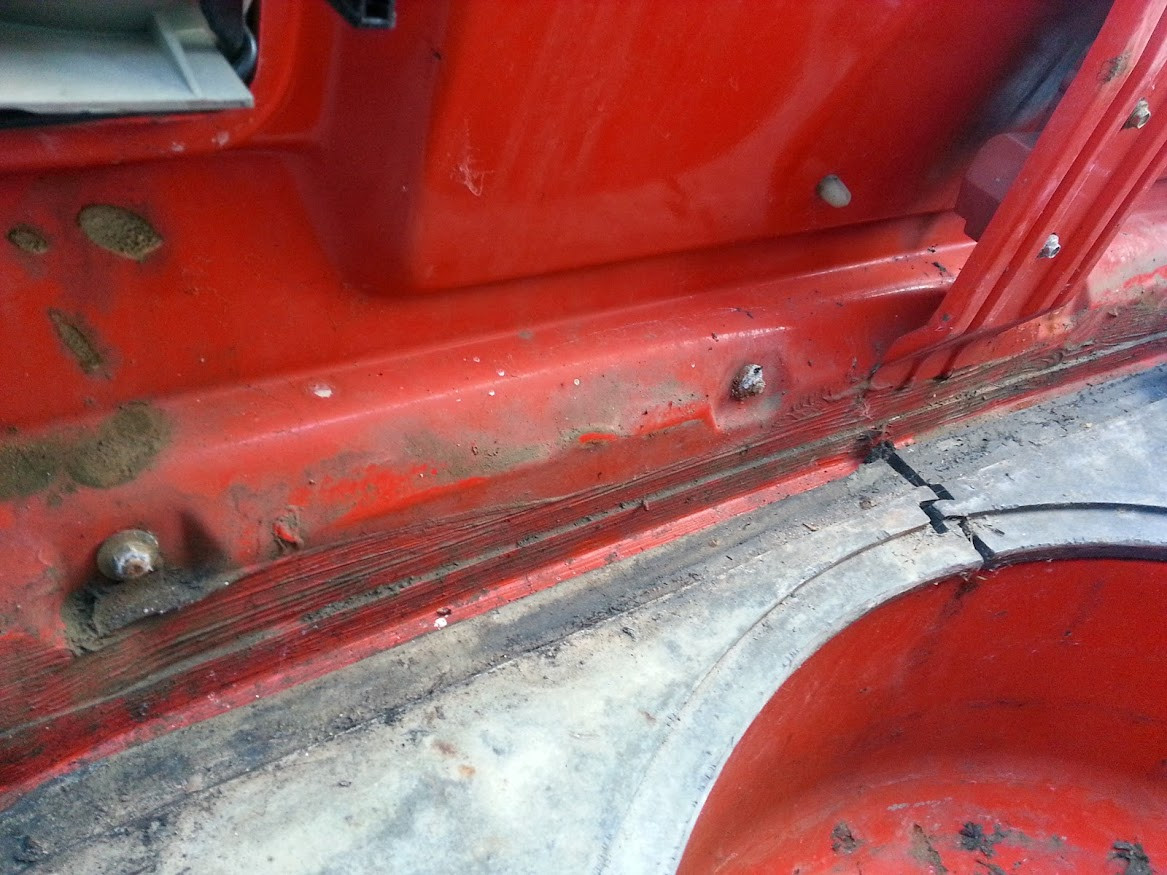 Close-up of the 8mm nuts holding the center trim piece, located inside the trunk
- Remove Side Trim Pieces: The side trim pieces are each held by four bolts. One of these bolts is shared with the center trim (the outer bolt you already removed). This leaves three bolts per side trim piece to remove. Accessing these bolts requires a bit of maneuvering:
- Wheel Well Bolt: The bolt in the far left hole (when facing the rear) is accessed from inside the wheel well.
- Welded Tab Bolt: The bolt on the welded tab can be reached from underneath the trim itself.
- Trunk Access Bolt: The bolt next to the vent is accessed from inside the trunk. On the driver’s side, it’s near the antenna; on the passenger’s side, it’s behind where the battery was (or is).
Once all bolts are removed, the side trim should come free. Before completely removing it, unplug the side marker socket by pulling it straight out.
 Location of bolts for removing the side trim piece, showing access points from the wheel well and trunk
3. Bumper Shock and Wiring Grommet Removal
With the bumper and trim removed, detach the bumper shocks and wiring grommets.
- Remove Bumper Shocks: The bumper shocks are attached with a 13mm nut on each side of the shock (accessible from underneath the car, except for one) and a 13mm bolt from the side of the frame horn. The passenger side shock clearly shows the frame horn bolt location. On the driver’s side, this bolt is hidden behind the exhaust heat shield. Remove all nuts and bolts to detach the shocks. Keep one of the 13mm bolts and at least three of the 13mm nuts for potential reuse.
- Remove Wiring Grommets: Gently tug on the wiring grommet on each side until it pops out of its hole. Carefully feed the wiring back through the hole while pinching the grommet from the trunk side. You won’t need the grommets anymore, but this method allows for clean removal. Alternatively, you can cut the wires and tape them, but feeding them back through is a cleaner approach.
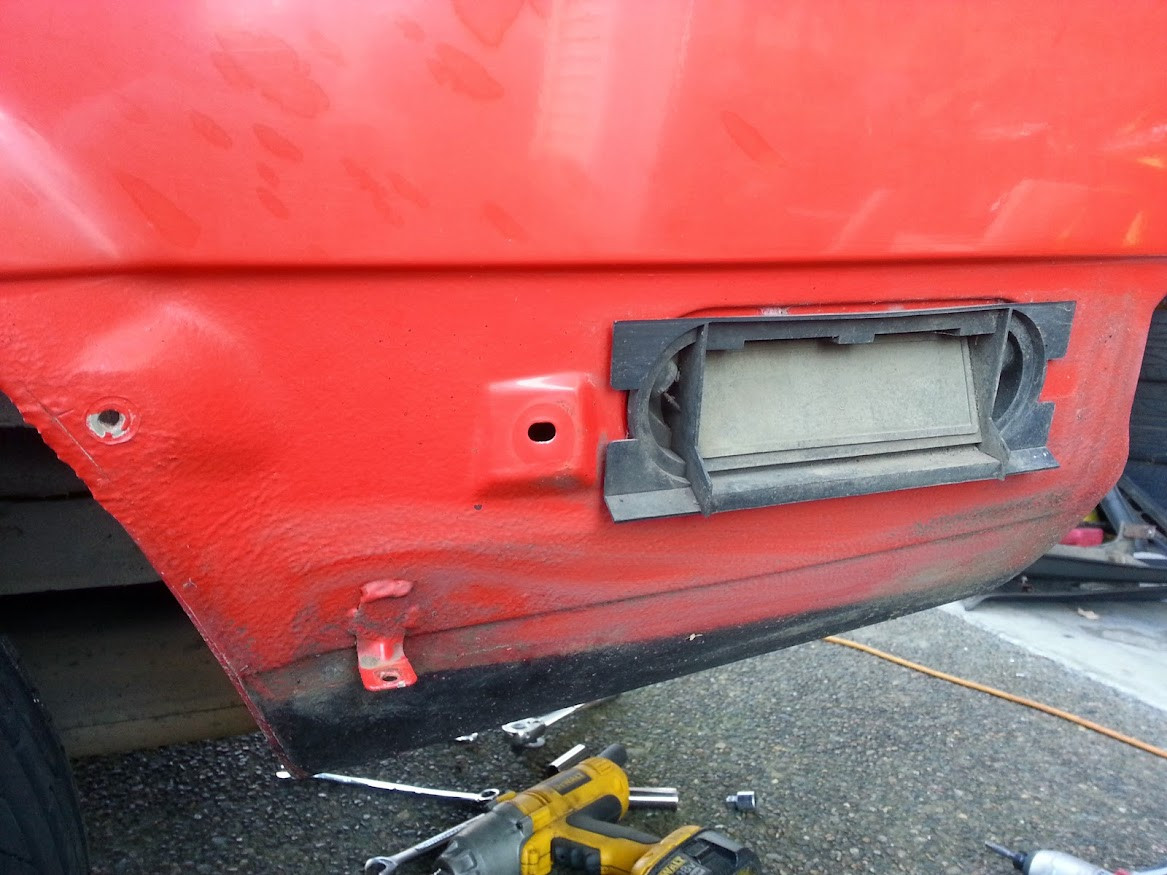
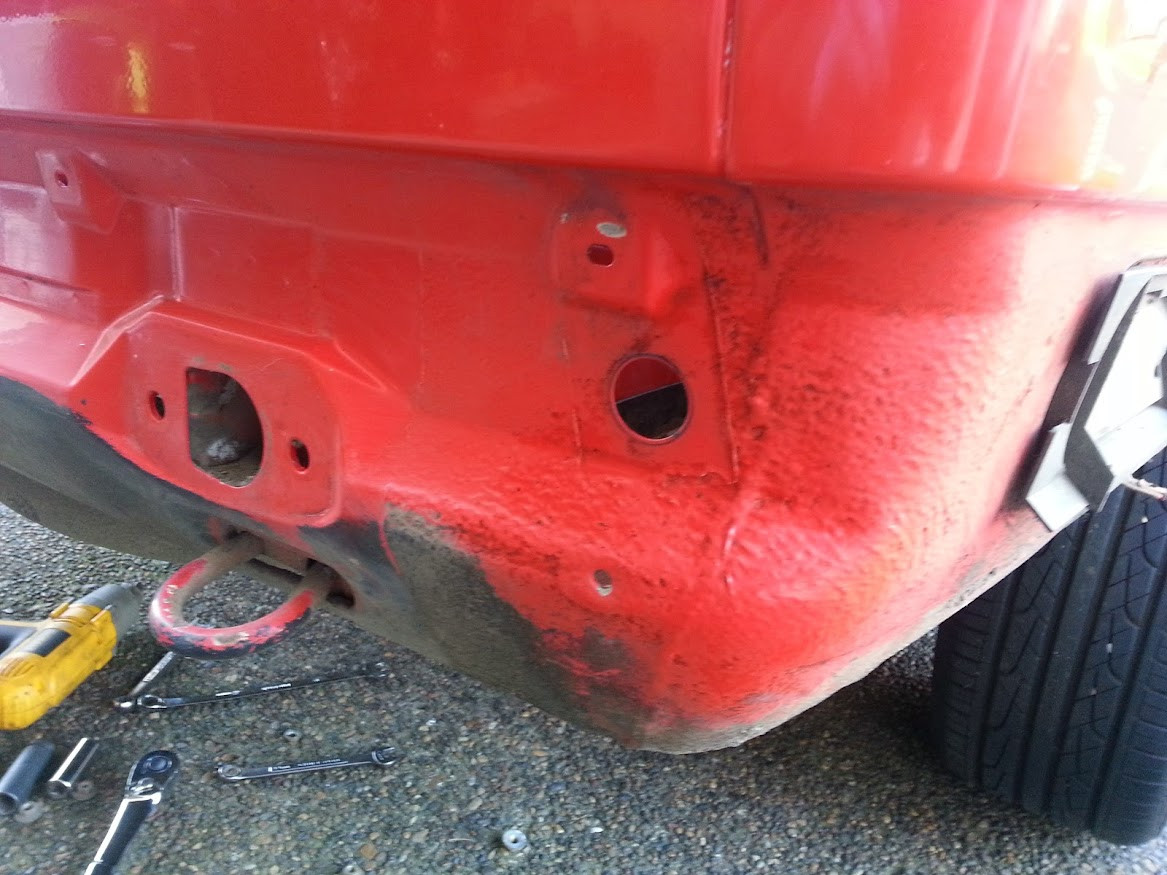 E30 rear end after removing the bumper and shocks, exposing the mounting points and holes to be addressed
4. Preparing the Body: Plugging Holes
After removing the US bumper, you’ll notice several exposed holes that need to be plugged for a clean and watertight installation of the Euro bumper.
- Plug Center Trim Holes: For the six horizontal holes that were used for the center trim, use the following method:
- Place a faucet washer onto an M5 bolt.
- Insert the bolt through one of the holes from the outside.
- From inside the trunk, place an old rubber washer (reused from the center trim studs) onto the bolt.
- Secure it with a nut and washer (reused from the center trim).
- Repeat this for the remaining five horizontal holes.
- Plug Wiring Grommet Holes: For the larger holes where the wiring grommets were located, use the 1″ nylon hole plugs. These plugs might be slightly too large, so use your Dremel to carefully enlarge the holes just enough for the plugs to fit snugly. Push the plugs into place. For extra security, you can apply a small amount of super glue around the edges to seal them.
- Plug Lower Small Holes: For the two small lower holes below the grommet holes, apply electrical tape to the inside of the car over the holes. Then, fill the holes from the outside with epoxy or JB Weld to create a smooth, sealed surface. You can touch up the epoxy with paint to match your car’s color for a seamless look.
- Seal Bumper Shock Hole (Passenger Side): Take the 13mm bolt that held the old bumper shock to the frame horn and one of the 13mm nuts from the bumper shock. Slip an OEM rubber washer over the bolt (it will stretch). Insert this bolt through the outermost hole on the passenger side where the bumper shock was mounted. From inside the battery box, place a faucet washer (enlarge the center hole with a drill bit if needed) and then secure it with the nut. This seals the only bumper shock hole that enters the chassis.
5. Drilling for Euro Bumper Mounts
The Euro bumper mounts utilize different mounting points compared to the US bumper. You’ll need to drill new holes using existing markers as guides.
- Locate Drilling Points: Look above the holes where the bumper shocks were mounted. You will see slightly raised rectangular sections on the body. These are the templates for the Euro bumper mount holes. Inside the trunk, behind these rectangles, you’ll find two dimples within each rectangle.
- Drill Pilot Holes: Examine your Euro bumper mounts. Notice that one stud is larger than the other. The larger stud will use the existing bumper shock hole. The smaller stud requires a new hole. Using a drill bit slightly smaller than the smaller stud, carefully drill through the dimple that is closest to the driver’s side of the car on both the left and right sides. Drill slowly and precisely.
 Raised rectangular drilling points above the bumper shock mount, with visible dimples for drilling pilot holes
Comparative illustration showcasing the differing rear bumper mounting hole positions between US and Euro-spec E30s, emphasizing the need for drilling new holes.
6. Assembling and Mounting the Euro Bumper
With the body prepared, you can now assemble and mount the Euro bumper.
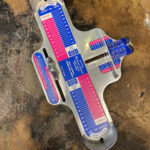
- Hardware Kit Overview: Familiarize yourself with the components of the Euro bumper hardware kit. Refer to the provided image for identification of each part.
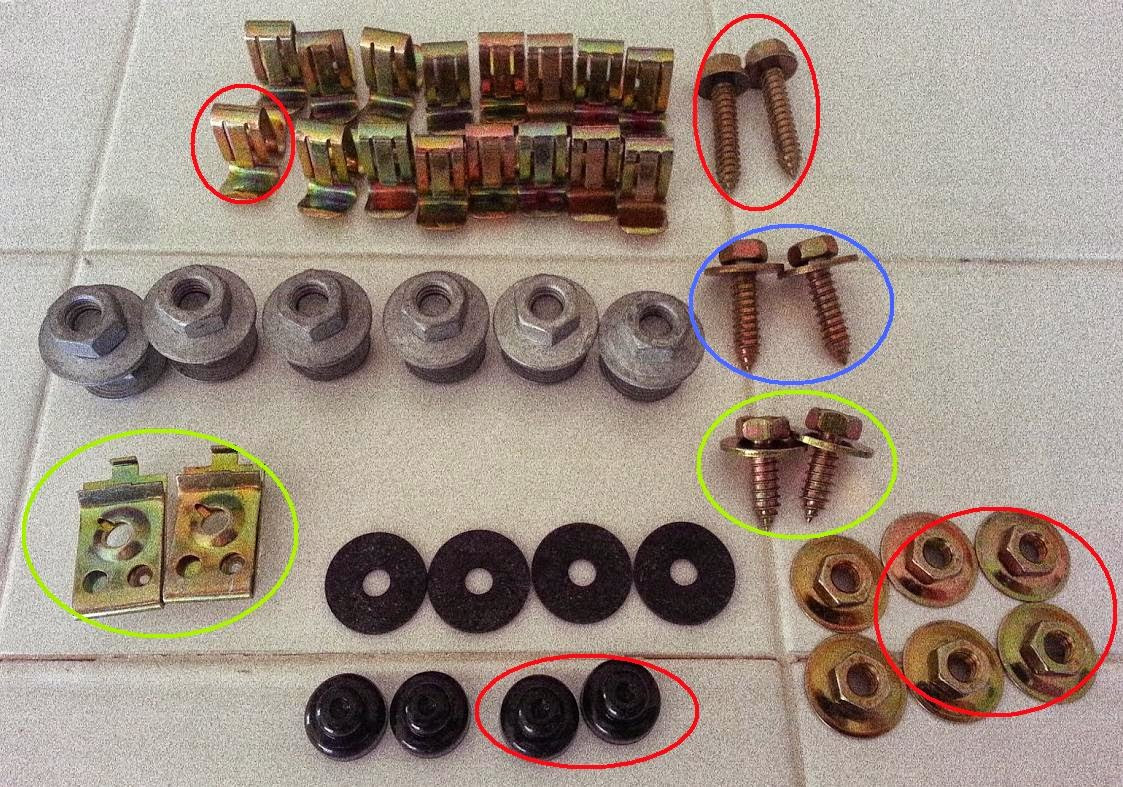 Euro bumper hardware kit components, including mounts, bolts, clips, and washers
- Attach Side Caps to Fenders: Use the blue-circled bolts from the hardware kit to attach the side caps to the fenders. These bolts go from inside the fender well into the plastic cap. Leave them slightly loose for adjustment later.
- Install Body Mounts: Place the body mounts in the correct orientation. The larger stud goes through the existing driver’s side bumper shock hole, and the smaller stud goes through the new hole you drilled. Place a rubber washer on the smaller stud before inserting it into the new hole. Secure the mounts from inside the trunk with a new nut and washer. The larger stud reuses one of the nut/washers from the old bumper shock.
 Euro bumper body mounts installed on the E30, showing stud placement and nut/washer securing them
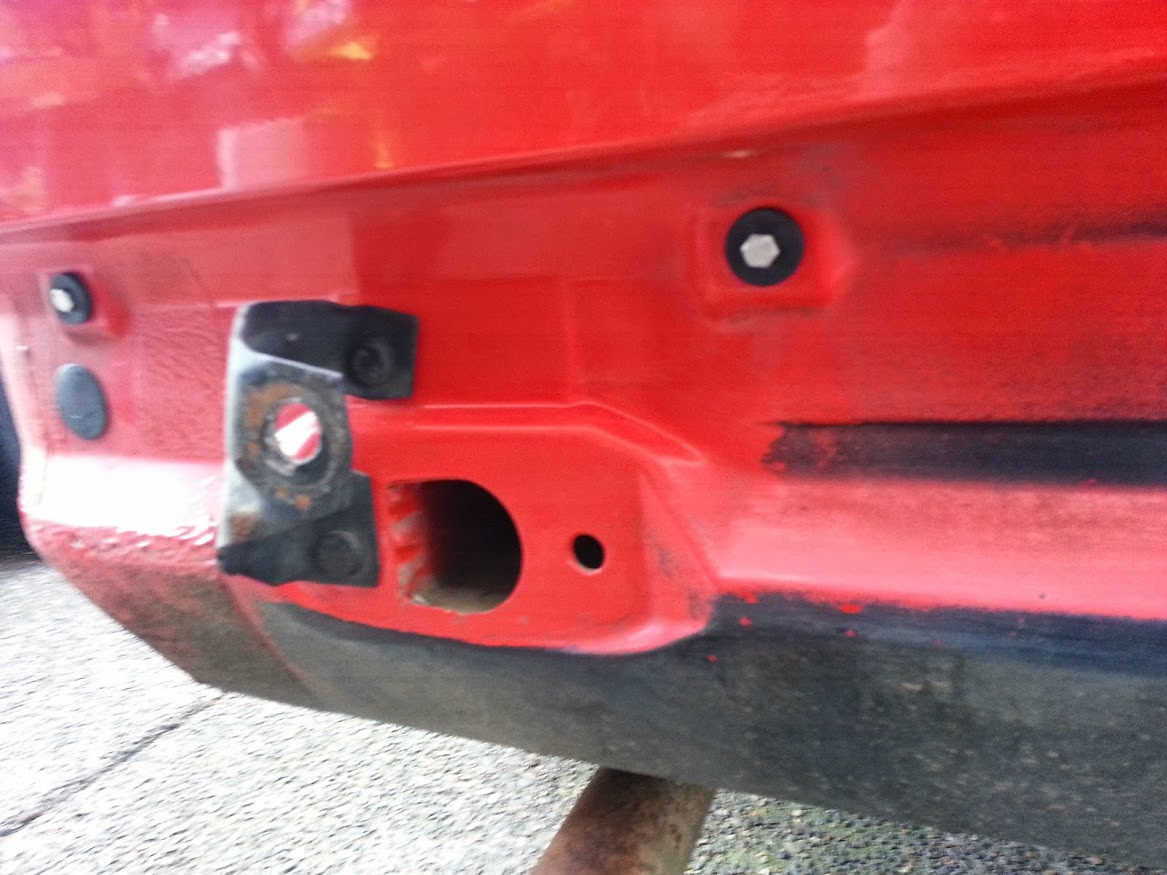 Alternative angle of Euro bumper mounts installed, showing detail of the hardware and positioning
- Mount the Assembled Bumper: It is highly recommended to have a helper for this step due to the bumper’s size and awkwardness. Ensure the impact strip is already attached to the Euro bumper. Slide the bumper onto the car, aligning it with the side mounts attached to the fenders. Make sure the bumper inserts correctly into these side mounts.
- Secure Bumper to Mounts: From underneath the car, guide the two studs on each side of the bumper into the body mounts you installed earlier. Loosely attach nut/washers to these studs to allow for adjustments.
- Install Side Bolts: Use the green-circled bolts from the hardware kit. Locate the holes next to the vents where you removed bolts earlier (near the antenna and battery). Place a new rubber washer on each bolt and insert them through these holes into the bumper. Snug these bolts down, but don’t fully tighten them yet.
- Final Adjustments and Tightening: With your helper, adjust the bumper until it is properly aligned. Once aligned, firmly tighten the two nuts on the bumper mounts from underneath the car. Return to the trunk and fully tighten the two bolts you installed in the previous step. Finally, ensure all bolts and nuts you’ve worked on are properly tightened.
7. Final Touches and Reassembly
Complete the installation by reassembling the trunk and admiring your upgraded E30.
- Reassemble Trunk: Put the trunk carpet back in place, ensuring it’s properly positioned.
- Reinstall Tail Light Sockets and Battery: Reconnect the tail light sockets you disconnected earlier. If you removed the battery, reinstall it now.
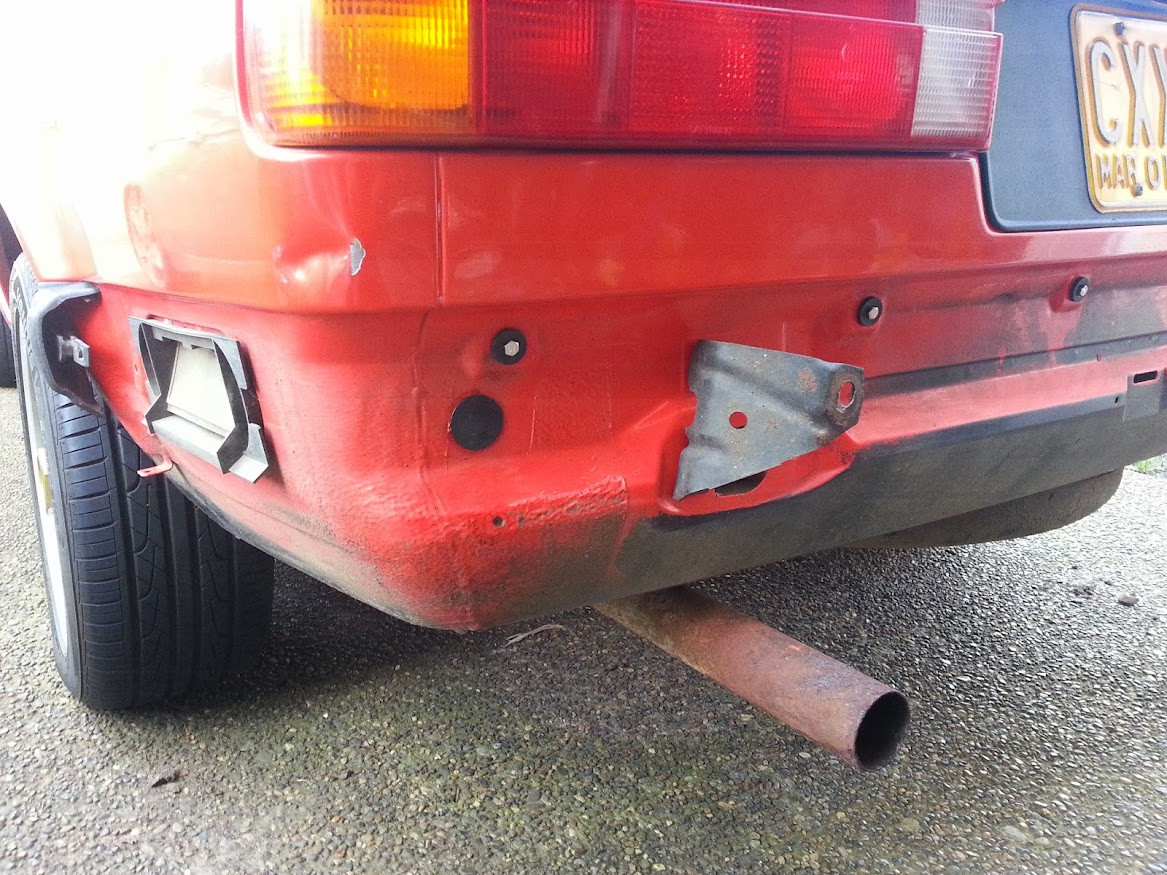
- Inspect Exposed Areas: Notice that the Euro bumper is shorter than the US bumper, leaving some previously covered areas exposed underneath the tail lights. You might want to clean up these areas. The brackets that were used to mount the old trim are now visible. You can grind or file these off and touch up the paint for a cleaner look. Alternatively, you can leave them as they are, as they are not very noticeable unless you look closely.
 Finished rear end with Euro bumper installed, showcasing the cleaner look and improved aesthetics
With your Euro bumpers installed, your E30 will sport a significantly improved rear appearance. You’ll also gain a bit of extra clearance, which can be helpful in tight parking situations. Enjoy the refreshed look of your classic BMW!
 Finished E30 with Euro bumpers, highlighting the overall aesthetic improvement and enhanced vehicle profile