Do It Yourself Euro Mount involves creating a European-style skull display, a popular and affordable way to preserve hunting trophies, and at eurodripusa.net, we understand the importance of honoring your successful hunts; this guide provides expert advice on achieving a quality DIY euro mount, combining traditional techniques with modern insights for a stunning display. Learn how to select the best tools, prepare the skull, and achieve a professional-looking finish while enhancing your understanding of the skeletal anatomy, bone preservation, and skull articulation.
1. What Does a Do It Yourself Euro Mount Entail?
A do it yourself euro mount is the process of cleaning and preparing an animal skull to create a European-style trophy display, and it involves removing the flesh, whitening the bone, and mounting the skull for an attractive presentation. This method is favored by hunters and wildlife enthusiasts who want an affordable and visually appealing way to preserve their trophies.
1.1 What Are the Key Steps in Creating a DIY Euro Mount?
The key steps include:
- Removing the head and skinning.
- Removing the lower jaw and eyes.
- Removing the brain.
- Maceration.
- Whitening.
- Drying and finishing.
Following these steps carefully will result in a professional-looking European mount.
1.2 What Tools and Equipment Are Needed for a DIY Euro Mount?
The essential tools and equipment for creating a DIY euro mount include:
- Scalpel blade knife.
- Flat head screwdriver.
- Drill with a 5/8” flat spade wood bit.
- Pressure washer or water hose.
- Water-tight plastic container.
- Stainless steel fish tank heater.
- Plastic wrap and electrical tape.
- Outdoor burner (turkey fryer or high output BBQ burner).
- Large pot.
- Hydrogen peroxide.
- Fast-drying clear super glue.
- Minwax provincial wood stain.
- Mop and glow.
Having these tools on hand will streamline the process and ensure high-quality results.
1.3 What Safety Precautions Should Be Taken During the DIY Euro Mount Process?
When creating a DIY euro mount, it’s essential to take the following safety precautions:
- Wear protective gloves: Always wear gloves to protect your hands from bacteria and chemicals.
- Work in a well-ventilated area: Ensure proper ventilation to avoid inhaling harmful fumes from cleaning agents.
- Use eye protection: Protect your eyes from splashes and debris by wearing safety glasses.
- Handle sharp tools with care: Be cautious when using knives and other sharp tools to avoid cuts.
- Dispose of waste properly: Dispose of biological waste and chemicals according to local regulations.
By following these safety measures, you can minimize risks and ensure a safe and successful DIY euro mount experience.
2. How Do You Start the Process of Head Removal and Skinning for a DIY Euro Mount?
The process begins by removing the head at the atlas joint and skinning it carefully to preserve the skull’s integrity. Correct head removal and skinning are critical for a successful euro mount.
2.1 What Is the Correct Way to Remove the Head for a Euro Mount?
To properly remove the head for a euro mount:
- Locate the atlas joint where the skull connects to the neck.
- Use a sharp knife to cut through the muscle and tissue around the joint.
- Detach the skull at the last vertebrae, ensuring minimal meat and tissue remain attached.
Removing the head at this point simplifies the skull cleaning process and reduces meat wastage.
2.2 Should the Hide Be Left on or Removed Before Maceration?
If you are hunting in your home state and don’t need to skin/clean the skull to cross state lines, it’s always best to leave the hide on your skull, and leaving the hide on ensures that no meat will dry and dehydrate the skull which can create issues during whitening later in the process.
2.3 How Do You Skin the Skull to Avoid Damage?
To skin the skull without causing damage:
- Start the incision at the back of the head/neck area.
- Run the knife blade along the top of the skull, between the eyes, down to the snout.
- Keep the knife blade pointed away from the bone to prevent unwanted marks.
- Use a flat head screwdriver to pry the hide from around the antler burs, avoiding scratches on the bone.
Careful skinning preserves the skull’s surface, which is essential for the final appearance of the euro mount.
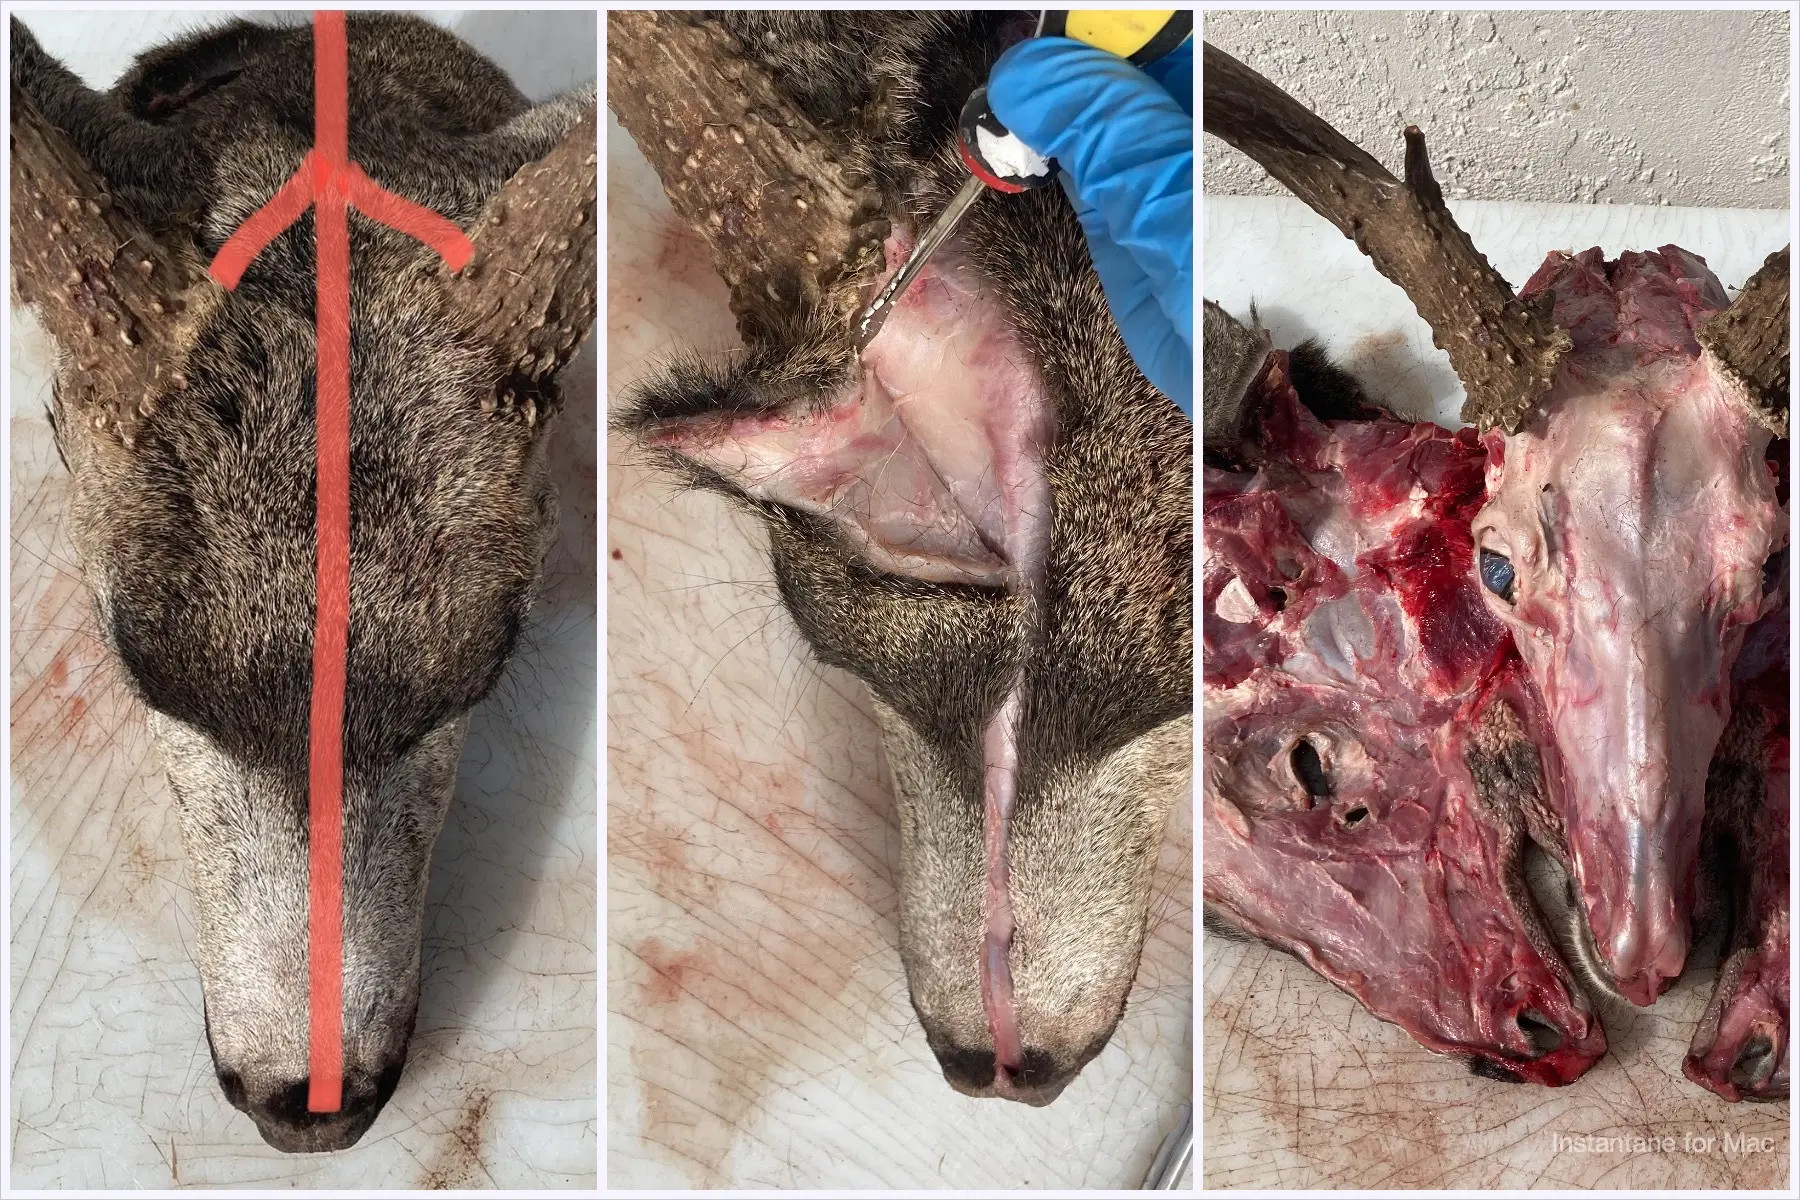 Skinning the skull carefully with a scalpel blade knife to prepare for a DIY euro mount, ensuring no unwanted knife marks on the bone
3. Removing the Lower Jaw and Eyes: What Are the Best Techniques?
Removing the lower jaw and eyes requires precise cuts to ensure all tissue is removed without damaging the skull. Proper removal of these parts is crucial for a clean and professional euro mount.
3.1 How Do You Detach the Lower Jaw from the Skull?
To detach the lower jaw:
- Make two incisions along the outside of the jaw bone from the back towards the mouth on both sides of the skull.
- Grab the snout and lower jaw, open the mouth, and continue to open until the lower jaw hyperextends and detaches.
- Use a knife to cut the remaining muscle and connective tissue to free the lower jaw completely.
This method ensures a clean removal of the lower jaw with minimal tissue remaining.
3.2 What Is the Best Way to Remove the Eyes from the Eye Sockets?
To remove the eyes effectively:
- Make an incision around the entire circumference of the eyeball, freeing up connective tissue.
- Flip the skull upside down and insert the knife into the back of the eye socket between the skull and orbital bone.
- Cut the remaining connective tissue behind the eye.
- Pull the eye from the socket and cut it free with minimal resistance.
This technique ensures complete removal of the eye with minimal damage to the surrounding bone.
3.3 What Additional Cleaning Should Be Done After Removing the Jaw and Eyes?
After removing the jaw and eyes, use your knife and remove as much meat from the outside of the skull as possible, and the less meat on the skull, the quicker the cleaning process will go.
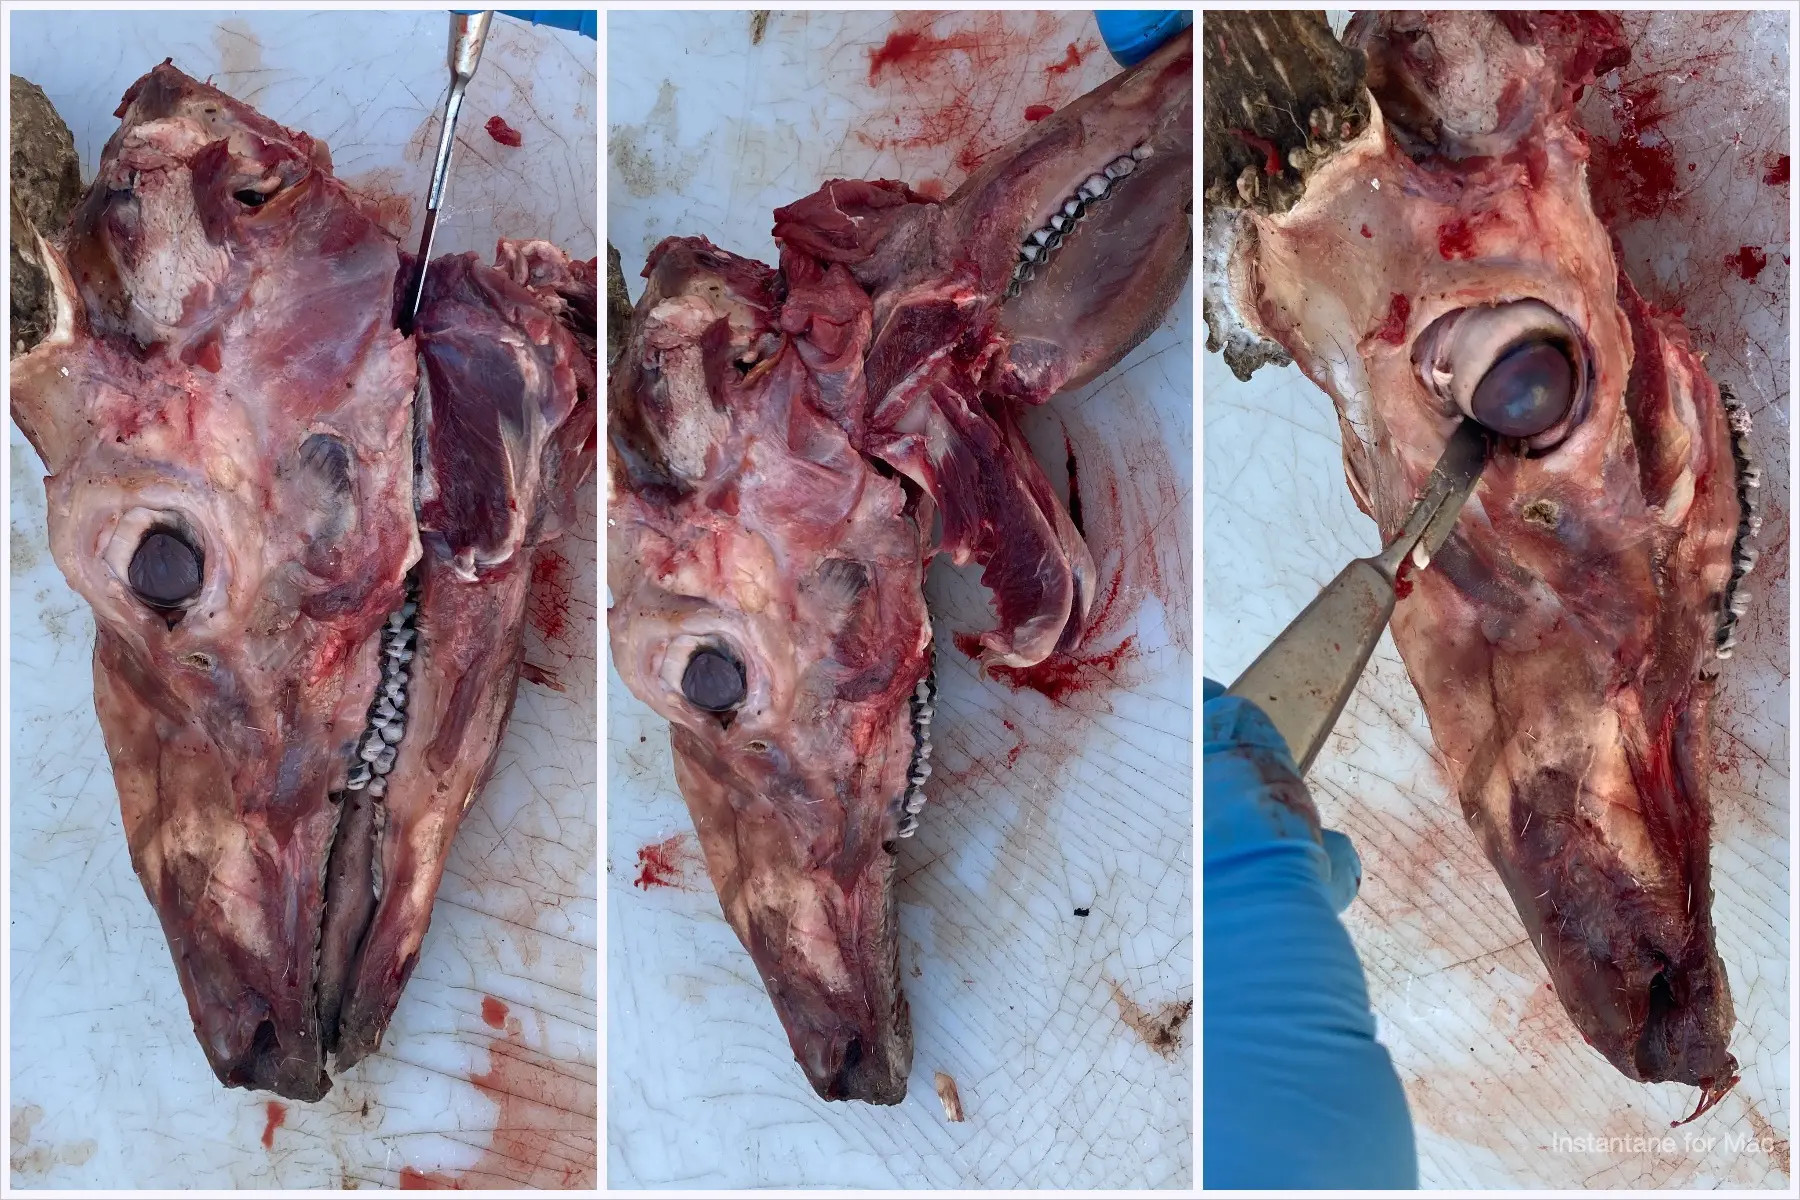 Using a knife to remove meat from the outside of the skull after the eyes and lower jaw have been removed
4. Brain Removal Techniques: What Works Best?
Effective brain removal is essential to prevent decay and ensure a clean skull. Using the right tools and methods makes this process more manageable.
4.1 What Tools Are Best for Removing the Brain?
The best tools for removing the brain include:
- Drill with a 5/8” flat spade wood bit: This tool is effective for scrambling the brain matter inside the skull.
- Screwdriver or strong stick: These can also be used to break up the brain tissue.
- Pressure washer or water hose: Essential for flushing out the liquified brain matter.
These tools help ensure thorough brain removal.
4.2 How Do You Liquify the Brain for Easy Removal?
To liquify the brain:
- Insert the drill bit into the hole at the back of the skull where the atlas joint was connected.
- Use the drill to scramble the brains until they are in liquid form.
- Alternatively, use a screwdriver or strong stick to achieve the same effect.
Liquifying the brain makes it easier to flush out.
4.3 What Is the Best Way to Flush Out the Brain Matter?
The best way to flush out brain matter is to use a pressure washer or water hose, and follow these steps:
- Stand back a few feet from the skull.
- Insert the hose into the same hole used to scramble the brains.
- Spray water into the skull until all brain matter is removed.
- Rinse thoroughly to ensure no residue remains.
This method ensures complete removal of brain matter, which is crucial for a clean euro mount.
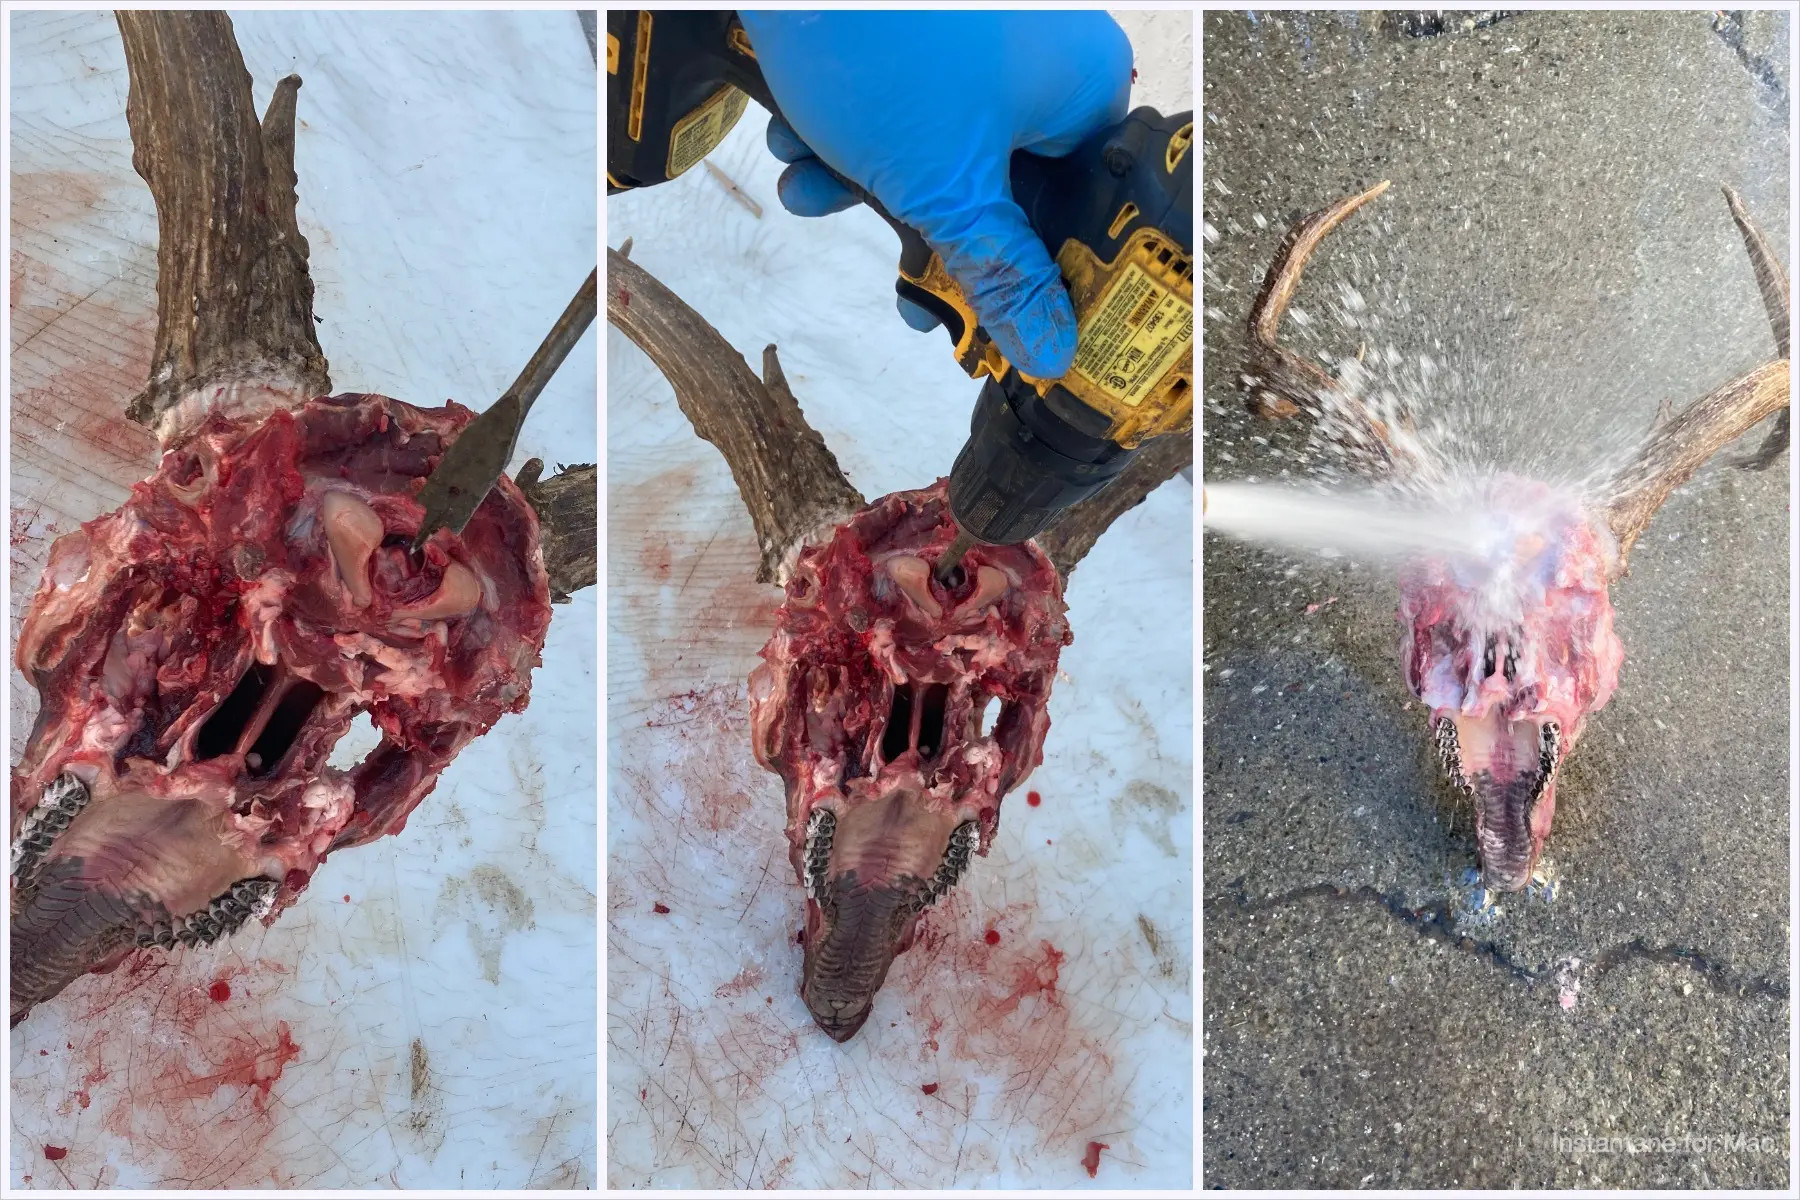 Using a drill to scramble and liquify the brains inside the skull before removal for a DIY euro mount
5. Understanding the Maceration Process for DIY Euro Mount
Maceration is a biological cleaning method that uses bacteria to break down soft tissues on the skull, and this process is vital for preserving the integrity of the bone and achieving a detailed euro mount.
5.1 What Is Maceration and Why Is It Important?
Maceration involves soaking the skull in water at a sustained temperature of 80-90 degrees Fahrenheit to promote bacterial growth. This process naturally breaks down soft tissues, preserving small, intricate bones often lost during boiling.
5.2 What Supplies Are Needed to Start the Maceration Process?
The supplies needed for maceration include:
- A water-tight plastic container.
- A stainless steel fish tank heater.
- Plastic wrap and electrical tape.
These supplies help maintain the ideal conditions for maceration.
5.3 How Do You Prepare the Skull for Maceration?
To prepare the skull for maceration:
- Ensure the skull is free of hide, meat, eyes, lower jaw, spinal fluid, and brain matter.
- Wrap the bases of the antlers with plastic wrap and electrical tape to protect them from discoloration.
This preparation ensures the maceration process is effective and preserves the skull’s appearance.
5.4 How Long Does the Maceration Process Typically Take?
According to research from the University of California, Davis, Department of Plant Sciences, in July 2025, the maceration process usually takes four to six days for a deer-sized animal.
5.5 What Maintenance Is Required During Maceration?
During maceration, check the water level every two days and add water as needed to ensure the skull remains submerged, and this helps maintain consistent bacterial activity.
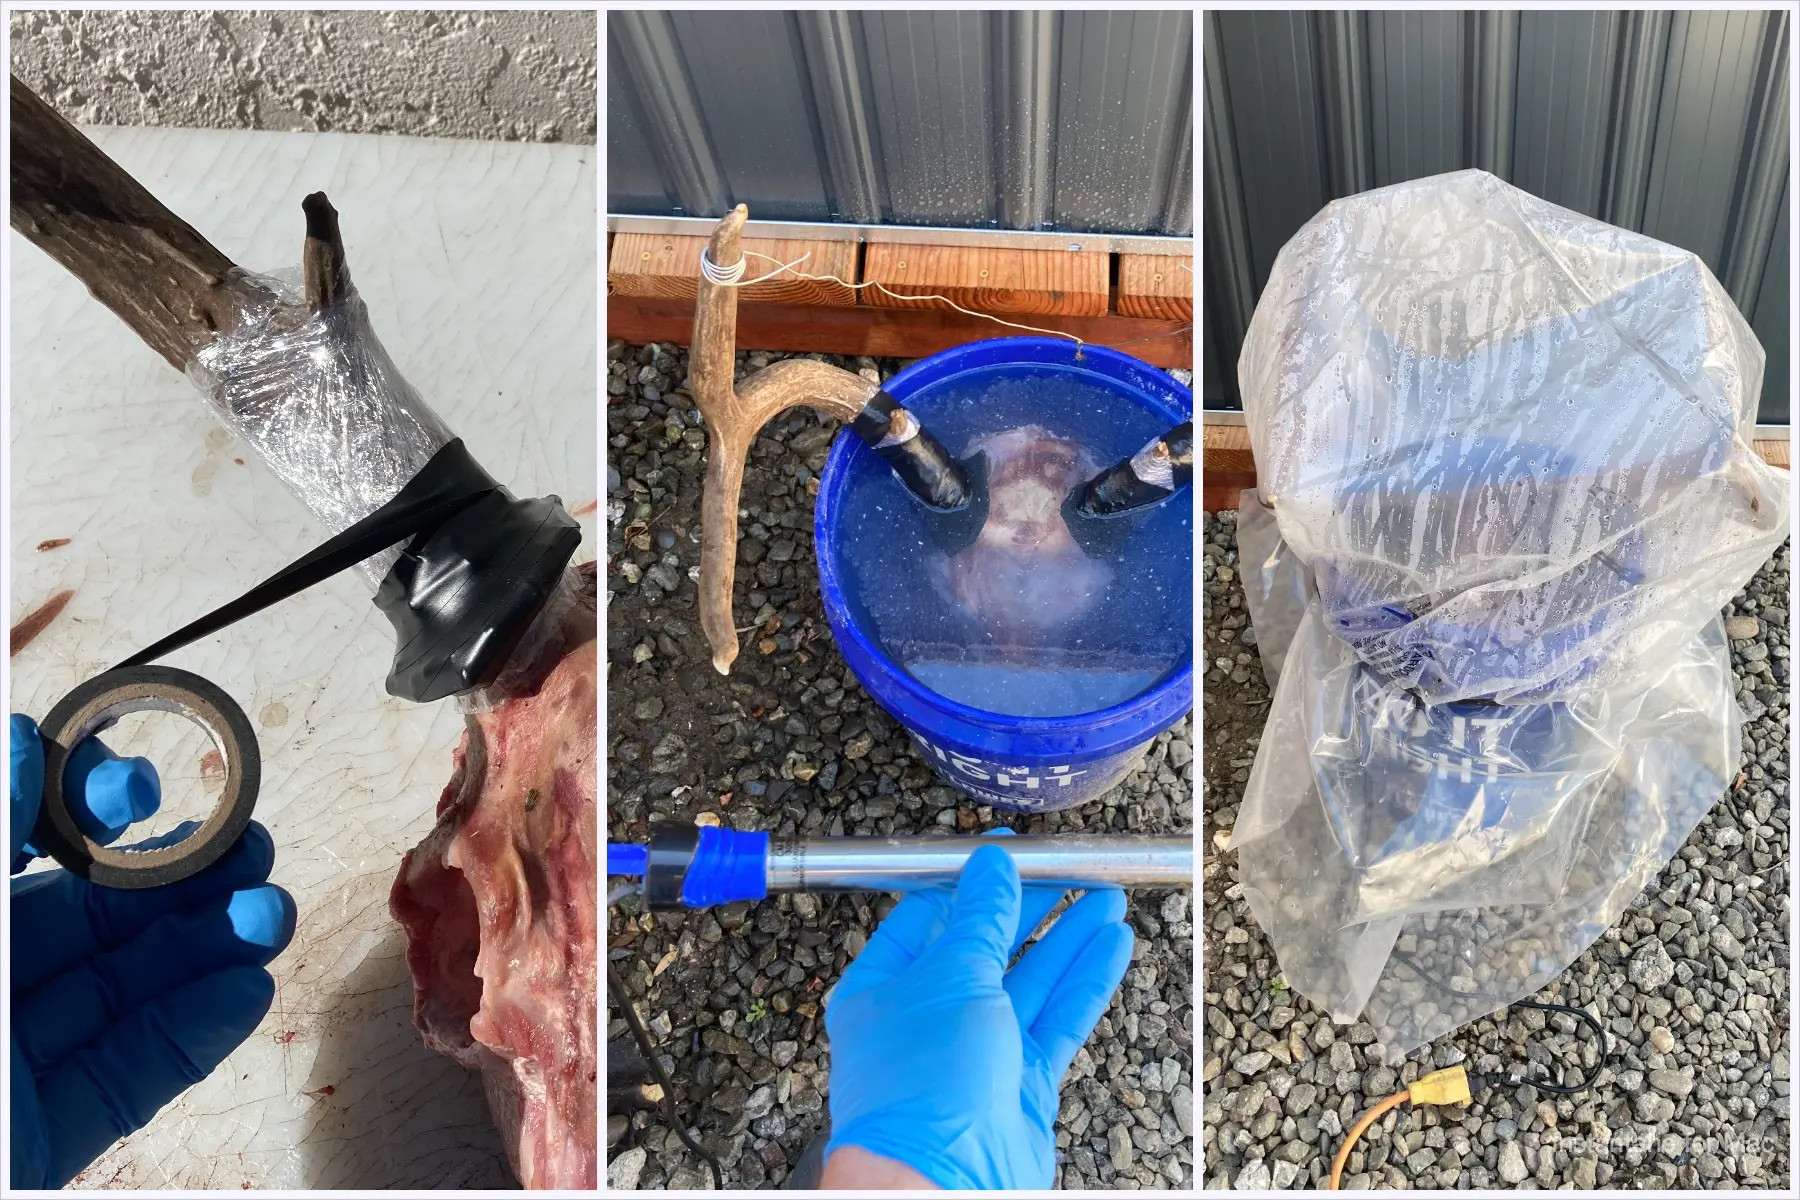 A skull submerged in a plastic container for maceration, with a stainless steel fish tank heater maintaining the water temperature
6. Skull Whitening: How to Achieve a Bright, Clean Look?
Skull whitening enhances the appearance of the euro mount by giving it a bright, clean look. Choosing the right whitening solution and method is essential for achieving the desired result.
6.1 What Whitening Solutions Are Recommended for Skulls?
For whitening skulls, a mixture of hydrogen peroxide and water is effective. Regular 3% hydrogen peroxide from your local store works well.
6.2 What Equipment Is Needed for the Whitening Process?
The necessary equipment includes:
- An outdoor burner (turkey fryer or high output BBQ burner).
- A pot large enough to completely submerge the skull in the whitening solution.
These tools ensure the skull is properly whitened.
6.3 How Do You Prepare the Whitening Solution and Skull?
To prepare the whitening solution and skull:
- Fill the pot 50 percent full with hydrogen peroxide.
- Place the skull inside the pot.
- Fill the remainder of the pot with water until the skull is completely covered.
- Ensure antlers are covered in tape and plastic to prevent contact with the whitening solution.
Proper preparation is key to achieving an even and effective whitening.
6.4 What Is the Process for Boiling the Skull in the Whitening Solution?
To boil the skull in the whitening solution:
- Bring the solution to a rolling boil.
- Submerge the skull in the boiling solution for 5-10 minutes.
- Periodically remove the skull to check for bone deterioration and desired color.
- Follow the same process for any loose teeth or nasal bones.
Careful monitoring ensures the skull is whitened without damage.
7. Drying and Finishing Touches: Completing Your DIY Euro Mount
The drying and finishing touches are crucial for the final appearance and preservation of your euro mount. Proper drying and reassembly ensure a professional-looking result.
7.1 How Do You Dry the Skull Properly?
To dry the skull properly:
- Fit any nasal bones in place while the bone is still wet and secure them with a rubber band.
- Place the skull in direct sunlight for drying, if possible.
- If sunlight isn’t available, use a space heater to dry the skull completely.
Proper drying prevents bone separation and ensures all pieces are secure.
7.2 How Do You Reassemble Any Loose Bones or Teeth?
To reassemble loose bones or teeth:
- Once the skull is dry, use fast-drying clear super glue to reattach any teeth or nasal bones that didn’t stick during drying.
- Ensure all pieces are securely in place for a complete and natural look.
7.3 What Finishing Touches Enhance the Appearance of the Euro Mount?
Final touches to enhance the appearance include:
- Remove the plastic and tape from the antler bases.
- Touch up any whitened horn with Minwax provincial wood stain, applied lightly with a Q-tip until the desired color is achieved.
- Coat the finished skull with a thin layer of mop and glow to seal the bone and prevent dust accumulation.
These finishing touches give the euro mount a polished and professional look.
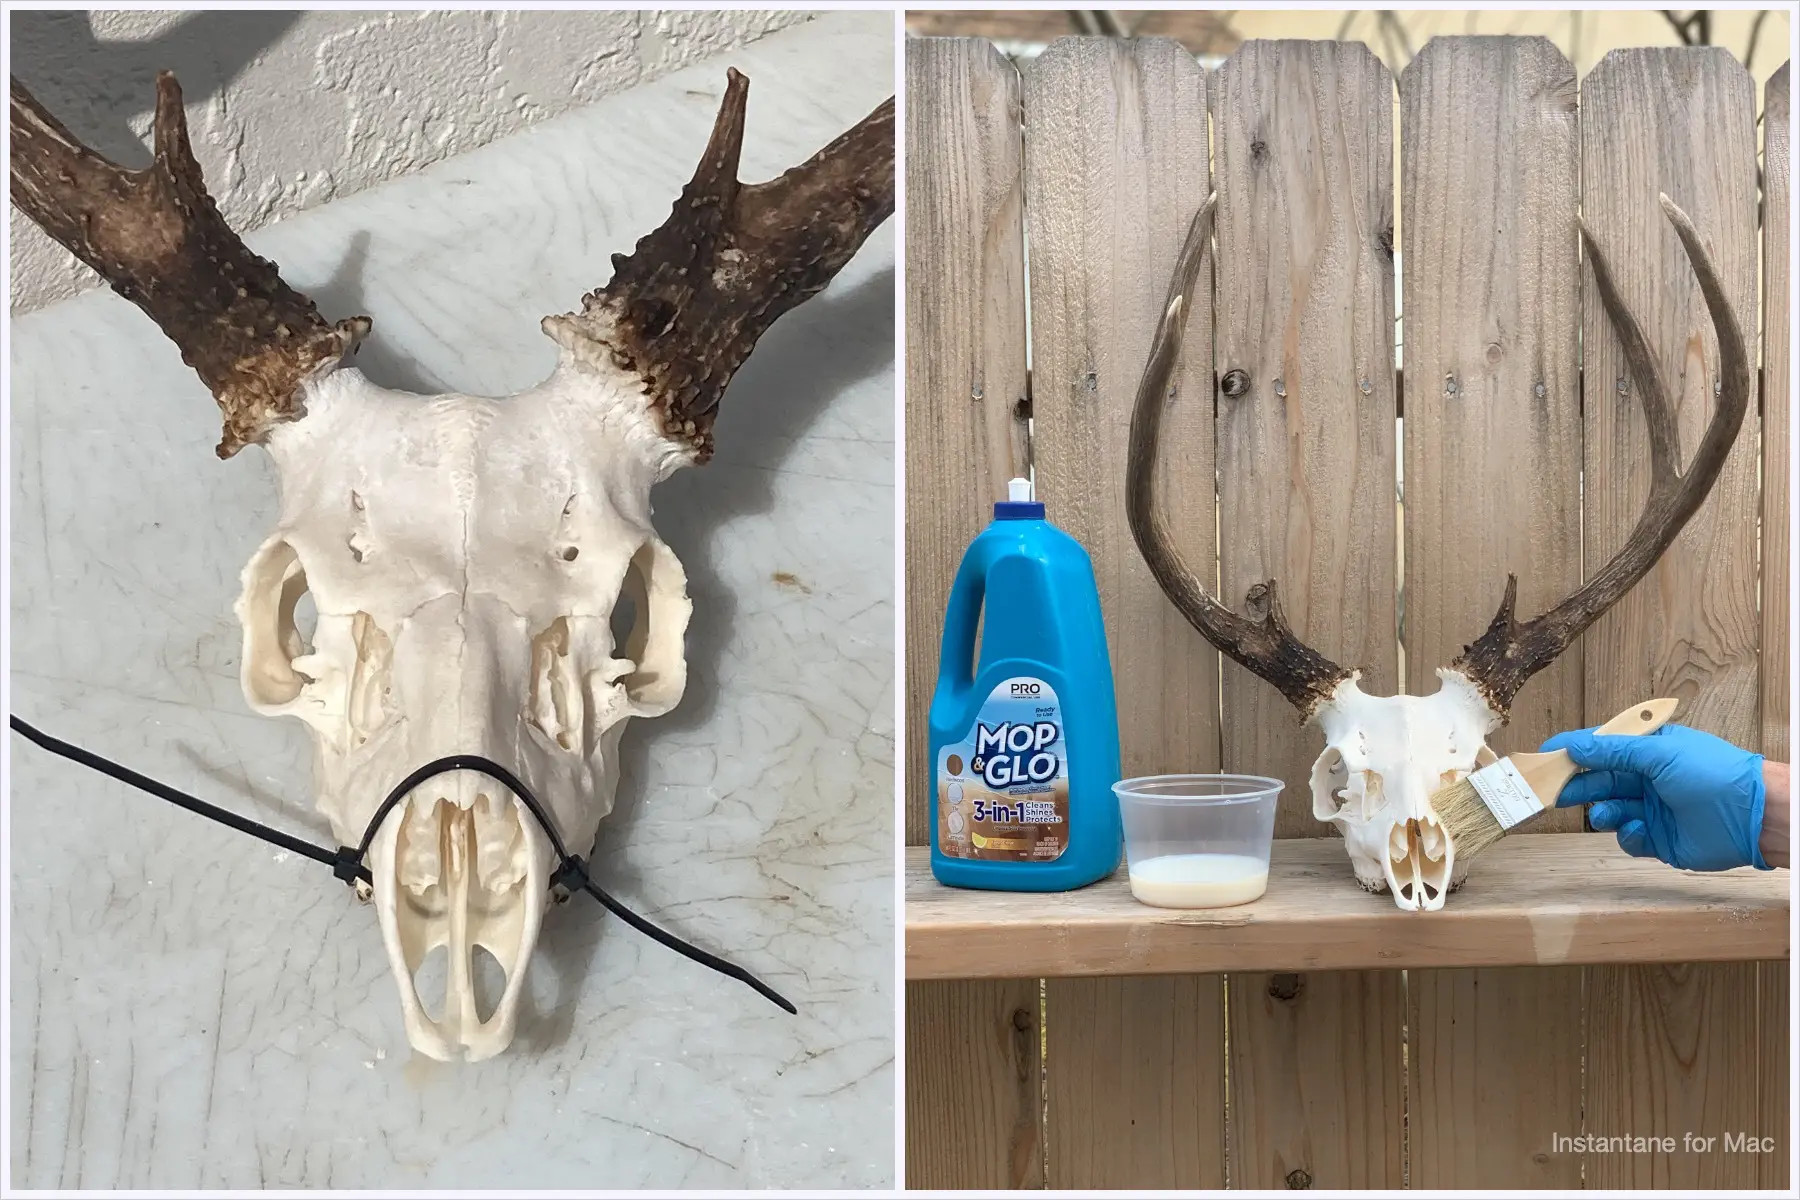 A completed DIY euro mount with nasal bones fitted, skull whitened, and antlers stained for a professional finish
8. Common Issues and How to Solve Them
Even with careful preparation, issues can arise during the DIY euro mount process. Knowing how to address these problems can save time and ensure a successful outcome.
8.1 What If the Skull Develops a Bad Odor During Maceration?
If the skull develops a strong odor during maceration:
- Ensure the container is sealed as tightly as possible.
- Move the container to a location where the smell won’t be bothersome.
- Consider adding enzymatic cleaning agents to the water to help break down organic matter and reduce odor.
These steps can help mitigate unpleasant odors during the maceration process.
8.2 What If the Bones Become Brittle During Whitening?
If the bones become brittle during whitening:
- Reduce the concentration of hydrogen peroxide in the solution.
- Shorten the boiling time to prevent over-processing.
- Ensure the skull is thoroughly rinsed after whitening to remove any residual chemicals.
Adjusting these factors can help prevent bone brittleness.
8.3 How Do You Fix Discoloration on the Antlers?
To fix discoloration on the antlers:
- Use Minwax provincial wood stain to touch up any areas that have lost color.
- Apply the stain lightly with a Q-tip, repeating coats until the desired color is achieved.
- Allow the stain to dry completely before handling the antlers.
This method restores the natural color and appearance of the antlers.
9. The Benefits of Using European Drip Systems in Agriculture
European drip systems offer numerous benefits for agricultural irrigation, including water conservation and improved crop yields. Understanding these advantages can help you make informed decisions about your irrigation needs. At eurodripusa.net, we provide top-quality drip systems designed to optimize your agricultural practices.
9.1 What Are the Main Advantages of Drip Irrigation?
Drip irrigation offers several key advantages:
- Water Conservation: Delivers water directly to the roots, minimizing evaporation and runoff.
- Improved Crop Yields: Ensures consistent moisture levels, promoting healthy plant growth.
- Reduced Weed Growth: Keeps the soil surface dry, inhibiting weed germination.
- Efficient Nutrient Delivery: Allows for precise application of fertilizers directly to the root zone.
These benefits make drip irrigation a superior choice for efficient and sustainable agriculture.
9.2 How Does European Drip Technology Enhance Irrigation Efficiency?
European drip technology incorporates advanced designs and materials that enhance irrigation efficiency, and these systems often include:
- Pressure-Compensating Emitters: Ensure uniform water distribution even on sloped terrains.
- Anti-Clog Designs: Reduce maintenance and ensure consistent performance.
- Durable Materials: Withstand harsh environmental conditions and extend system lifespan.
These features contribute to more reliable and effective irrigation.
9.3 What Types of Crops Benefit Most from Drip Irrigation?
Drip irrigation is particularly beneficial for:
- Row crops such as tomatoes, peppers, and strawberries.
- Orchards and vineyards.
- Vegetable gardens.
The precise water delivery of drip systems promotes optimal growth and higher yields for these crops.
10. Why Choose EurodripUSA.net for Your Irrigation Needs?
EurodripUSA.net offers a comprehensive range of high-quality drip irrigation products from Europe, ensuring you receive the best solutions for your agricultural needs. Our commitment to quality and customer satisfaction makes us a trusted partner for farmers and gardeners alike.
10.1 What Makes EurodripUSA.net a Reliable Source for Drip Irrigation Products?
EurodripUSA.net stands out due to:
- Quality Products: We source our drip irrigation systems from leading European manufacturers known for their durability and performance.
- Expert Advice: Our team provides knowledgeable support to help you choose the right system for your specific needs.
- Comprehensive Solutions: We offer a wide range of products, from emitters to filters, ensuring you find everything you need for a complete irrigation setup.
We are committed to providing top-quality products and exceptional service.
10.2 What Types of Drip Irrigation Products Does EurodripUSA.net Offer?
EurodripUSA.net offers a variety of drip irrigation products, including:
- Drip tape and drip lines
- Emitters and micro-sprinklers
- Filters and pressure regulators
- Fittings and connectors
Our extensive product range ensures you can find the perfect components for your irrigation system.
10.3 How Can EurodripUSA.net Help You Optimize Your Irrigation System?
EurodripUSA.net can help you optimize your irrigation system by:
- Providing detailed product information and specifications.
- Offering customized system design assistance.
- Sharing best practices for installation and maintenance.
We are dedicated to helping you achieve the most efficient and effective irrigation possible.
Creating your own DIY euro mount is a rewarding way to honor your hunting achievements, and with the right tools and techniques, you can achieve professional-quality results. For all your irrigation needs, remember to visit eurodripusa.net, where you’ll find top-quality European drip systems and expert advice to help you maximize your agricultural success. Explore our products and contact us today to learn more and take the first step toward a more efficient and sustainable irrigation system. Visit us at 1 Shields Ave, Davis, CA 95616, United States, call us at +1 (530) 752-1011, or browse our website at eurodripusa.net to discover the best in European drip irrigation technology.
FAQ: Do It Yourself Euro Mount
- What is a euro mount?
A euro mount is a method of preserving animal trophies by cleaning and displaying the skull in a European-style manner, offering an affordable and visually appealing alternative to traditional taxidermy. - Why should I choose a DIY euro mount over professional taxidermy?
A DIY euro mount is more affordable and allows you to have full control over the process, providing a unique and personal way to display your trophies. - How long does it take to complete a DIY euro mount?
The entire process typically takes between one to two weeks, depending on the size of the skull and the methods used for cleaning and whitening. - What is maceration and why is it important for a euro mount?
Maceration is the process of soaking the skull in water to allow bacteria to break down soft tissues, preserving intricate bone structures that might be lost with other methods. - Can I use bleach to whiten the skull?
It’s not recommended, as bleach can damage the bone over time. Hydrogen peroxide is a safer and more effective option for whitening. - How do I prevent the skull from smelling during the maceration process?
Ensure the container is tightly sealed and consider adding enzymatic cleaning agents to the water to help break down organic matter and reduce odor. - What should I do if the skull becomes greasy after maceration?
Soak the skull in a degreasing solution, such as a mixture of dish soap and warm water, to remove any remaining grease. - How can I protect the antlers during the whitening process?
Wrap the bases of the antlers with plastic wrap and electrical tape to prevent them from coming into contact with the whitening solution. - What is the best way to reattach loose teeth or nasal bones?
Use a fast-drying clear super glue to carefully reattach any loose teeth or nasal bones after the skull has been dried. - How do I maintain my completed euro mount?
Dust the euro mount regularly and consider applying a thin coat of mop and glow to seal the bone and prevent dust accumulation.