
For dedicated hunters, the pursuit of game is more than just a pastime; it’s a commitment of time, effort, and respect for nature. Beyond the thrill of the hunt and the careful processing of game meat, preserving the memory of a successful hunt often comes down to trophy care. Among the various methods for showcasing your hard-earned trophy, Euro Mounts stand out as an increasingly popular and cost-effective choice. A European mount, or skull mount, offers a clean, natural, and visually striking way to display antlers, horns, or even tusks. For the hands-on hunter, creating a quality euro mount is a rewarding DIY project, achievable with the right techniques and a bit of patience. This guide will walk you through each step of the process, ensuring your trophy skull is cleaned, whitened, and ready to display with pride.
Step-by-Step Guide to Creating Your Own Euro Mount
Creating a euro mount is a process that requires attention to detail, starting right in the field after a successful hunt. Proper initial handling of the skull is crucial for a clean and impressive final product.
1. Head Removal and Skinning
The journey to a stunning euro mount begins the moment your animal is down. A common mistake is leaving excessive neck meat and vertebrae attached to the skull. To simplify the cleaning process and conserve meat, detach the head at the atlas joint, the last vertebra connecting to the skull’s base. This clean separation makes subsequent steps much easier.
If you are hunting locally and regulations permit transporting the skull without removing the hide, it’s advisable to leave it on. The hide acts as a natural barrier, preventing the skull from drying out and potentially causing issues during the whitening stage. However, if you need to transport your trophy across state lines or regulations require skull preparation, skinning becomes necessary.
For skinning, a replaceable scalpel blade knife is ideal for its precision. Begin by making an incision at the back of the head, along the neck area. Run the knife blade along the top of the skull, between the eyes, and down to the snout. Always direct the blade away from the bone to avoid unwanted knife marks that will be visible on the finished euro mount. When working around antlers, use a flat-head screwdriver to gently pry the hide away from the antler bases (burs). This prevents accidentally scoring the bone with your knife, preserving the smooth surface of your trophy.
Carefully work the hide off the skull, moving down each side, around the eyes, and tear ducts. Cut the ears off close to the skull base. As you approach the nose, exercise extra caution to avoid cutting or removing any bone or cartilage.
 Hunter removing deer head for euro mount preparation.
2. Removing the Lower Jaw and Eyes
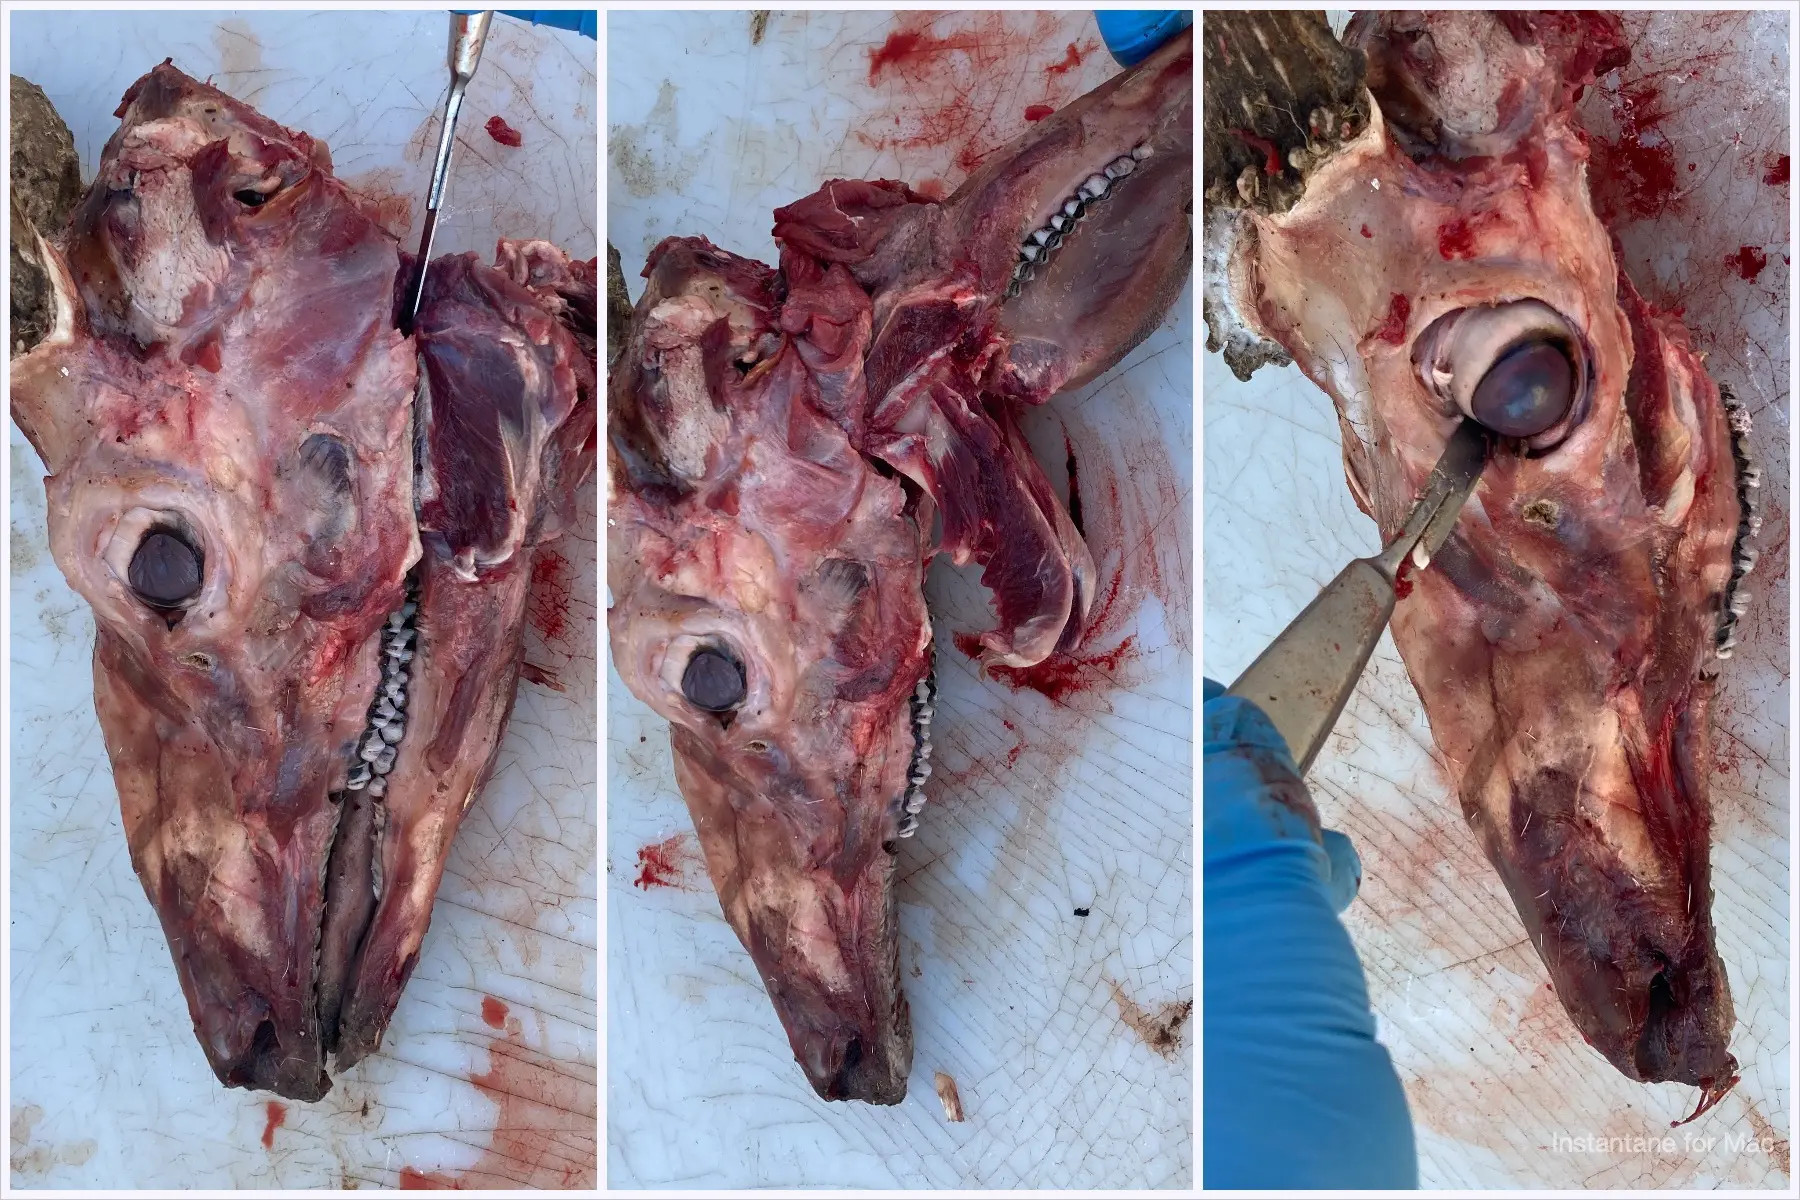
With the hide removed, the next step is to detach the lower jaw. Make two incisions along the outside of the jawbone, from the back towards the mouth, on both sides of the skull. This loosens the muscles holding the jaw in place. Grip the snout with one hand and the lower jaw with the other. Open the mouth and continue to extend it backward until the jaw hyperextends and detaches. Use your knife to cut away any remaining muscle and connective tissue holding the lower jaw.
Next, focus on removing the eyes. Make a circular incision around each eyeball, cutting through the connective tissue. Flip the skull upside down and insert your knife into the back of the eye socket, between the skull and orbital bone. Cut any remaining tissue behind the eye. You should now be able to easily pull the eye out of its socket.
After removing the eyes, use your knife to remove as much meat as possible from the outside of the skull. Reducing the amount of tissue will significantly speed up the subsequent cleaning process.
 Close-up of deer skull showing eye removal process for euro mount.
3. Brain Removal
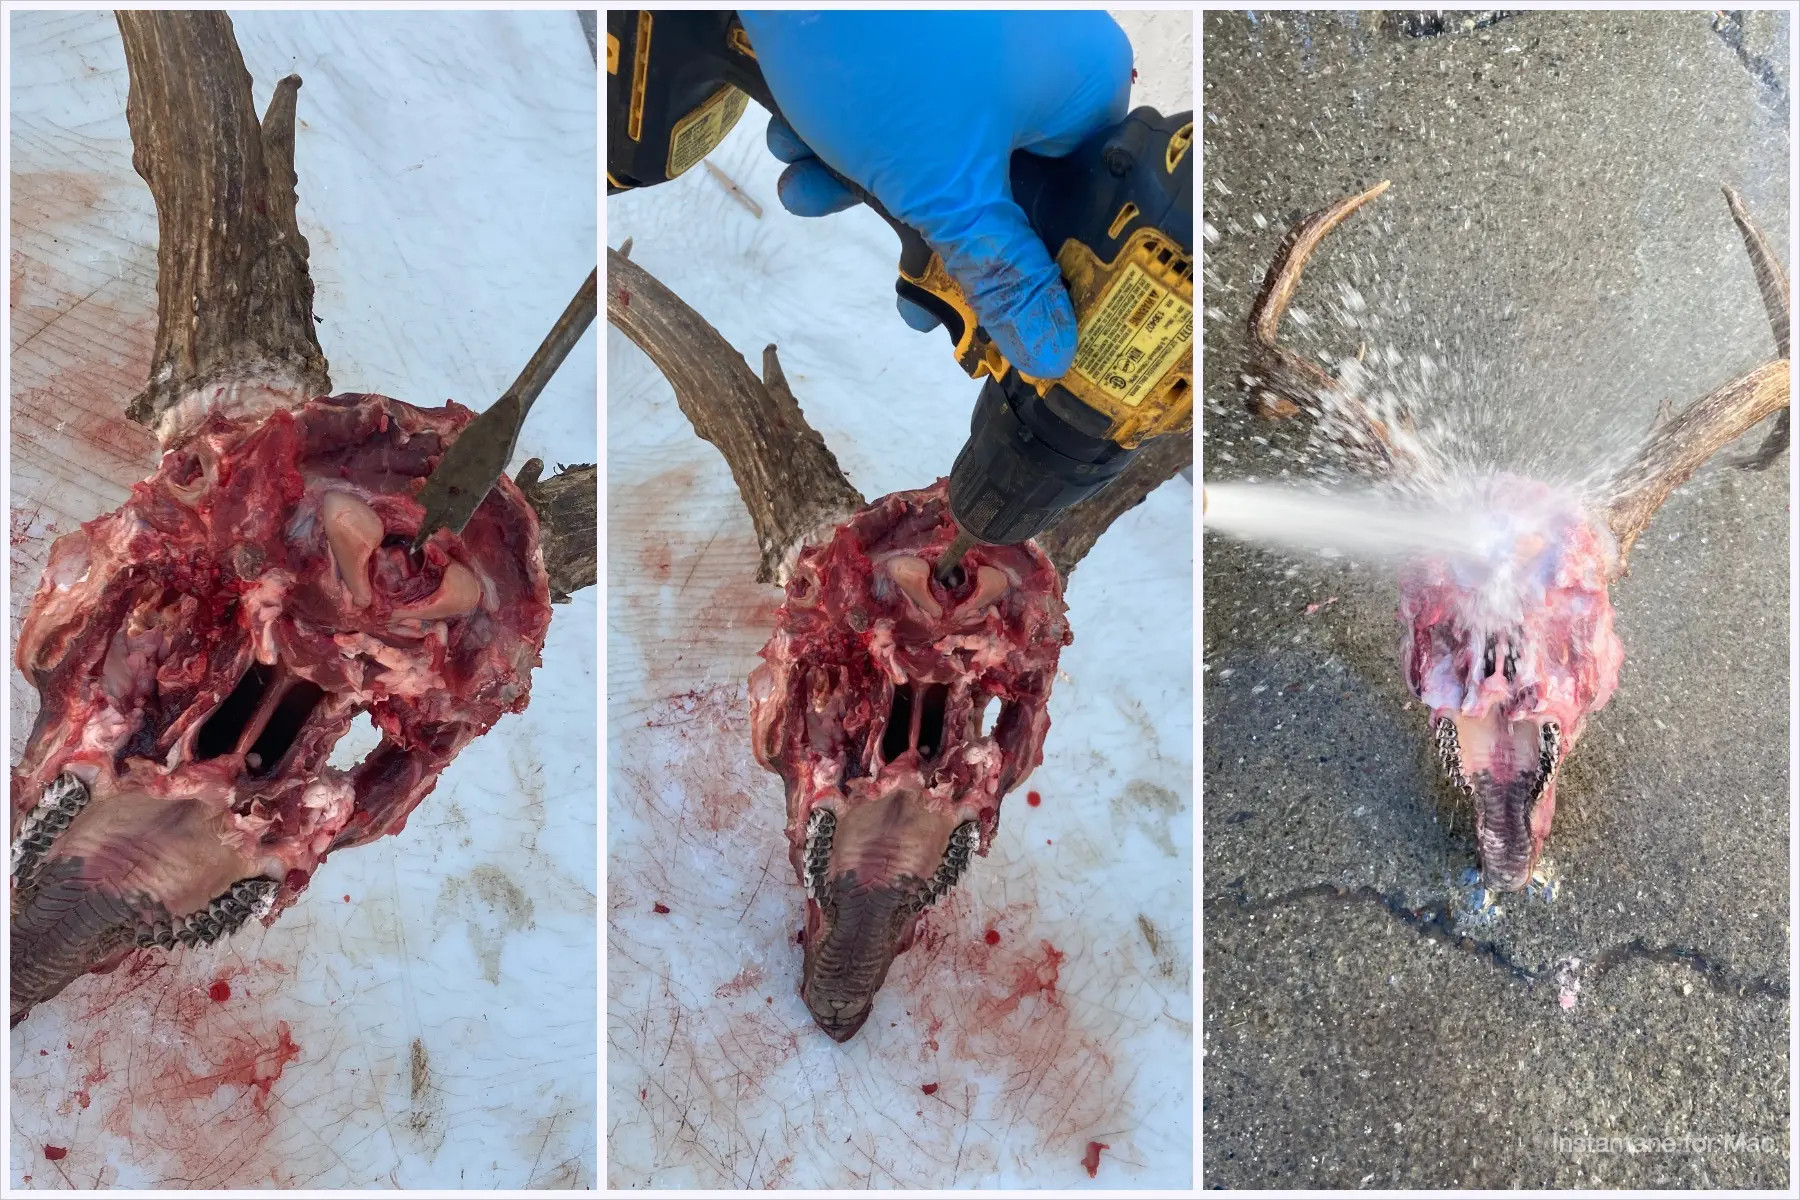
The final preparation step before cleaning is brain removal. The brain needs to be thoroughly removed to prevent decomposition and odor. A drill with a 5/8” flat spade wood bit is an effective tool for this. Insert the drill bit into the spinal cord opening at the back of the skull (atlas joint). Activate the drill to macerate the brain tissue inside the skull until it liquefies. Alternatively, a screwdriver or sturdy stick can achieve the same result. The goal is to break down the brain matter so it can be flushed out.
Once liquefied, use a pressure washer or garden hose to rinse the brain matter out. Insert the hose into the same hole used for maceration and flush with water until all brain tissue is removed. Rinse thoroughly. If you are in the field without access to a hose, a self-service car wash pressure washer can be used as a last resort before transporting the skull.
 Using drill to remove brain from deer skull for euro mount.
4. The Maceration Process
With the skull prepped by removing hide, meat, eyes, jaw, and brain, it’s ready for the deep cleaning process. Maceration is a highly effective method for cleaning skulls, especially for euro mounts, as it preserves even the smallest, delicate bones that can be lost with other methods like boiling.
Maceration involves soaking the skull in water at a consistent temperature of 80-90 degrees Fahrenheit. This “slow cooking” environment encourages bacterial growth, which naturally breaks down remaining tissue.
To begin maceration, gather the following:
- A water-tight plastic container: Choose a container large enough to fully submerge the skull. Avoid metal containers as they can rust and discolor the bone.
- A stainless steel fish tank heater: Select a heater capable of maintaining a water temperature of at least 80°F to promote optimal bacterial activity.
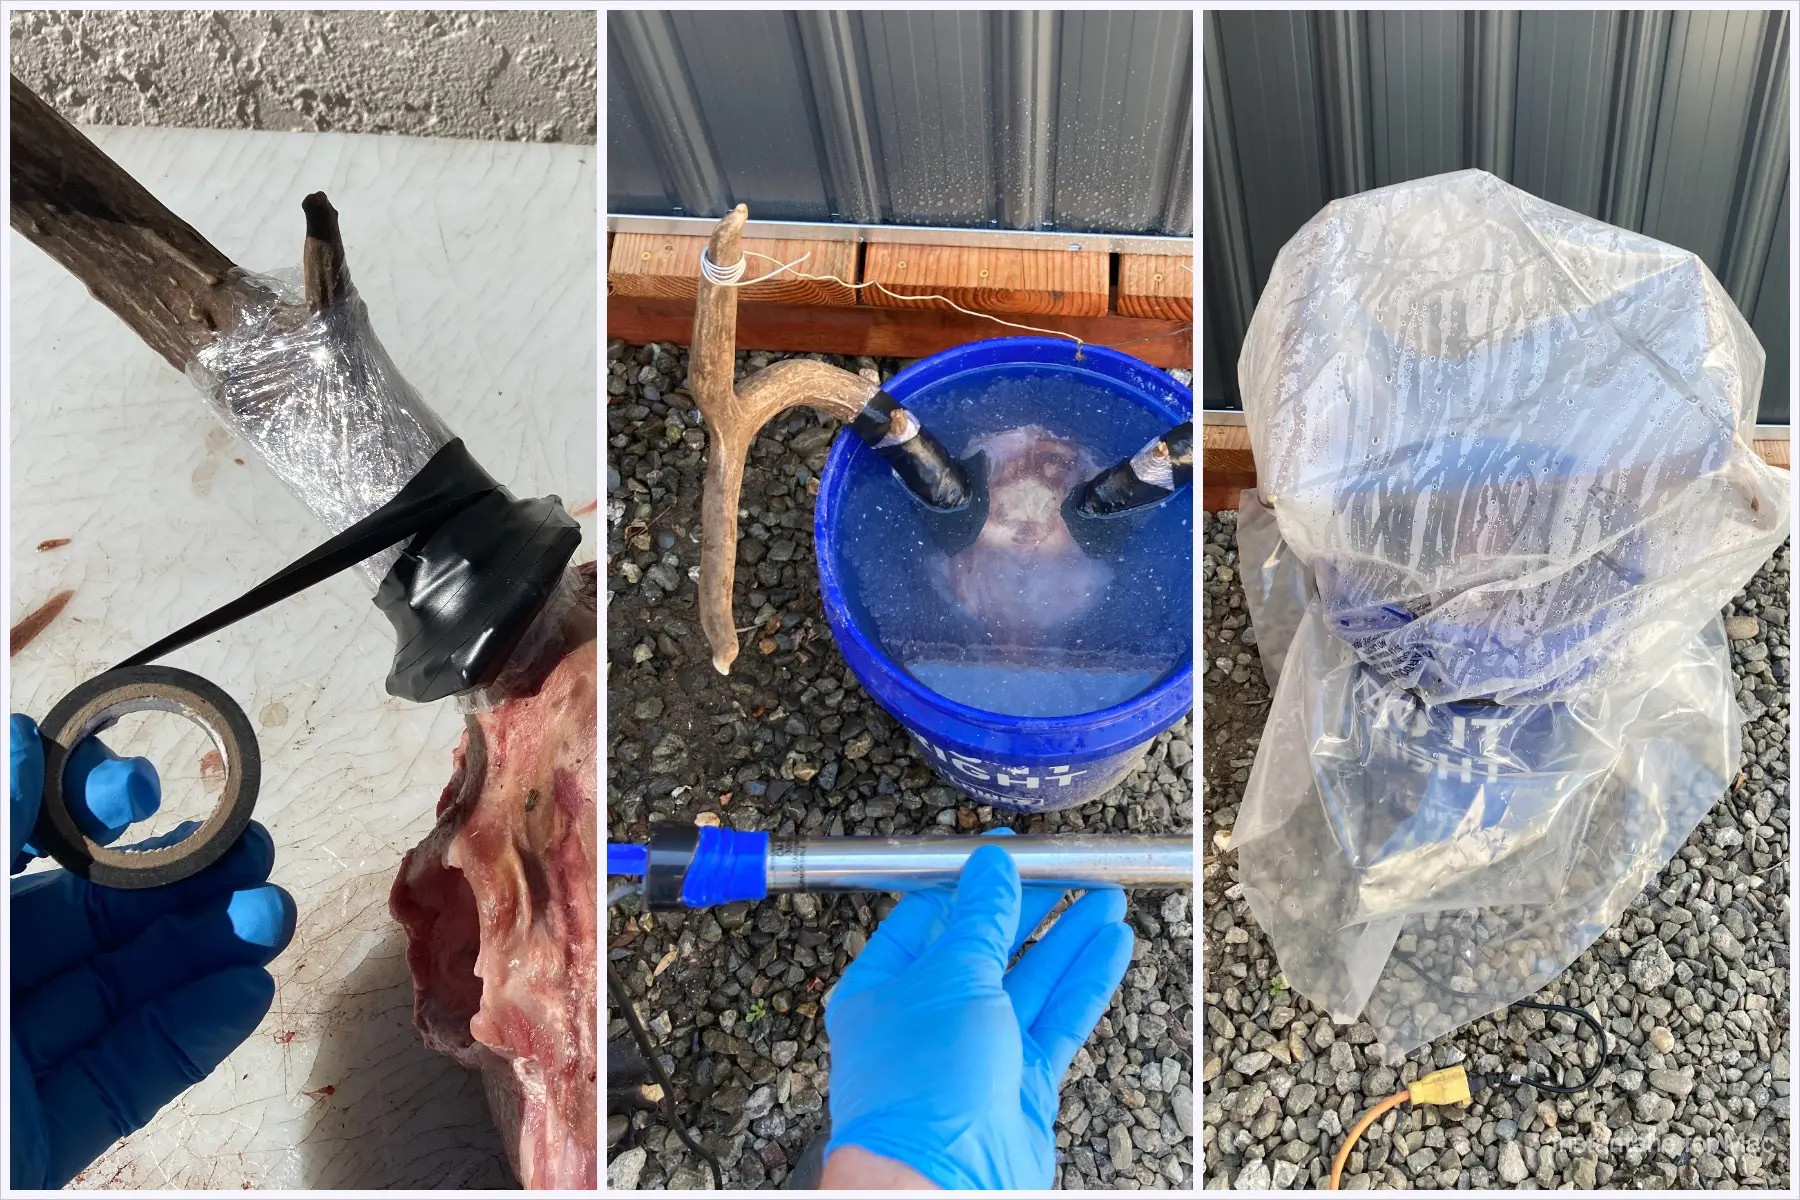
- Plastic wrap and electrical tape: These are essential for protecting antler bases. Wrap the antler bases near the skull with plastic wrap, extending about 6-8 inches up the antler. Then, tightly seal the plastic wrap with electrical tape to create a waterproof barrier. This prevents antler discoloration during maceration. Any minor color loss can be touched up later with wood stain.
Choose a location for maceration that is away from living areas due to the odor produced during the process, and inaccessible to animals. You will also need access to electricity for the tank heater. Place the skull in the container and fill it with water until the skull is fully submerged. For skulls with antlers, ensure the water level is about an inch above the antler bases. Submerge the fish tank heater and set it to 80°F, ensuring it remains fully immersed in water to prevent overheating. Cover the container with a lid to minimize evaporation and help contain the smell. If a lid isn’t available, a large plastic garbage bag secured with a bungee cord can serve as a substitute.
Plug in the heater and allow the maceration process to work. For a deer-sized skull, this typically takes 4-6 days. Monitor the water level every couple of days and replenish as needed to keep the skull submerged. After a few days, you’ll notice tissue decomposition and meat falling away from the bone. Once approximately 90% of the tissue has decomposed, it’s time to remove the skull.
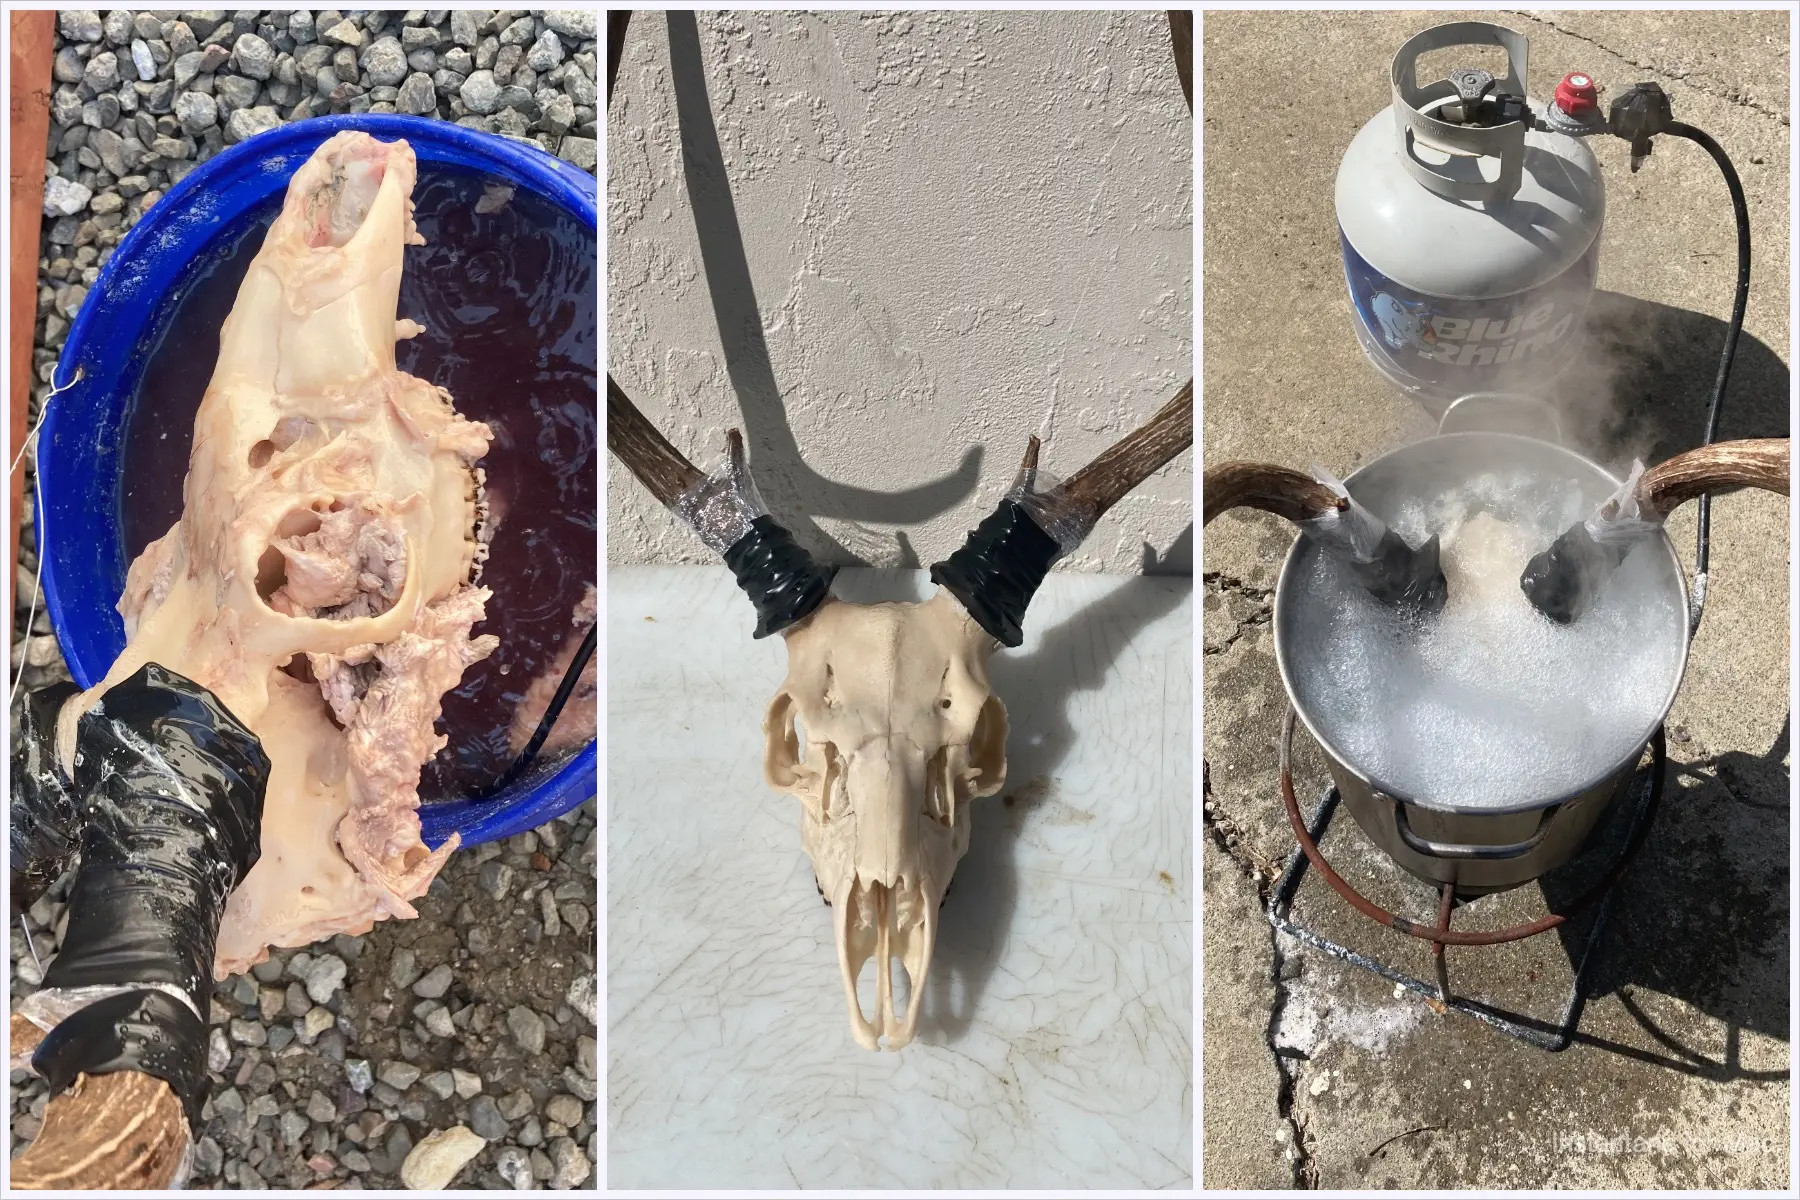
Carefully remove the skull from the maceration water and rinse it thoroughly. Be gentle, especially around the teeth, nasal passages, and sinus bones, as they will be softened and easily damaged at this stage. A garden hose provides a gentle rinse to remove the remaining tissue and debris.
 Deer skull macerating in water for euro mount cleaning.
5. Skull Whitening
After maceration, the skull is clean but likely has a natural bone color. Whitening is optional, but preferred by many to achieve the classic euro mount look.
For whitening, you’ll need an outdoor burner like a turkey fryer or high-output BBQ burner, and a pot large enough to submerge the skull in whitening solution.
Hydrogen peroxide and water are an effective whitening solution. Standard 3% hydrogen peroxide from a local store works well. Fill the pot about halfway with hydrogen peroxide, place the skull inside, and then add water until the skull is completely submerged. Ensure the antler bases remain protected by the plastic wrap and tape to prevent whitening of the antlers.
Remove the skull temporarily and bring the hydrogen peroxide solution to a rolling boil. Submerge the skull in the boiling solution for 5-10 minutes. It’s crucial to ensure the solution does not contact any exposed antler, as it will whiten any bone or antler it touches.
Periodically remove the skull between 5-10 minutes to check the whitening progress and ensure the solution isn’t deteriorating the bone. Remember that the skull will continue to whiten further as it dries, so don’t over-whiten it in the boiling solution. Repeat this process for any teeth or nasal bones that may have detached during maceration.
 Boiling deer skull in hydrogen peroxide solution for whitening euro mount.
6. Drying and Finishing Touches
Once the skull and any loose bones are whitened to your liking, it’s time for drying. While the bone is still wet, reposition any nasal bones and secure them with a rubber band. Nasal bones often separate during drying, so a rubber band around the snout helps keep everything aligned.
If possible, dry the skull in direct sunlight. If sunlight is unavailable, a space heater can be used. Place the skull in front of a space heater until it is completely dry and no bones feel loose.
At this stage, your skull should be exceptionally clean and white. After drying, glue any teeth or nasal bones that didn’t stay in place back using a fast-drying clear super glue.
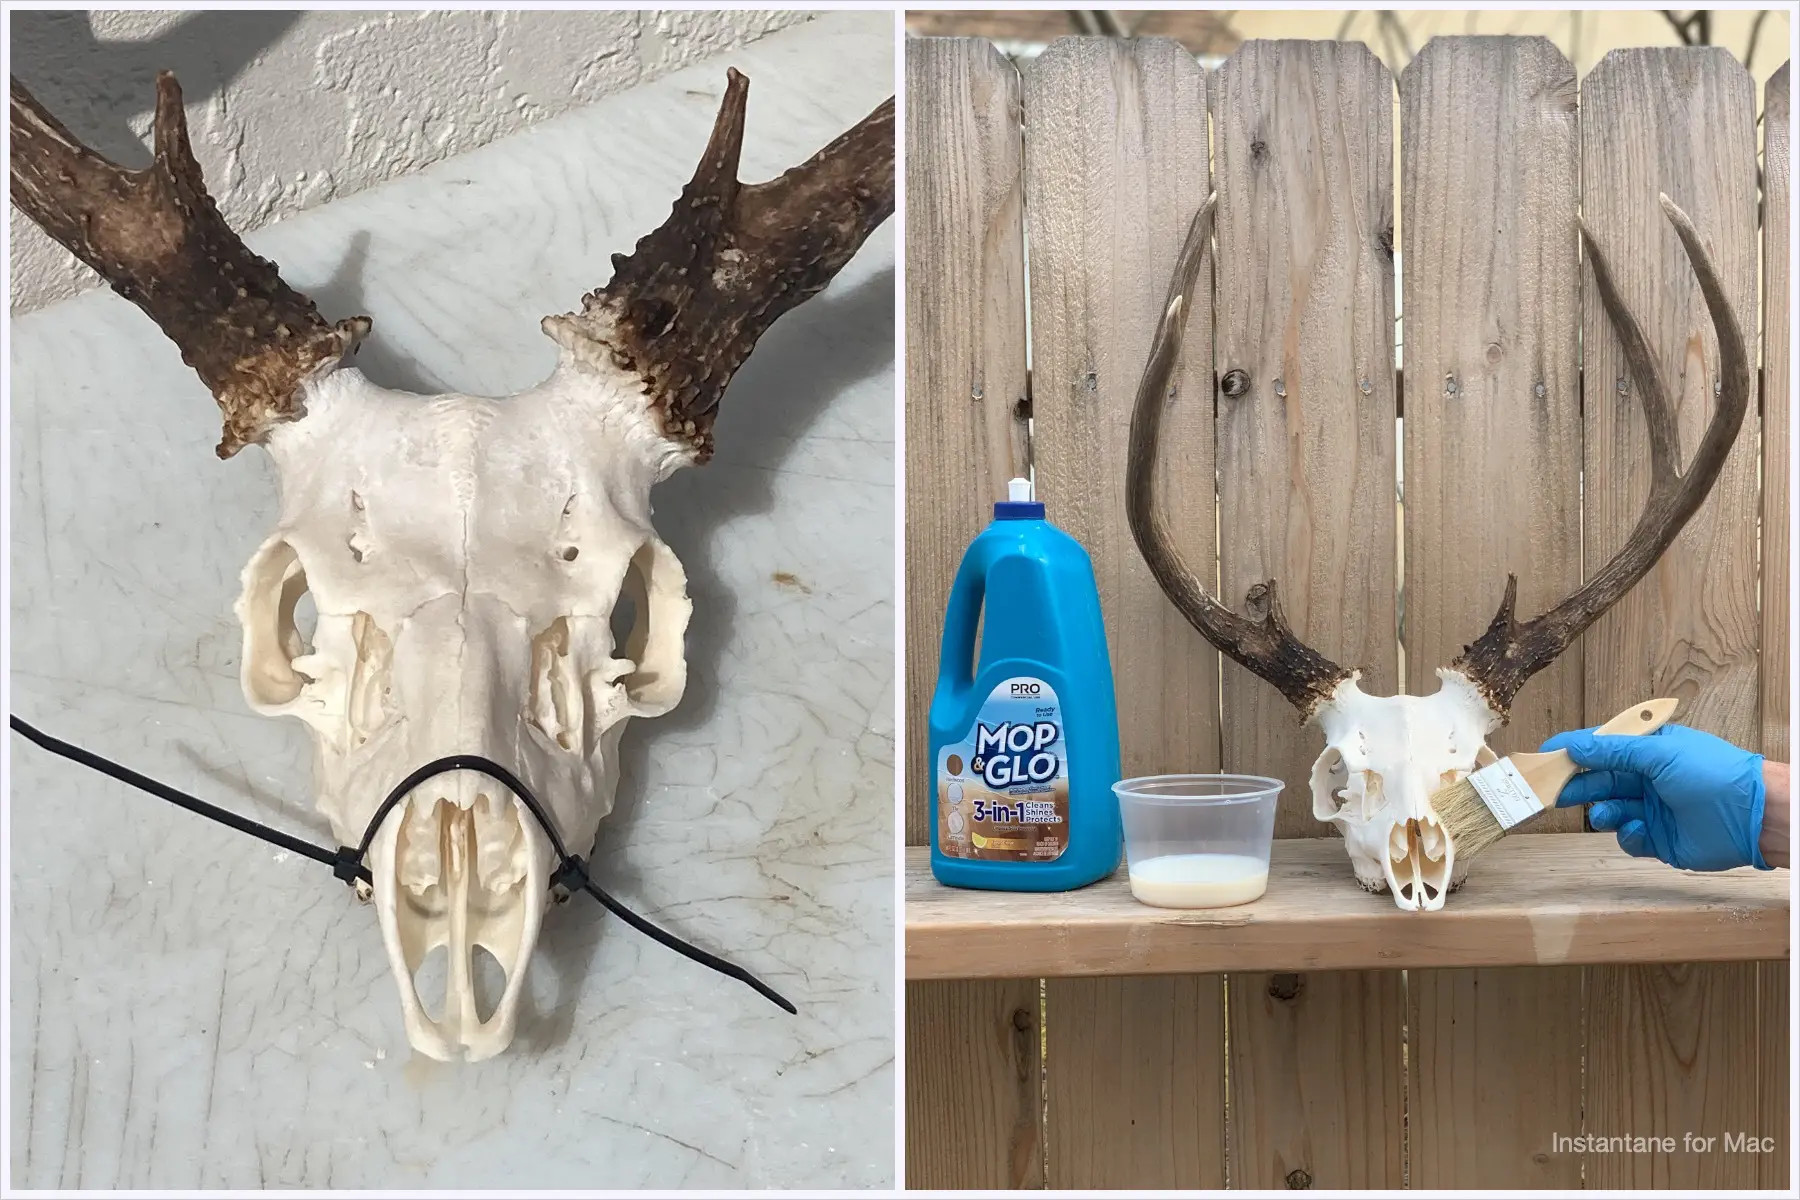
For the final touches, remove the plastic wrap and tape from the antler bases. If any antler color was inadvertently lightened during whitening, touch it up with a provincial wood stain, applying it lightly with a Q-tip in multiple coats until the desired color is achieved. For a final protective layer and subtle sheen, consider applying a thin coat of mop and glow to the skull. This also helps seal the bone, preventing dust and dirt accumulation.
Following these steps meticulously will result in a wall-worthy euro mount, a lasting tribute to your successful hunt.
 Drying whitened deer skull in sunlight for euro mount finishing.