Are you looking for a way to preserve your hunting trophy with a visually appealing and affordable method? Eurodripusa.net offers you an expert guide on How To Euro A Deer Skull, transforming it into a stunning display using proven European techniques. This method not only preserves your trophy but also adds a unique touch to your décor, with the added benefit of utilizing advanced drip irrigation systems for effective cleaning and minimal environmental impact, making the entire process sustainable.
1. What Is A European Mount And Why Choose It?
A European mount, also known as a “Euro mount,” is a method of displaying an animal’s skull, typically a deer, without the hide or skin attached. Instead, the skull is meticulously cleaned and whitened to showcase the natural bone structure. It is an increasingly popular alternative to traditional taxidermy.
1.1. Aesthetics And Cost-Effectiveness
European mounts offer a clean, modern aesthetic that fits well in various décor styles, from rustic to contemporary. Beyond aesthetics, European mounts are significantly more affordable than traditional taxidermy. The costs associated with tanning a hide, constructing a form, and paying a professional taxidermist can quickly add up. With a European mount, much of the work can be done yourself, saving considerable money.
1.2. Space-Saving And Versatility
Compared to traditional shoulder mounts, European mounts require less space. Their sleek, minimalist design allows them to fit easily on walls or shelves without overwhelming a room. Additionally, European mounts can be customized with various display options, such as wooden plaques or metal stands, to further enhance their visual appeal.
2. Planning Your Hunt And Trophy Care
The process of creating a quality European mount begins well before you even harvest an animal. Proper planning and initial care are essential to ensuring the best possible outcome.
2.1. Pre-Hunt Preparation
Before heading into the field, consider how you will handle the trophy if you are successful. Research local regulations regarding the transportation of carcasses and skulls. Gather necessary supplies such as knives, bone saws, and bags for transporting the skull. This proactive approach will save time and effort later.
2.2. Immediate Post-Harvest Care
Once you have harvested an animal, prompt action is crucial. Begin by taking detailed photographs and measurements for your records. Next, protect the skull from damage and contamination. Keep the skull cool and dry to prevent bacterial growth and insect infestation. If possible, begin the initial cleaning process in the field to reduce the workload later.
3. Initial Skull Preparation
The initial preparation of the skull is a critical step in creating a high-quality European mount. Proper preparation will streamline the cleaning process and ensure the best possible aesthetic outcome.
3.1. Head Removal
The first step is to remove the head from the carcass. Use a sharp knife or bone saw to sever the head at the atlas joint, where the skull connects to the first vertebra. This is the narrowest point and will minimize waste.
3.2. Skinning The Skull
Next, carefully skin the skull. Begin by making an incision along the back of the head and neck. Use your knife to separate the hide from the skull, working your way around the antlers (if present), eyes, and nose. Take extra care to avoid cutting or damaging the bone. A dull edge will prevent cuts, unwanted knife marks in the bone will be visible on your finished euro mount.
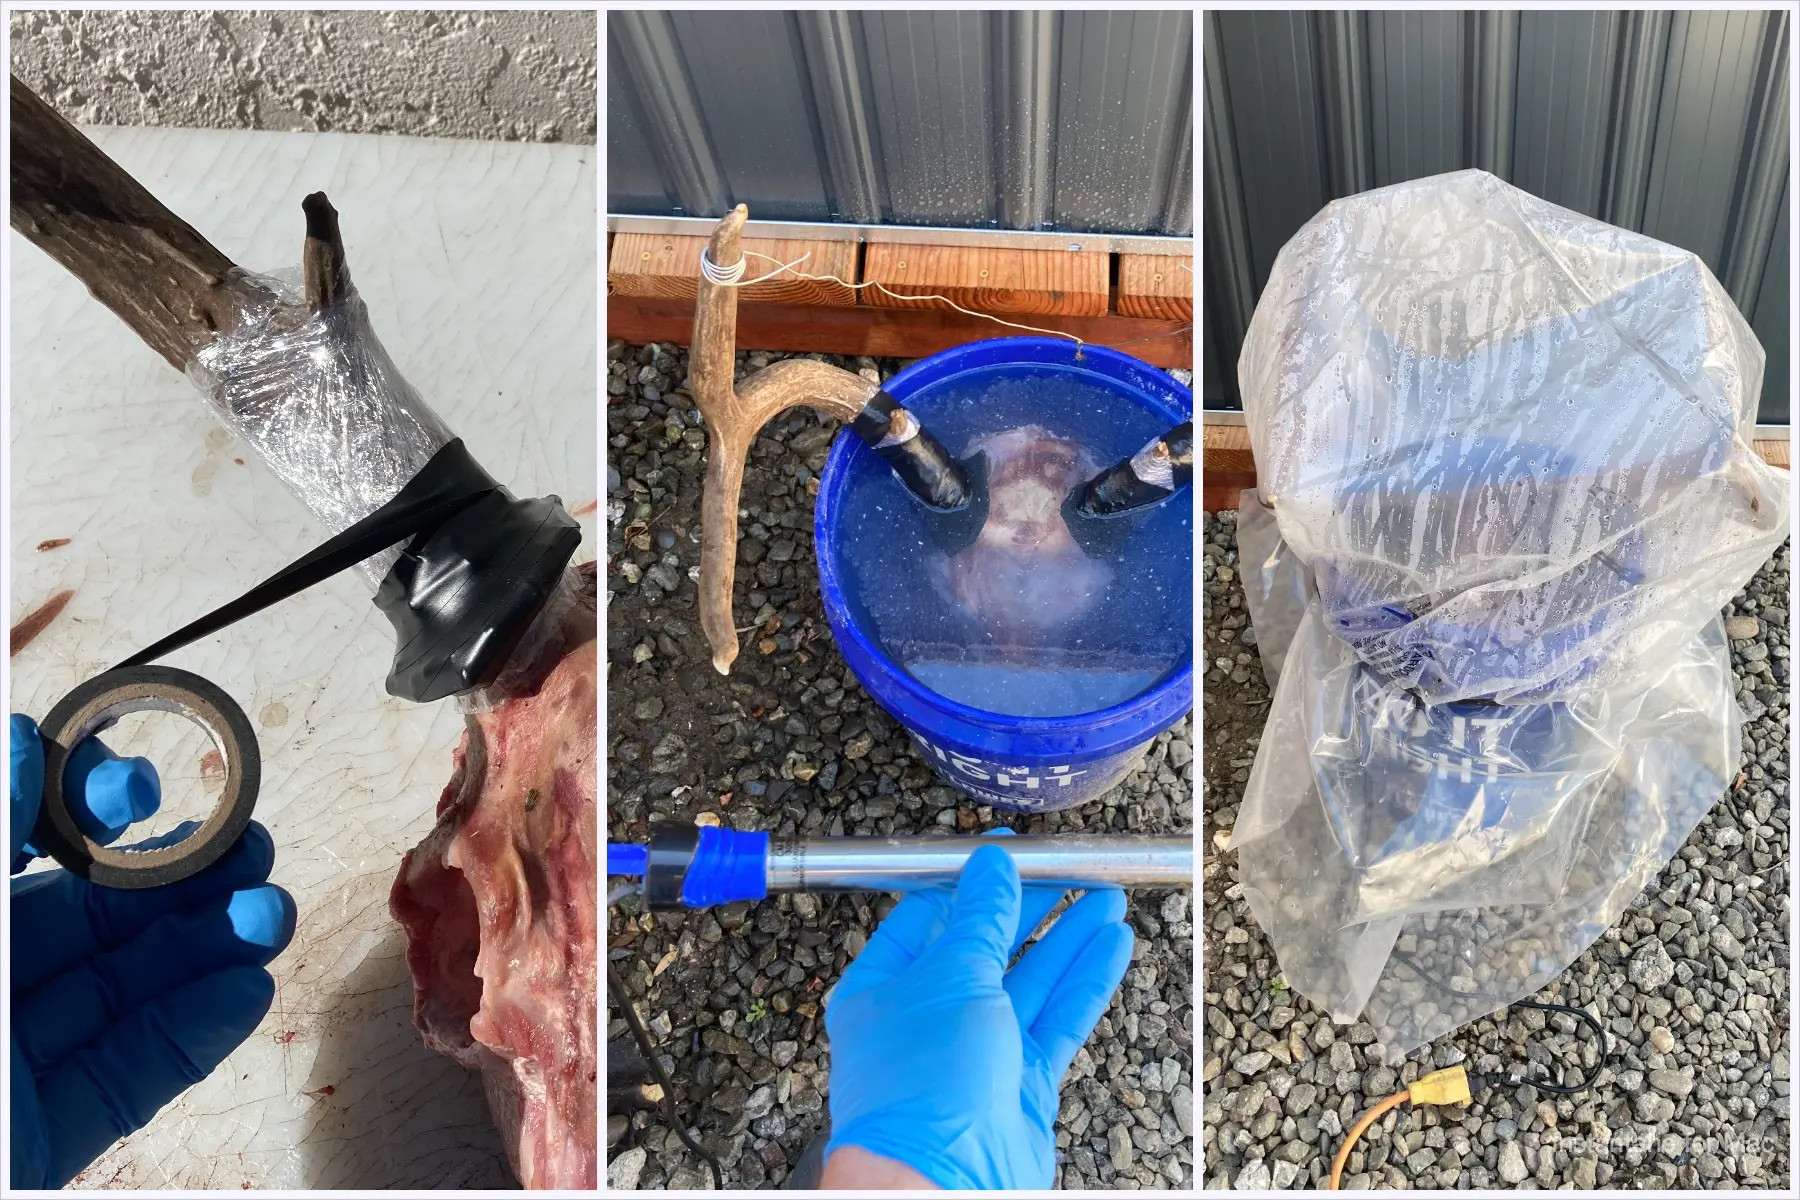
3.3. Removing Antlers Safely
If the skull has antlers, use a flathead screwdriver to gently pry the hide away from the antler bases. Avoid using a knife in this area, as it is easy to scratch or gouge the bone.
4. Detailed Cleaning Procedures
With the initial preparation complete, the next step is to thoroughly clean the skull. This involves removing all remaining tissue, meat, and other organic matter.
4.1. Removing The Lower Jaw
To remove the lower jaw, make two incisions along the outside of the jaw bone, freeing the muscle. Open the mouth and hyperextend the lower jaw until it detaches. Cut away any remaining muscle and connective tissue.
4.2. Eye Removal
Remove the eyes by making an incision around the circumference of the eyeball. Insert your knife into the back of the eye socket and cut any remaining connective tissue. The eye should then pull out with minimal resistance.
4.3. Brain Removal Techniques
The brain must be removed to prevent decay and odor. One effective method is to use a drill with a 5/8” flat spade wood bit. Insert the drill bit into the hole at the back of the skull and scramble the brains until they liquefy. Then, use a pressure washer or water hose to flush out the brain matter.
4.4. Trimming Excess Meat
Use your knife to remove as much meat and tissue from the outside of the skull as possible. The less meat remaining, the quicker the cleaning process will be.
5. The Maceration Process: A Detailed Guide
Maceration involves soaking the skull in water at a sustained temperature to promote bacterial growth, which breaks down the remaining tissue.
5.1. Required Supplies
Gather the following supplies:
- A watertight plastic container large enough to submerge the skull.
- A stainless steel fish tank heater that can be set to at least 80°F.
- Plastic wrap and electrical tape to protect antler bases.
5.2. Setting Up The Maceration Container
Choose a location for your maceration container that is away from animals and sensitive noses. Make sure you have access to electricity for the tank heater.
5.3. Temperature Control And Maintenance
Submerge the skull in water, ensuring it is completely covered. Set your fish tank heater to 80°F and submerge it in the container. Place a lid on the container to reduce evaporation and contain odors. Check the water level every two days and add water as needed.
5.4. Monitoring The Process
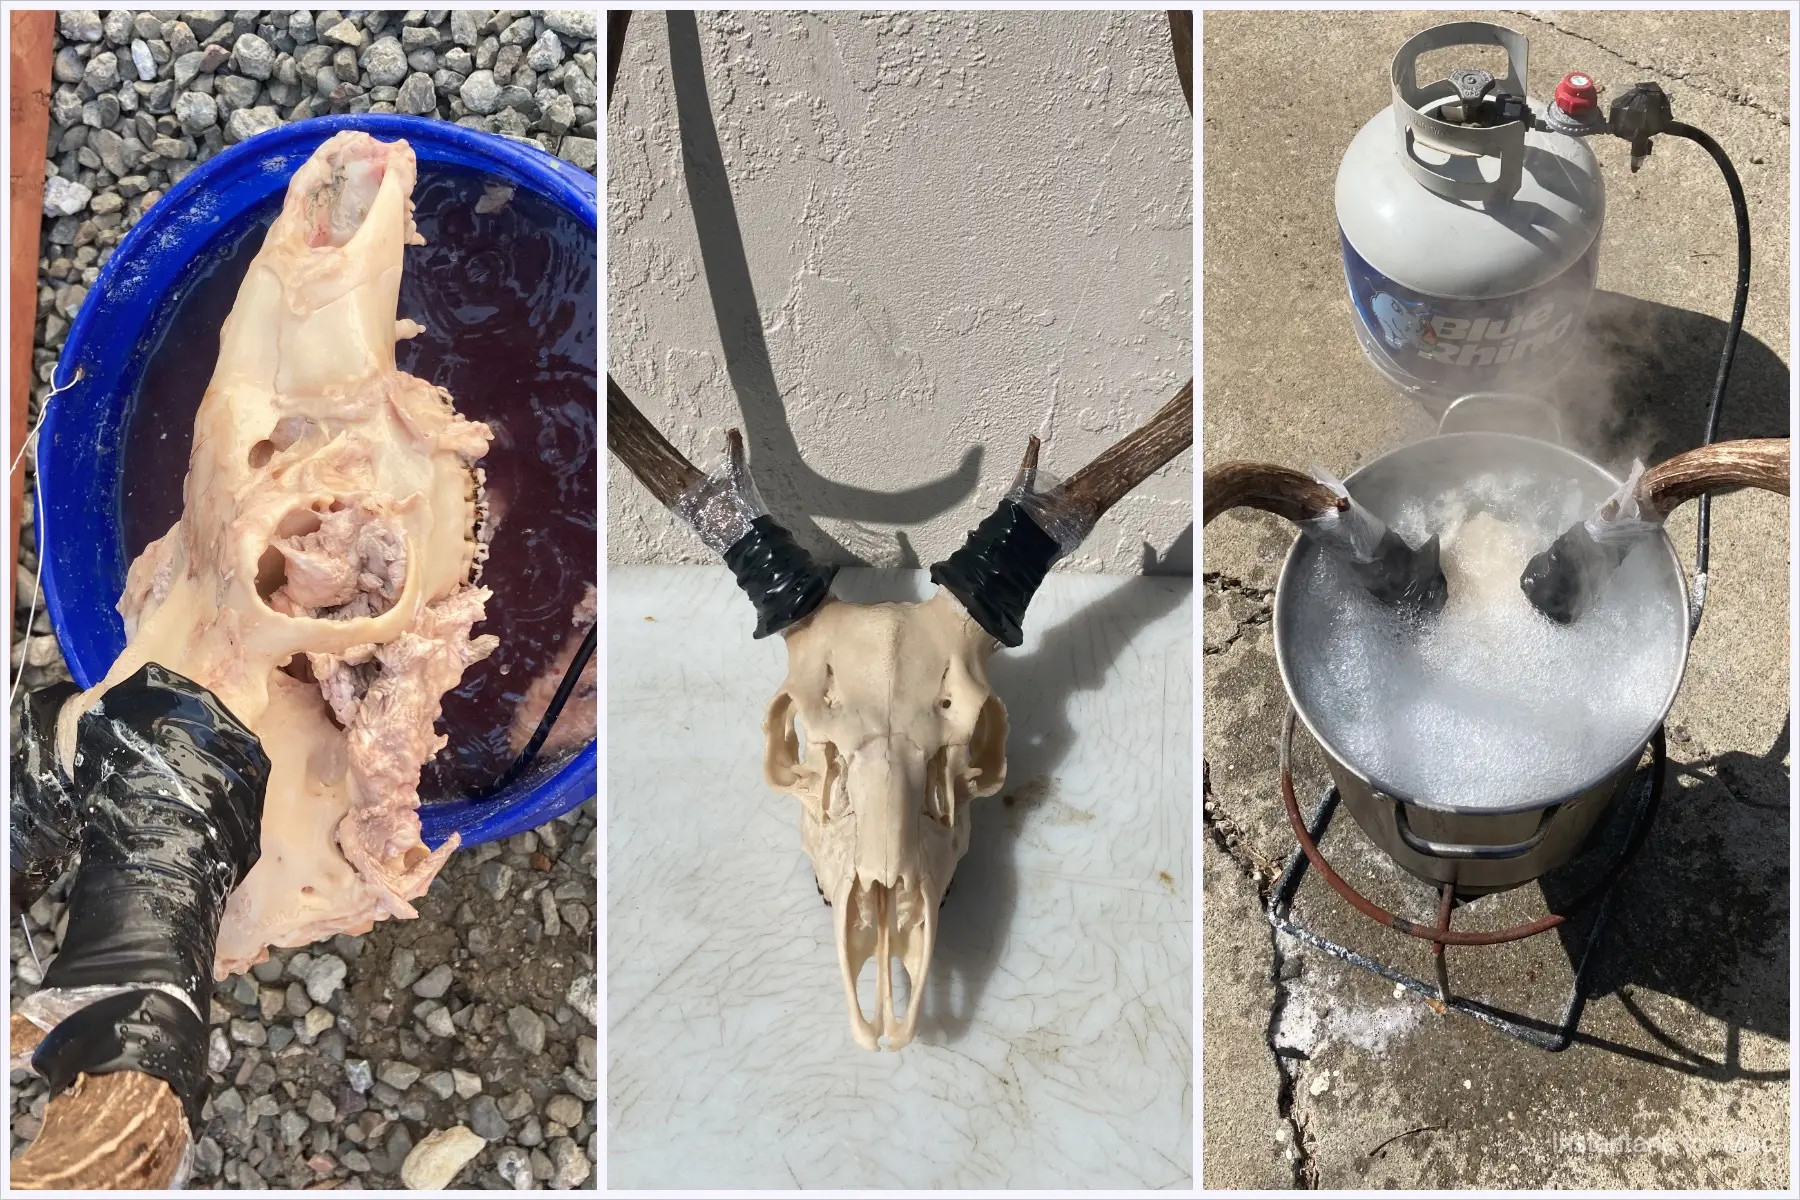
The maceration process typically takes four to six days for a deer-sized animal. You will notice the meat and connective tissue rotting and falling off the skull. Once about 90% of the tissue is gone, it’s time to remove the skull.
6. Alternative Cleaning Methods
While maceration is a popular method, there are several alternative approaches to cleaning skulls.
6.1. Boiling
Boiling involves simmering the skull in water until the tissue softens and can be removed. While quicker than maceration, boiling can damage delicate bones and cause shrinkage.
6.2. Dermestid Beetles
Dermestid beetles are small insects that feed on dried flesh and tissue. They can be used to efficiently clean skulls, but require careful management and containment.
6.3. Chemical Digestion
Chemical digestion involves using enzymes or other chemical solutions to dissolve tissue. This method is generally used by professionals due to the potential hazards involved.
7. Skull Whitening Techniques
Once the skull is thoroughly cleaned, the next step is whitening. This process removes any remaining stains and discoloration, resulting in a clean, white bone appearance.
7.1. Hydrogen Peroxide Method
The hydrogen peroxide method is a popular and effective way to whiten skulls. You will need:
- 3% hydrogen peroxide
- An outdoor burner
- A pot large enough to submerge the skull
- Water
7.2. Preparing The Whitening Solution
Fill your pot 50% full with hydrogen peroxide, then add water until the skull is completely covered. Make sure the antlers are still protected with tape and plastic.
7.3. Boiling The Skull In Solution
Bring the solution to a rolling boil and submerge the skull for 5-10 minutes. Periodically check the skull to ensure the solution is not deteriorating the bone.
7.4. Safety Precautions
Always wear gloves and eye protection when working with hydrogen peroxide. Work in a well-ventilated area to avoid inhaling fumes.
8. Drying And Finishing Touches
After whitening, the skull needs to be dried and any loose pieces secured.
8.1. Drying Process
Place the skull in direct sunlight or in front of a space heater until it is completely dry. Use rubber bands to hold any loose nasal bones in place during the drying process.
8.2. Reattaching Loose Pieces
Once the skull is dry, use super glue to reattach any teeth or nasal bones that may have come loose.
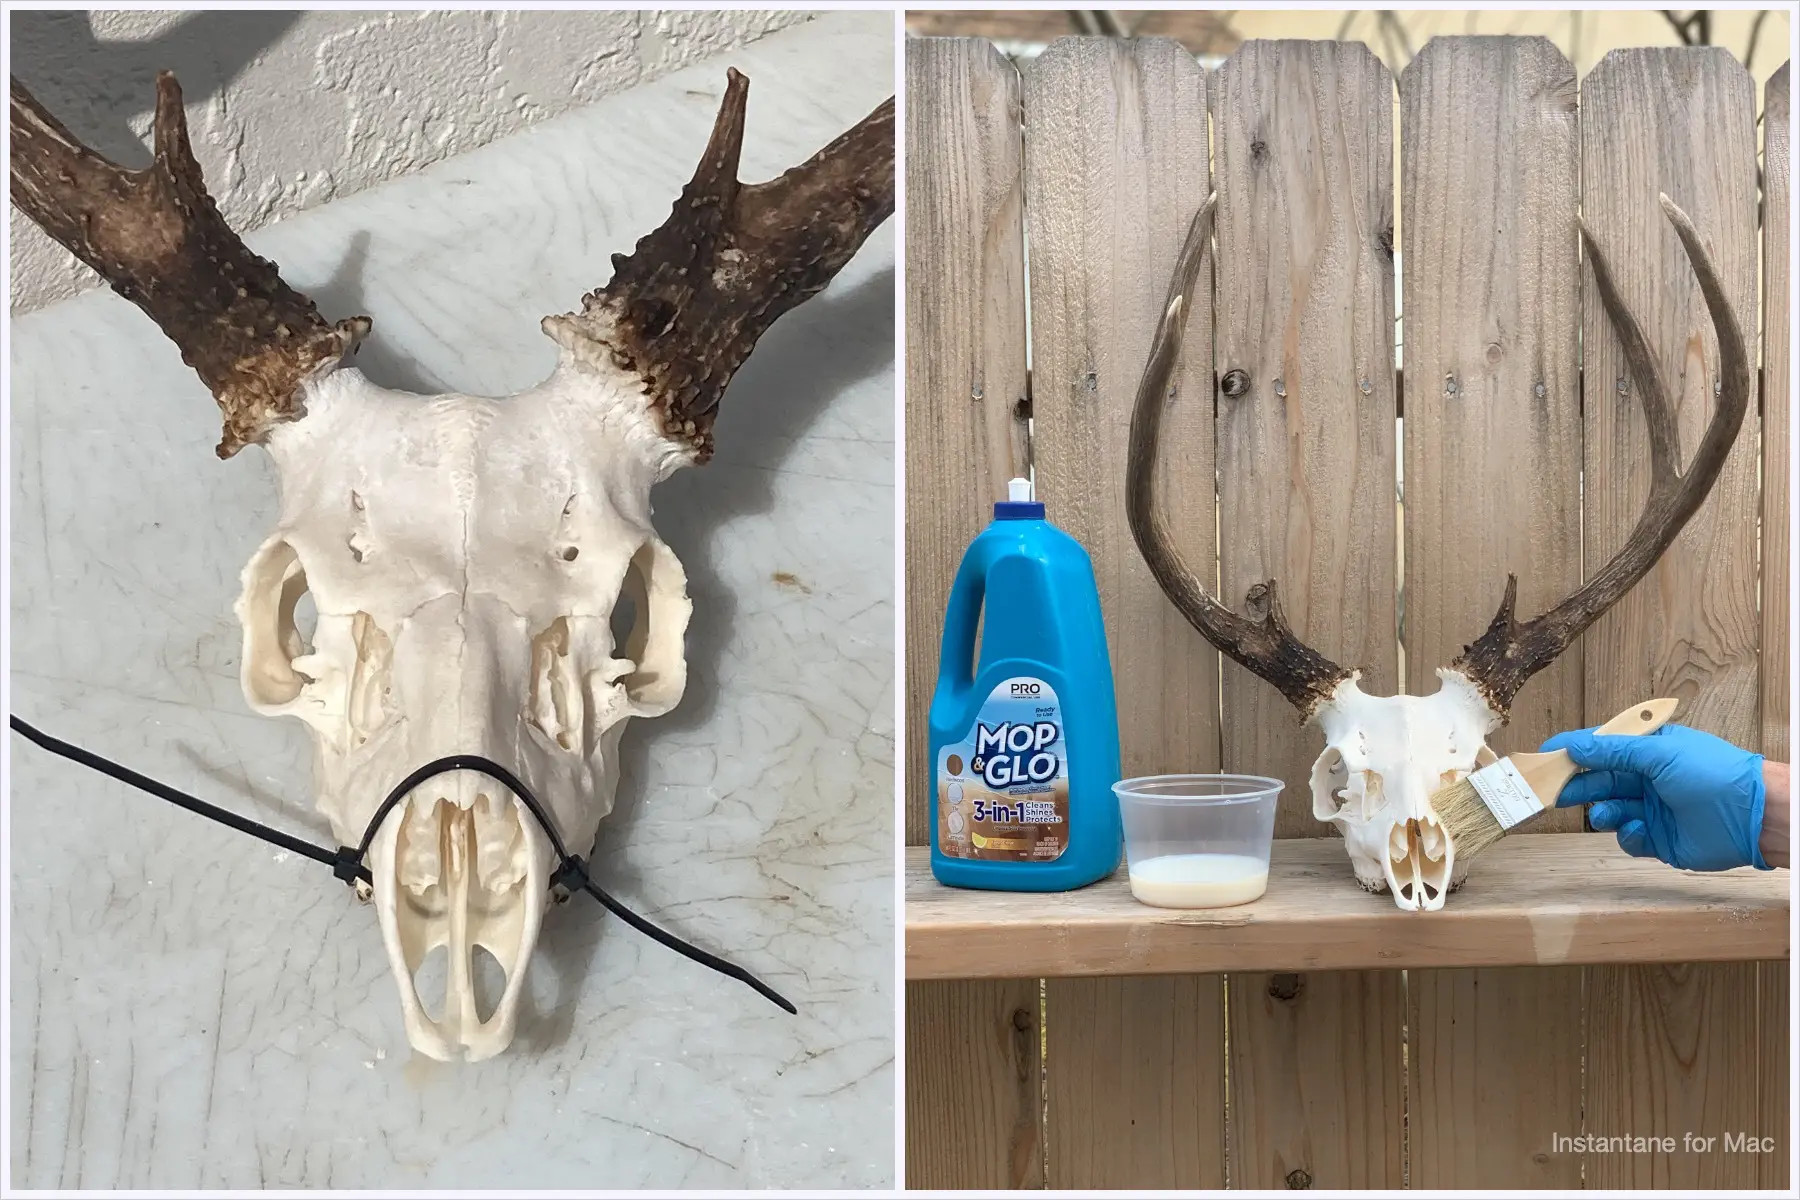
8.3. Antler Care
Remove the plastic and tape from the antler bases. If any of the horn was whitened during the process, touch them up with Minwax provincial wood stain.
8.4. Final Coating
For a final touch, consider coating the skull with a thin layer of Mop & Glo. This will give the skull a pleasant smell and seal the bone to prevent dust and dirt from settling in the porous bone.
9. Display Options And Creative Ideas
Once your European mount is complete, the final step is to display it proudly. There are numerous ways to showcase your trophy, depending on your personal style and décor preferences.
9.1. Wall Mounting
Wall mounting is a popular option for displaying European mounts. You can purchase pre-made mounting kits or create your own custom mount using wood or metal.
9.2. Tabletop Displays
If you prefer a tabletop display, consider using a decorative stand or base. This allows you to showcase your European mount on a desk, shelf, or mantel.
9.3. Customization Ideas
Get creative with your display by adding unique touches such as:
- Engraved plaques with the date and location of the hunt.
- LED lighting to highlight the skull’s features.
- Camouflage netting or other hunting-themed accents.
10. Common Mistakes To Avoid
While creating a European mount can be a rewarding DIY project, there are several common mistakes to avoid:
10.1. Over-Boiling
Boiling the skull for too long can damage the bone and cause it to become brittle.
10.2. Using Bleach
Avoid using bleach to whiten the skull, as it can weaken the bone structure and cause it to yellow over time.
10.3. Neglecting Safety
Always wear appropriate safety gear when handling chemicals or power tools.
11. Troubleshooting Common Issues
Despite your best efforts, you may encounter some challenges during the European mount process. Here are some common issues and how to resolve them:
11.1. Lingering Odor
If your skull still has a lingering odor after cleaning, try soaking it in a solution of water and baking soda.
11.2. Yellowing
If your skull starts to yellow over time, re-whiten it using the hydrogen peroxide method.
11.3. Bone Damage
If you accidentally damage the bone, use epoxy or super glue to repair it.
12. Ethical Considerations
As hunters, it is important to approach trophy care with ethical considerations in mind.
12.1. Respect For The Animal
Always treat the animal with respect and reverence.
12.2. Fair Chase Principles
Ensure that your hunt adheres to fair chase principles and ethical hunting practices.
12.3. Legal Compliance
Comply with all local and federal laws regarding hunting and wildlife management.
13. The Science Behind Maceration
Maceration is a fascinating process that relies on the power of bacteria to break down organic matter. Understanding the science behind maceration can help you optimize the process and achieve better results.
13.1. Microbial Activity
Maceration works by creating an environment that is conducive to the growth of bacteria. These microorganisms produce enzymes that break down proteins, fats, and other organic compounds in the tissue.
13.2. Temperature Dependence
The rate of maceration is highly dependent on temperature. Bacteria thrive in warm conditions, with an optimal temperature range of 80-90°F (26-32°C). Maintaining this temperature range will accelerate the maceration process.
13.3. Water Quality
The quality of the water used for maceration can also affect the process. Clean, non-chlorinated water is ideal, as chlorine can inhibit bacterial growth.
14. The Art Of Skull Art
Beyond simply cleaning and whitening the skull, many hunters and artists are now incorporating creative elements into their European mounts.
14.1. Painting And Embellishments
Some artists choose to paint the skull with intricate designs or camouflage patterns. Others add embellishments such as beads, feathers, or metal accents.
14.2. Incorporating Natural Elements
Natural elements such as wood, antlers, or plants can be incorporated into the display to create a unique and visually appealing piece.
14.3. Commissioning A Professional
If you lack the skills or time to create your own skull art, consider commissioning a professional artist to create a custom piece for you.
15. Legal And Regulatory Aspects
Before embarking on your European mount project, it is important to understand the legal and regulatory aspects.
15.1. State And Federal Laws
Check with your state fish and wildlife agency to ensure that you are complying with all applicable laws and regulations regarding the possession and transportation of animal skulls.
15.2. Lacey Act
Be aware of the Lacey Act, which prohibits the interstate transportation of illegally taken wildlife.
15.3. International Regulations
If you plan to transport your European mount across international borders, be sure to comply with all relevant international regulations.
16. Maintaining Your European Mount
Once your European mount is complete, proper maintenance is essential to keeping it looking its best.
16.1. Cleaning And Dusting
Regularly clean and dust your European mount to prevent the buildup of dirt and grime.
16.2. Pest Control
Inspect your European mount regularly for signs of pests such as insects or rodents.
16.3. Storage
If you need to store your European mount, keep it in a cool, dry place away from direct sunlight.
17. The Benefits Of Drip Irrigation In Skull Cleaning
Innovative solutions can significantly improve the skull cleaning process. Drip irrigation systems from eurodripusa.net offer precise water control, reducing water waste and ensuring thorough cleaning.
17.1. Targeted Cleaning
Drip irrigation allows for targeted water delivery, ensuring every part of the skull is cleaned effectively.
17.2. Water Conservation
Compared to traditional methods, drip irrigation conserves water, making the skull cleaning process more environmentally friendly.
17.3. Preventing Damage
The gentle flow of water from drip irrigation prevents damage to delicate bone structures, preserving the integrity of the skull.
18. Real-Life Examples And Case Studies
Examining real-life examples can provide valuable insights into the European mount process.
18.1. Successful Projects
Share examples of successful European mount projects, highlighting the techniques and strategies used.
18.2. Lessons Learned
Discuss common challenges and how they were overcome, providing valuable lessons for others to learn from.
18.3. Before And After Photos
Showcase before-and-after photos to illustrate the dramatic transformation that can be achieved through the European mount process.
19. Partnering With Eurodripusa.Net
Eurodripusa.net is your go-to source for all things related to efficient and sustainable watering solutions. We offer a range of products that can assist you in preparing the perfect European mount.
19.1. Product Integration
Highlight specific Eurodripusa.net products that can be used in the European mount process, such as drip irrigation systems for skull cleaning.
19.2. Educational Resources
Provide links to additional resources and educational materials on the Eurodripusa.net website.
19.3. Community Engagement
Encourage readers to share their own European mount projects and experiences on the Eurodripusa.net website and social media channels.
20. Conclusion: Preserving Memories
Creating a European mount is more than just a taxidermy project; it’s a way to honor the animal and preserve your hunting memories for years to come. With careful planning, meticulous execution, and a touch of creativity, you can create a stunning tribute to your hunting success. Whether you are a seasoned hunter or a newcomer to the sport, the European mount process offers a rewarding and meaningful way to connect with nature and celebrate the hunting tradition.
By embracing sustainable practices and innovative solutions, such as those offered by eurodripusa.net, you can ensure that your passion for hunting aligns with your commitment to environmental stewardship. From utilizing drip irrigation systems for efficient skull cleaning to sourcing eco-friendly materials for display, every step of the European mount process can be an opportunity to make a positive impact. So, embark on your European mount journey with confidence, knowing that you are not only preserving a trophy but also contributing to a more sustainable future for hunting and conservation.
5 Search Intentions
- DIY European Mount Guide: Users seek detailed instructions for creating a European mount themselves.
- European Mount Taxidermy Cost: Users want to know the cost comparison between European mounts and traditional taxidermy.
- Best Way to Clean Deer Skull for European Mount: Users look for the most effective methods to clean a deer skull for a European mount.
- European Mount Display Ideas: Users seek creative ways to display their completed European mounts.
- Ethical Considerations for European Mounts: Users are interested in the ethical aspects of preparing and displaying animal skulls.
FAQ: How To Euro A Deer Skull
1. What is a European mount?
A European mount is a method of displaying an animal’s skull, typically a deer, after it has been cleaned and whitened, without any hide or skin attached. It is an aesthetic alternative to traditional taxidermy, showcasing the skull’s natural bone structure.
2. Why should I choose a European mount over traditional taxidermy?
Choosing a European mount offers several advantages, including lower cost, less space requirement, and a clean, modern aesthetic that fits well with various decor styles.
3. What are the basic steps involved in creating a European mount?
The basic steps include removing the head, skinning the skull, removing the lower jaw and eyes, removing the brain, macerating or boiling the skull to clean it, whitening the skull, drying it, and finally, displaying the finished mount.
4. How do I remove the head and skin the skull properly?
To remove the head, sever it at the atlas joint. Skin the skull carefully by making an incision along the back of the head and separating the hide from the skull, avoiding any cuts to the bone.
5. What is the maceration process, and how is it done?
Maceration is the process of soaking the skull in water at a sustained temperature (80-90°F) to promote bacterial growth, which breaks down remaining tissues. It requires a watertight container, a fish tank heater, and regular monitoring of water levels and temperature.
6. Can you explain the skull whitening process using hydrogen peroxide?
To whiten the skull, submerge it in a solution of 3% hydrogen peroxide and water, heat the solution, and let the skull simmer for 5-10 minutes, checking periodically to avoid bone damage.
7. What are some common mistakes to avoid when creating a European mount?
Common mistakes include over-boiling the skull, using bleach for whitening, and neglecting safety precautions when handling chemicals and tools.
8. How can I ensure my European mount is ethically and legally compliant?
Ensure ethical compliance by treating the animal with respect, adhering to fair chase principles, and complying with all local, federal, and international laws regarding hunting and wildlife management.
9. What innovative solutions can Eurodripusa.net offer to aid in the skull cleaning process?
Eurodripusa.net offers drip irrigation systems that provide targeted cleaning, conserve water, and prevent damage to delicate bone structures during the skull cleaning process. Contact us at Address: 1 Shields Ave, Davis, CA 95616, United States. Phone: +1 (530) 752-1011. Website: eurodripusa.net for more information.
10. How do I display and maintain my finished European mount to ensure its longevity?
Display options include wall mounting or tabletop displays. Maintain it by regularly cleaning and dusting, inspecting for pests, and storing it in a cool, dry place away from direct sunlight.
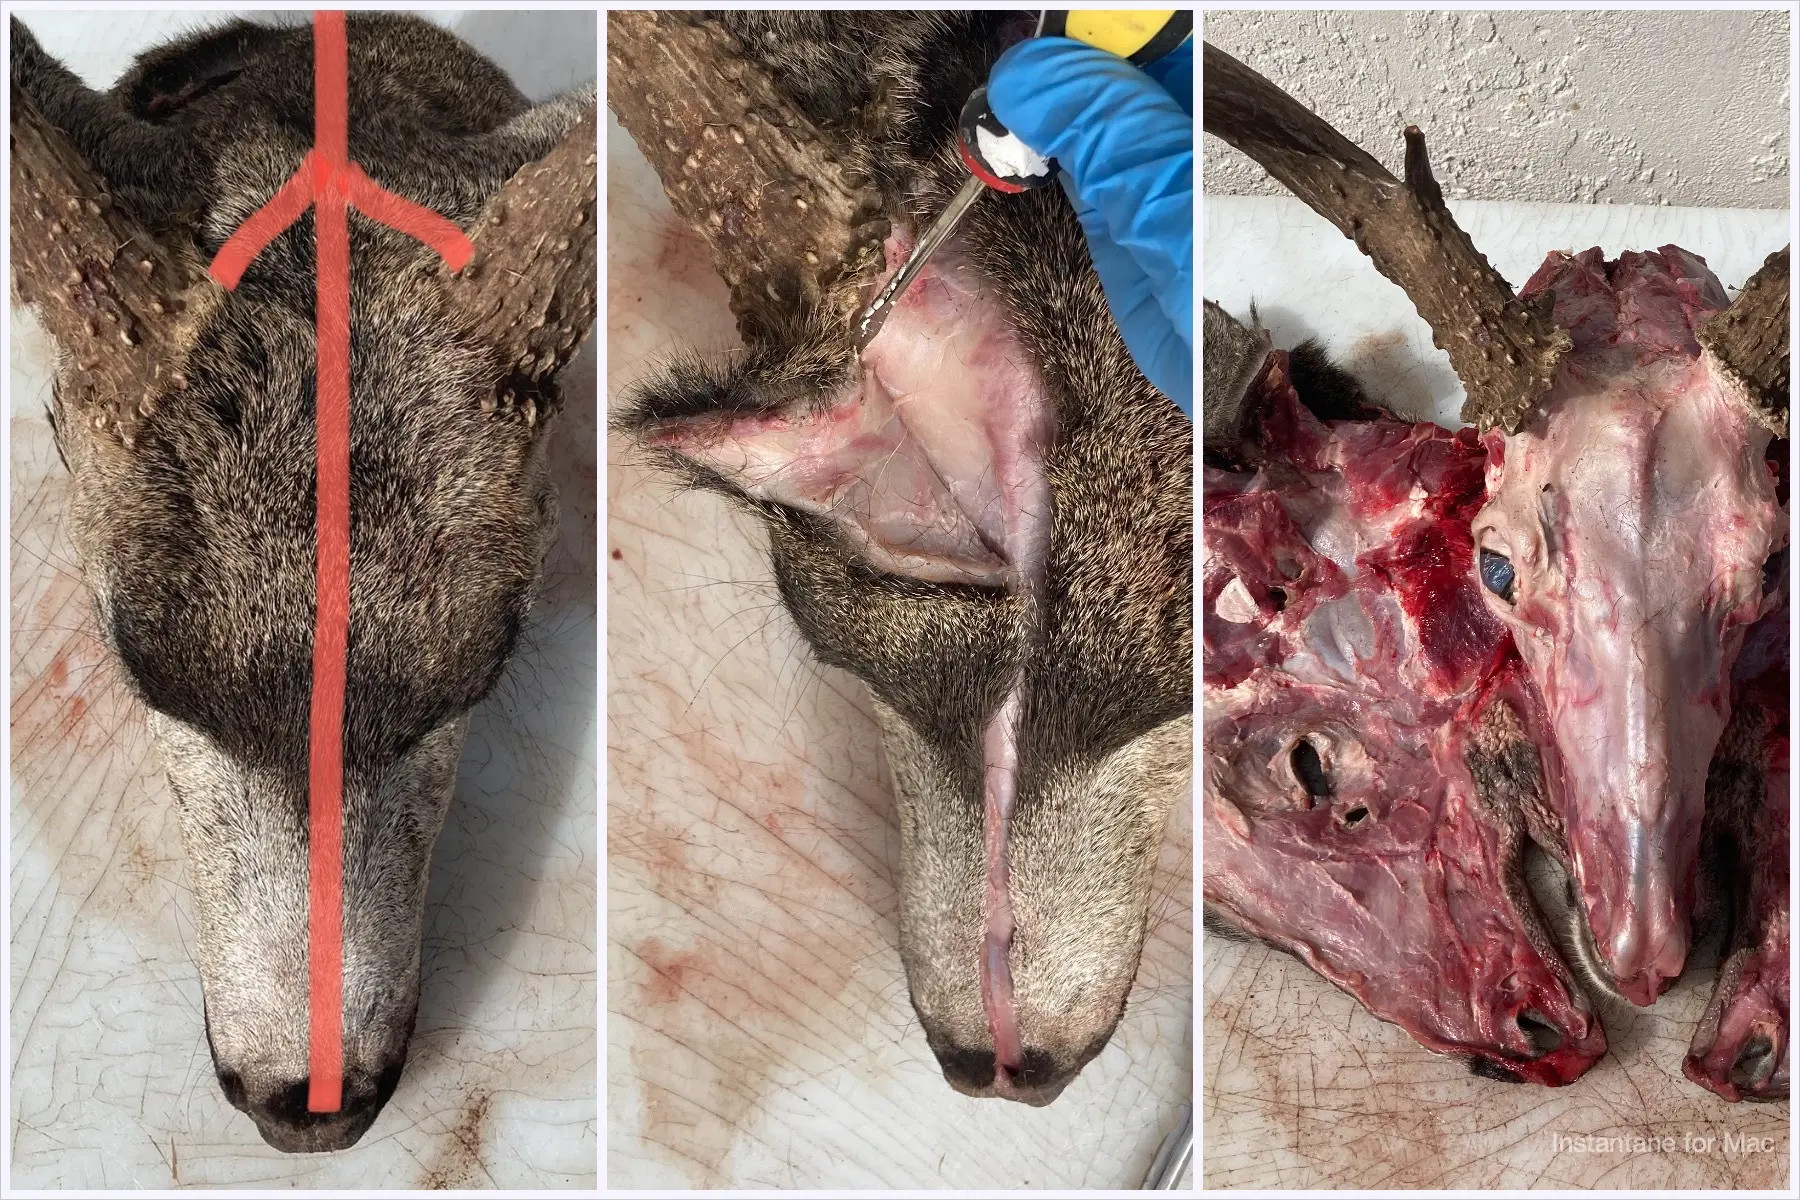 Deer skull head removal with knife
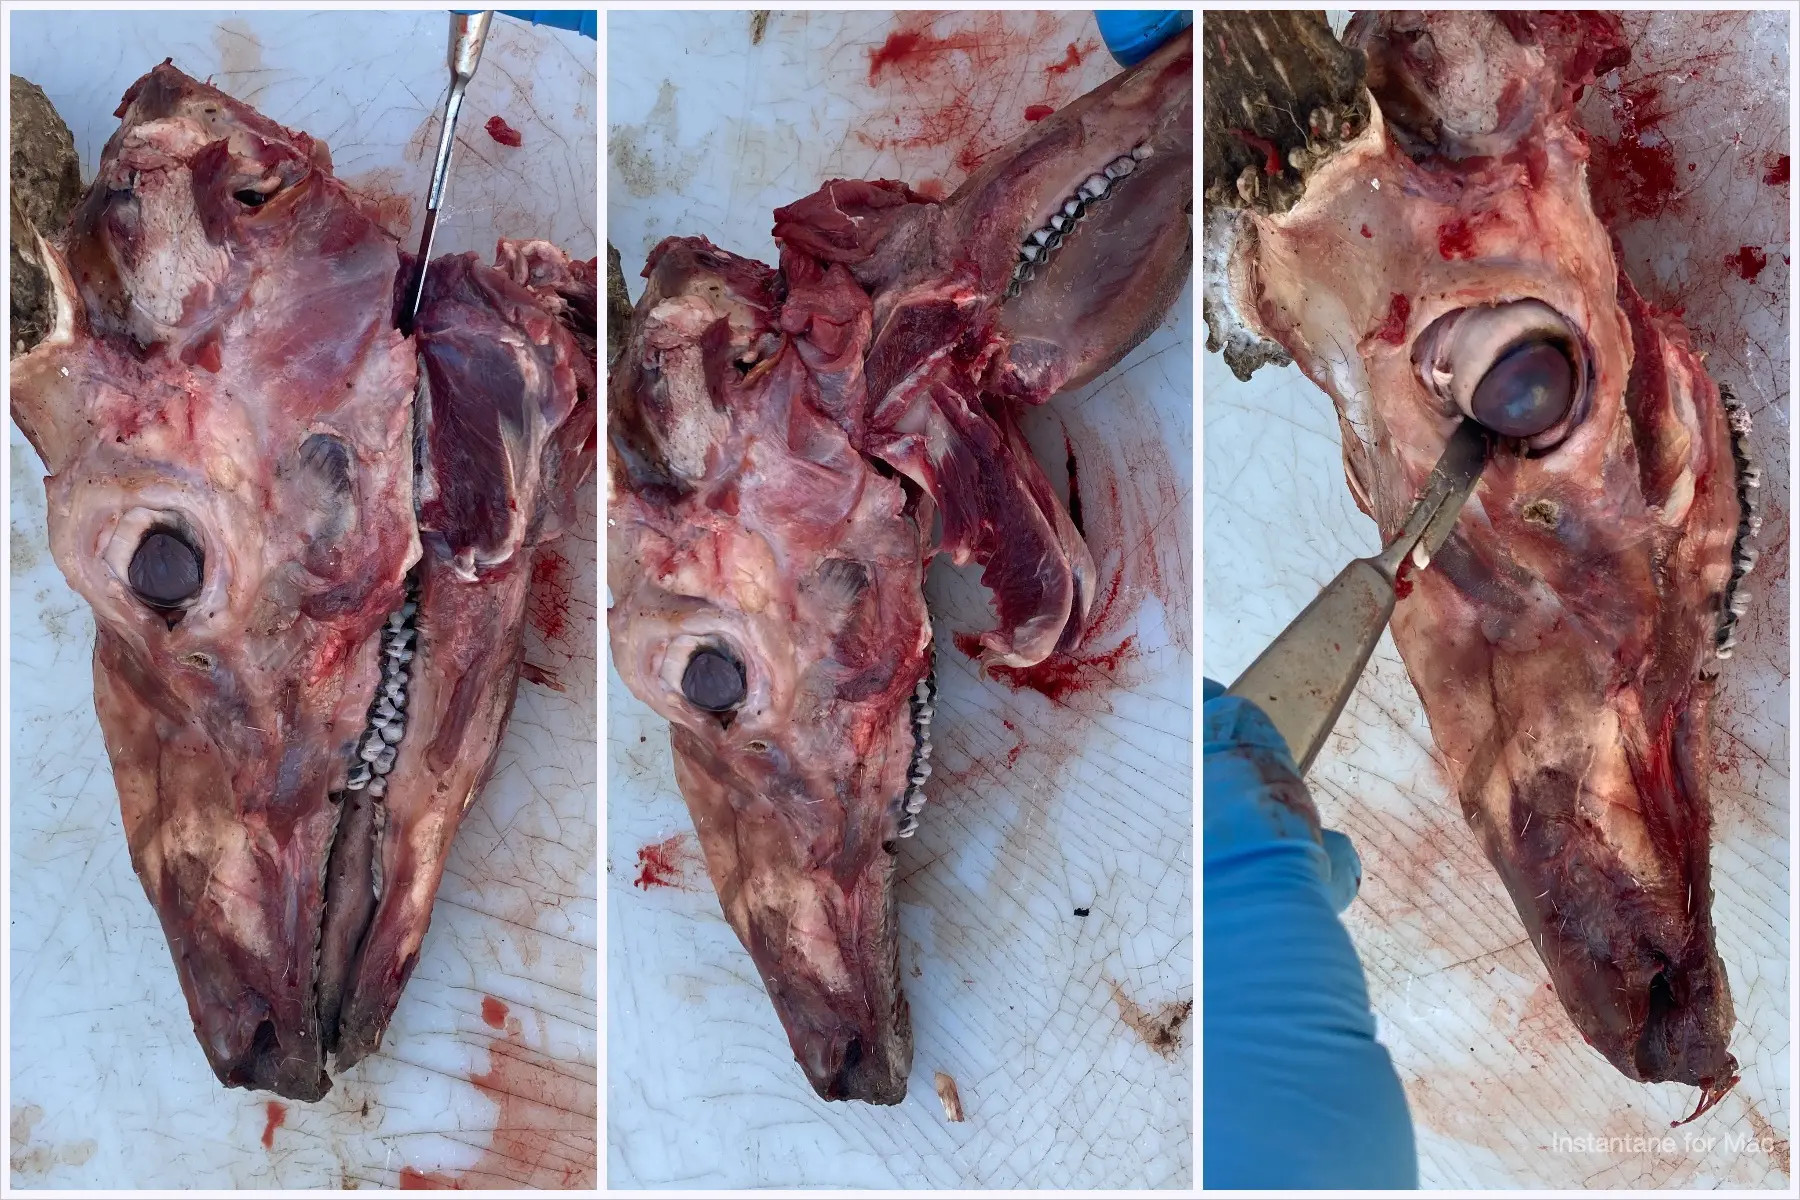 Removing deer skull lower jaw
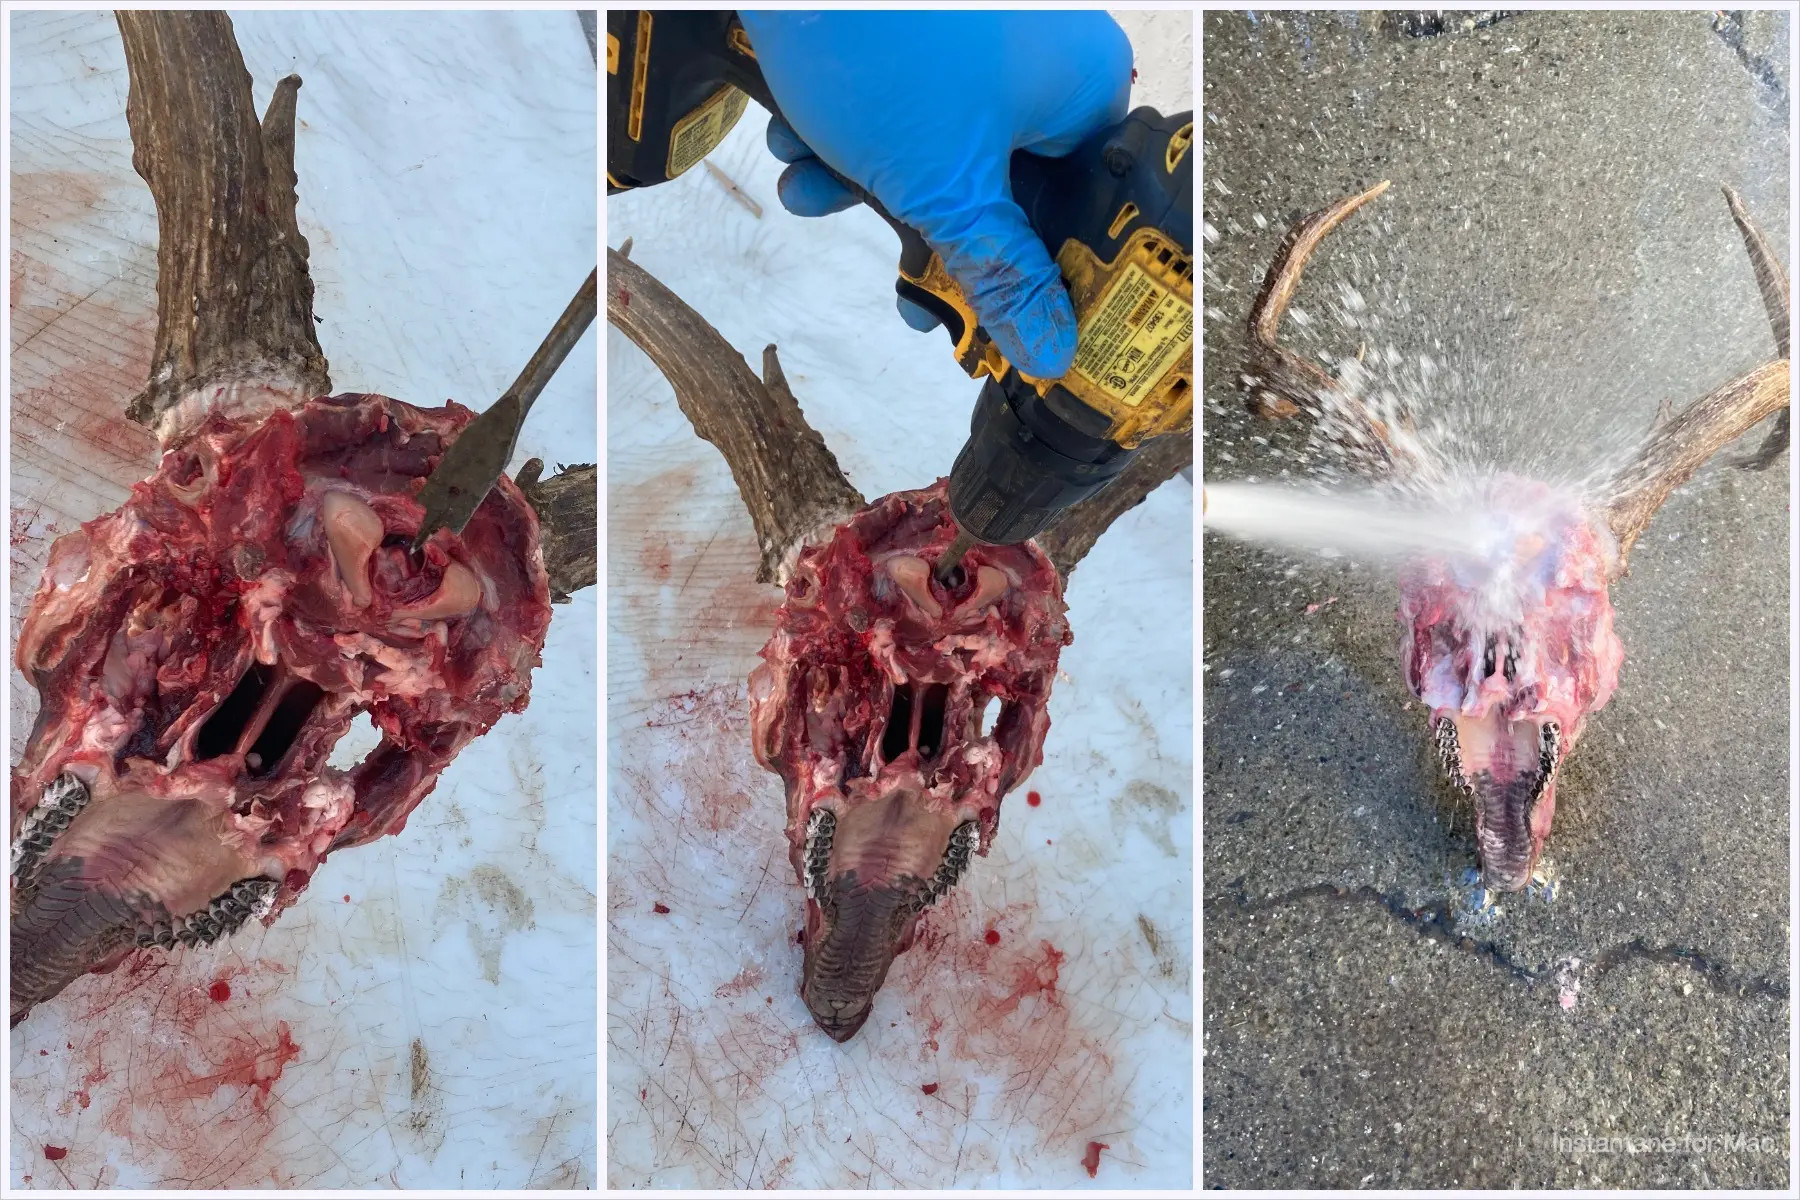 Drilling deer skull for brain removal
 Deer skull maceration process in bucket
 Deer skull whitening process in pot
 Final stages of drying euro deer skull