
Making a European deer mount involves meticulously cleaning and preparing the skull to showcase its natural beauty. This guide, brought to you by eurodripusa.net, provides a detailed, step-by-step approach to creating a stunning Euro mount, combining traditional techniques with modern efficiency, and offering insights into European-quality standards. Learn how to transform your trophy into a lasting display with our water-saving, eco-friendly approach.
1. What is a Euro Deer Mount and Why Choose It?
A Euro deer mount, also known as a European skull mount, is the process of cleaning and preserving an animal’s skull, typically a deer, to display it without the hide or other soft tissues. This method showcases the skull’s natural shape and bone structure, providing a unique and aesthetically pleasing way to commemorate a successful hunt.
1.1. What are the Benefits of Choosing a Euro Mount?
There are several reasons why hunters and outdoor enthusiasts opt for Euro mounts:
- Affordability: Compared to traditional taxidermy, a Euro mount is significantly more budget-friendly. It eliminates the cost of tanning the hide and the labor-intensive process of mounting it on a form.
- Space-saving: Euro mounts take up less space than traditional shoulder mounts, making them ideal for those with limited wall space.
- DIY-friendly: With the right tools and knowledge, you can create a Euro mount yourself, adding a personal touch to your trophy.
- Aesthetic appeal: Many people appreciate the clean, natural look of a Euro mount, which highlights the skull’s intricate details.
- Longevity: A properly cleaned and preserved skull can last for generations.
1.2. What kind of tools do I need?
The tools required are simple. You will need knives, containers, and cleaning products. In addition to those, the list includes a pressure washer, a heat source, and whitening agents.
2. Essential Tools and Materials for Your DIY Euro Mount
Before you begin, gather the necessary tools and materials to ensure a smooth and efficient process.
| Tool/Material | Description | Purpose |
|---|---|---|
| Scalpel or Sharp Knife | Replaceable blade recommended | Skinning and removing tissue |
| Flathead Screwdriver | To pry the hide around antler bases | Prevent scoring the bone |
| Large Plastic Container | Watertight, non-metal | Maceration process |
| Stainless Steel Heater | Adjustable, submersible | Maintain water temperature for maceration |
| Plastic Wrap | Clear | Protect antler bases |
| Electrical Tape | Black | Create a watertight seal over plastic wrap on antlers |
| Drill | With 5/8″ flat spade wood bit | Brain removal |
| Pressure Washer | Brain and tissue removal | |
| Hydrogen Peroxide | 3% solution | Whitening the skull |
| Large Pot | Stainless steel | Boiling the skull in whitening solution |
| Outdoor Burner | Turkey fryer or high output BBQ burner | Heat source for boiling whitening solution |
| Rubber Bands | Hold nasal bones in place during drying | |
| Super Glue | Fast drying, clear | Reattaching loose teeth or bones |
| Minwax Wood Stain | Provincial color | Touch up antler color |
| Mop & Glo | Floor finish | Seal and protect the skull, add a pleasant smell |
| Protective Gloves | Protect hands from bacteria and chemicals | |
| Safety Glasses | Protect eyes from splashes and debris | |
| Breathing Mask | Protect from strong odors | |
| Degreaser (Dawn Soap) | Remove Grease |
3. Step-by-Step Guide: How to Create a Euro Deer Mount
Follow these detailed steps to create your own Euro deer mount.
3.1. Step 1: Field Preparation
Successful Euro mount creation begins the moment the animal is harvested. Proper field preparation is crucial for preserving the skull and preventing damage.
3.1.1. Head Removal
- Immediately after harvesting the deer, remove the head at the atlas joint, which is the last vertebrae where the skull connects to the neck.
- Use a sharp knife to cut through the hide and muscle, taking care not to damage the skull.
- Removing the head at this point minimizes meat wastage and streamlines the cleaning process.
- If possible, leave the hide on the skull until you are ready to begin the cleaning process. This helps prevent the meat from drying out and dehydrating the skull, which can cause issues during whitening.
 Head Removal
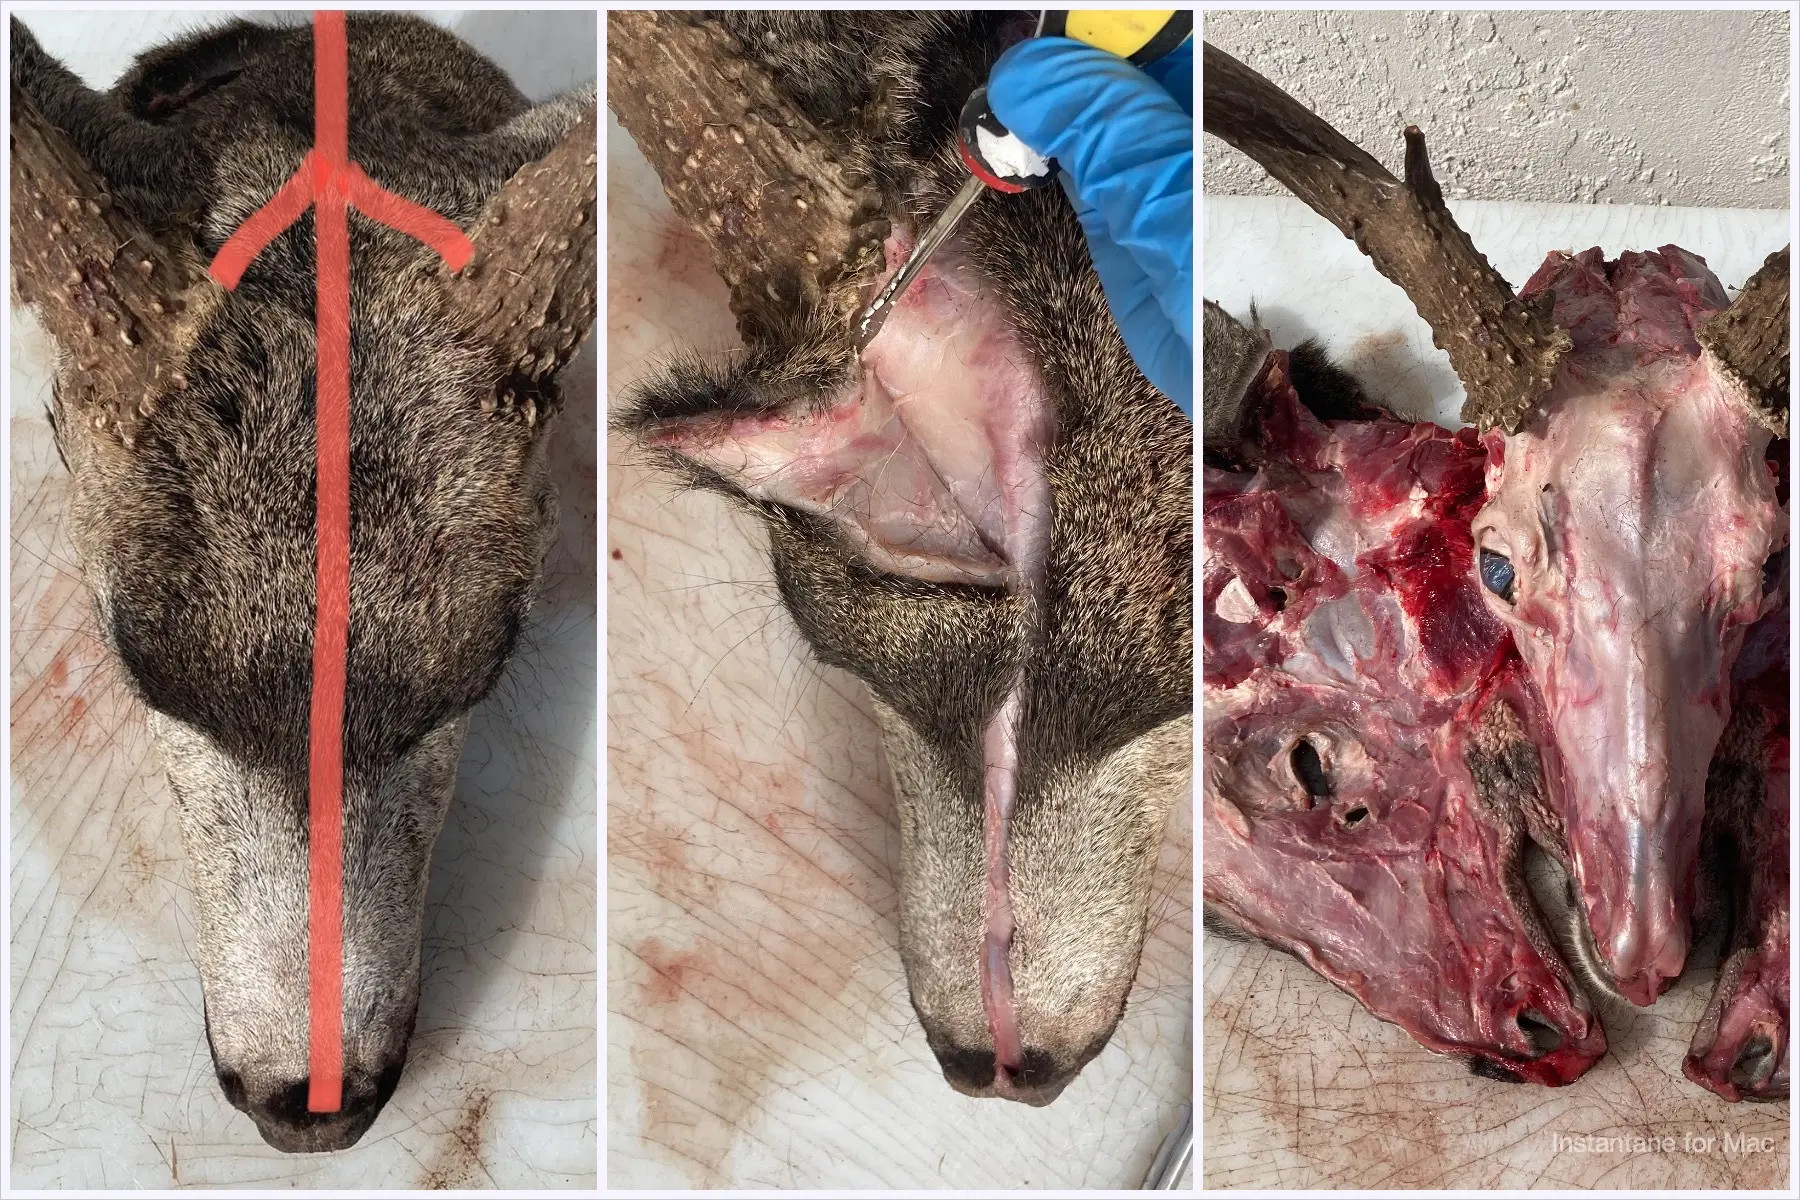
3.1.2. Skinning the Skull (If Required)
If you need to transport the skull across state lines, you may be required to remove the hide and clean the skull according to state regulations. If that is the case, follow these steps:
- Use a scalpel or sharp knife to make an incision from the back of the head/neck area, running the spine of the knife blade across the top of the skull, between the eyes, all the way down to the snout.
- Keep the edge of the knife blade pointed away from the bone to avoid unwanted knife marks on the skull.
- Use a flathead screwdriver to pry the hide from around the antler bases. This prevents scoring the bone with your knife.
- Work the hide off the skull down each side, around the eyes, and tear ducts.
- Cut the ears off at the base of the skull.
- Take special care around the nose to avoid removing any bone or cartilage with the knife.
3.2. Step 2: Initial Cleaning
Once the head is removed and skinned (if necessary), the next step is to remove as much soft tissue as possible.
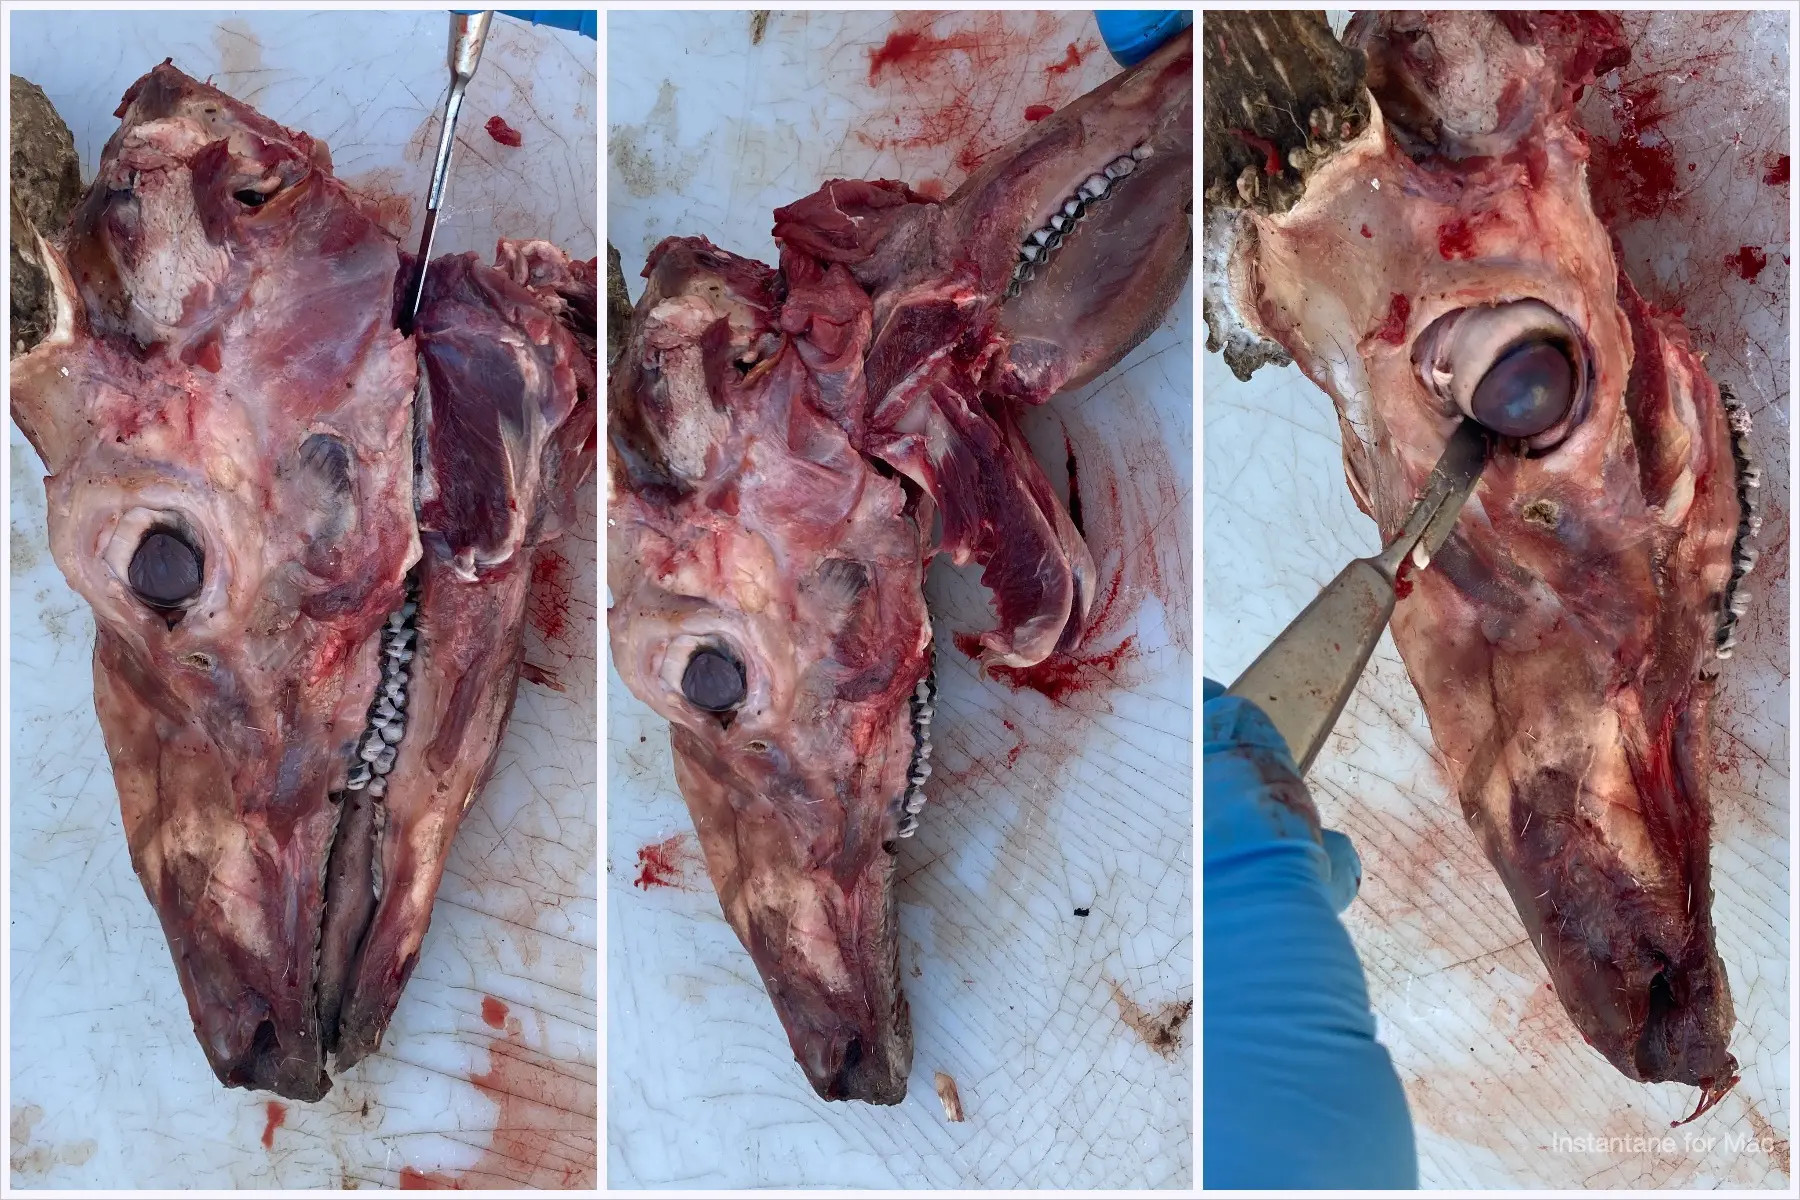
3.2.1. Removing the Lower Jaw and Eyes
- Make two incisions along the outside of the jaw bone from the back of the jaw toward the mouth on both sides of the skull. This will free up the muscle holding the jaw bone in place.
- Grab the snout in one hand and the lower jaw in the other, open the mouth and continue to open until the lower jaw hyperextends to the back of the head and detaches itself. Use your knife to cut the lower jaw free.
- To remove the eyes, make an incision around the entire circumference of the eyeball, freeing up all of the connective tissue around the eye.
- Flip the skull upside down and insert your knife into the back of the eye socket between the skull and orbital bone. Cut the remainder of the connective tissue behind the eye.
- Pull the eye from the eye socket and cut it free with very little resistance.
- Remove as much meat as possible from the outside of the skull with your knife. The less meat on the skull, the quicker the cleaning process will go.
 Removing Lower Jaw
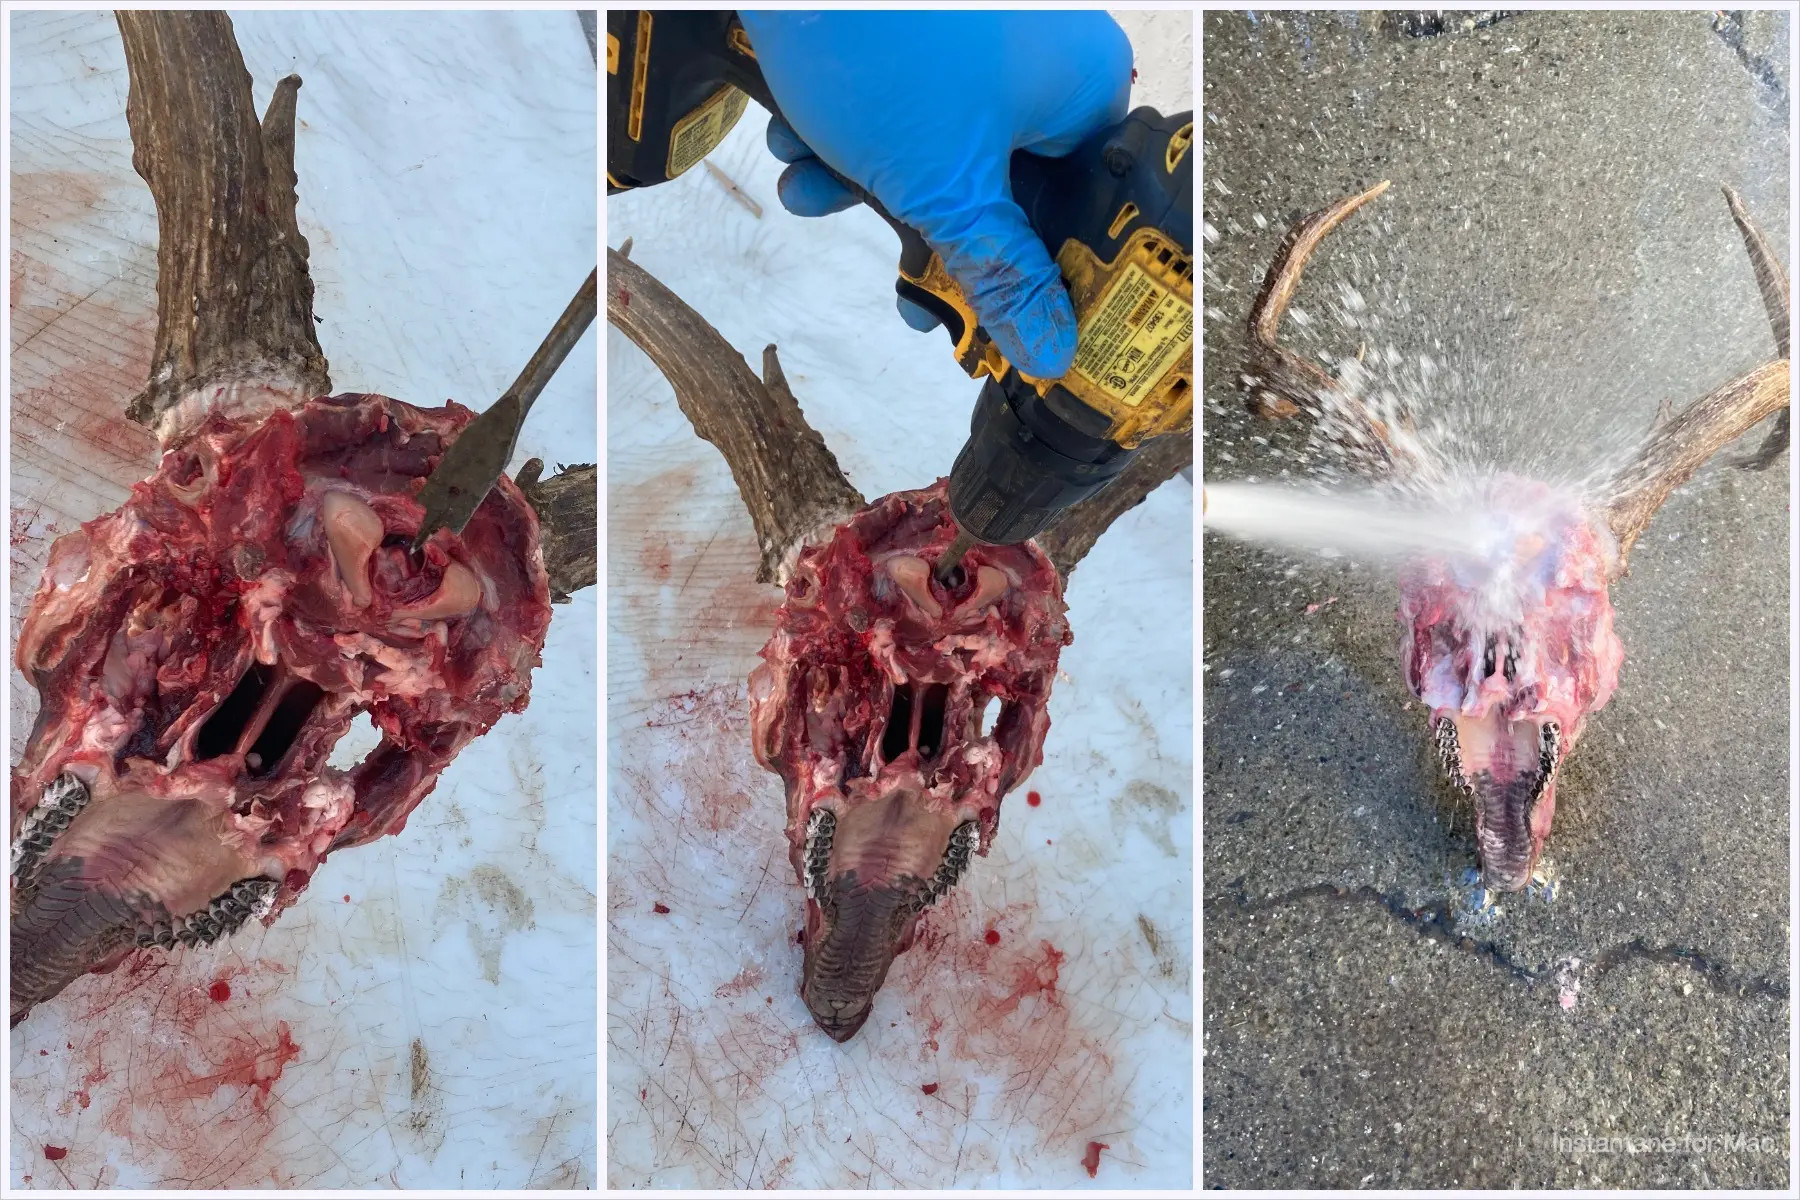
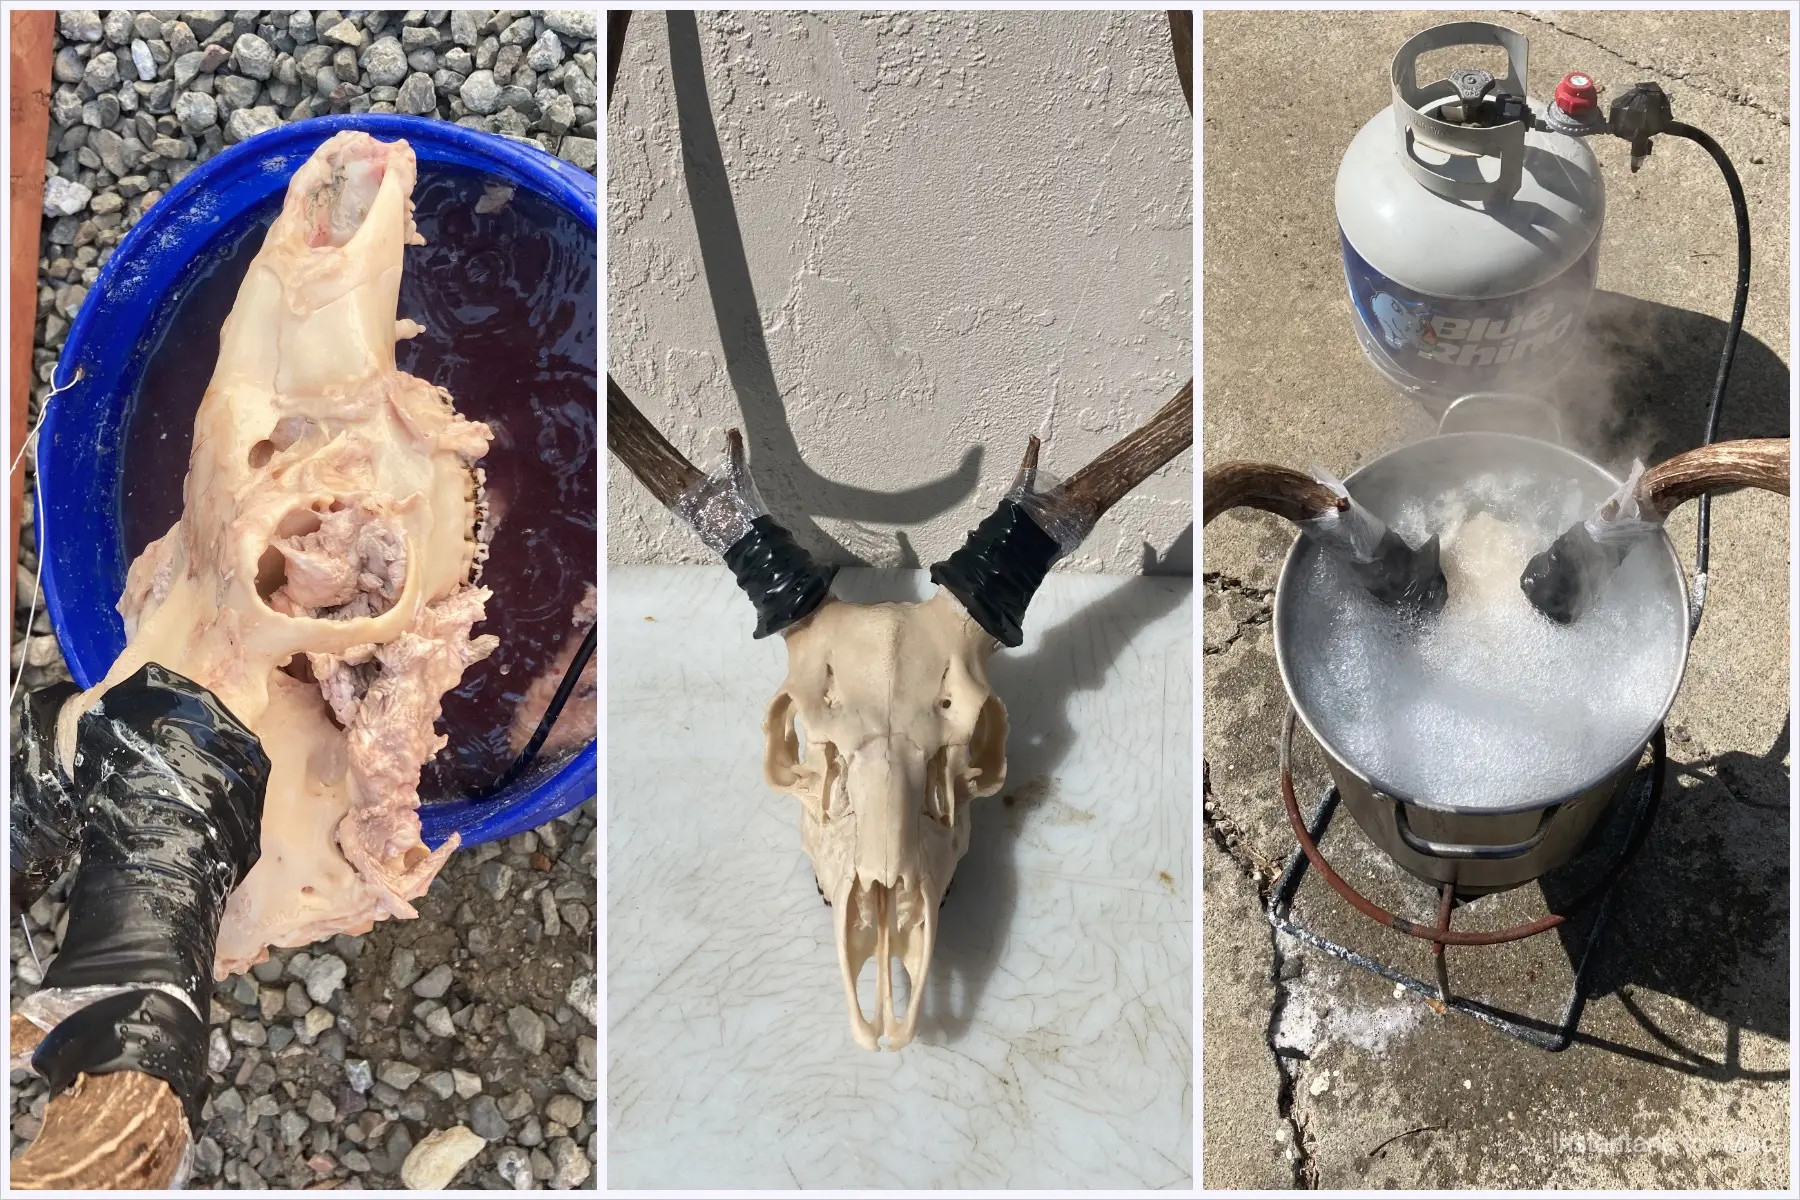
3.2.2. Brain Removal
- Use a drill with a 5/8” flat spade wood bit to scramble the brains inside the skull. Insert the drill bit into the hole on the back of the skull at the atlas joint where the last vertebrae were connected.
- Pull the trigger and scramble the brains until they are in liquid form. You can also achieve the same thing with a screwdriver or strong stick.
- Once the brains are liquified, use a pressure washer or water hose to remove them. Stand back a few feet and insert the hose into the same hole you used to scramble the brains.
- Spray water into the skull until all brain matter has been removed and rinse thoroughly.
 Brain Removal
3.3. Step 3: Maceration
Maceration is a biological process that uses bacteria to break down the remaining soft tissues on the skull.
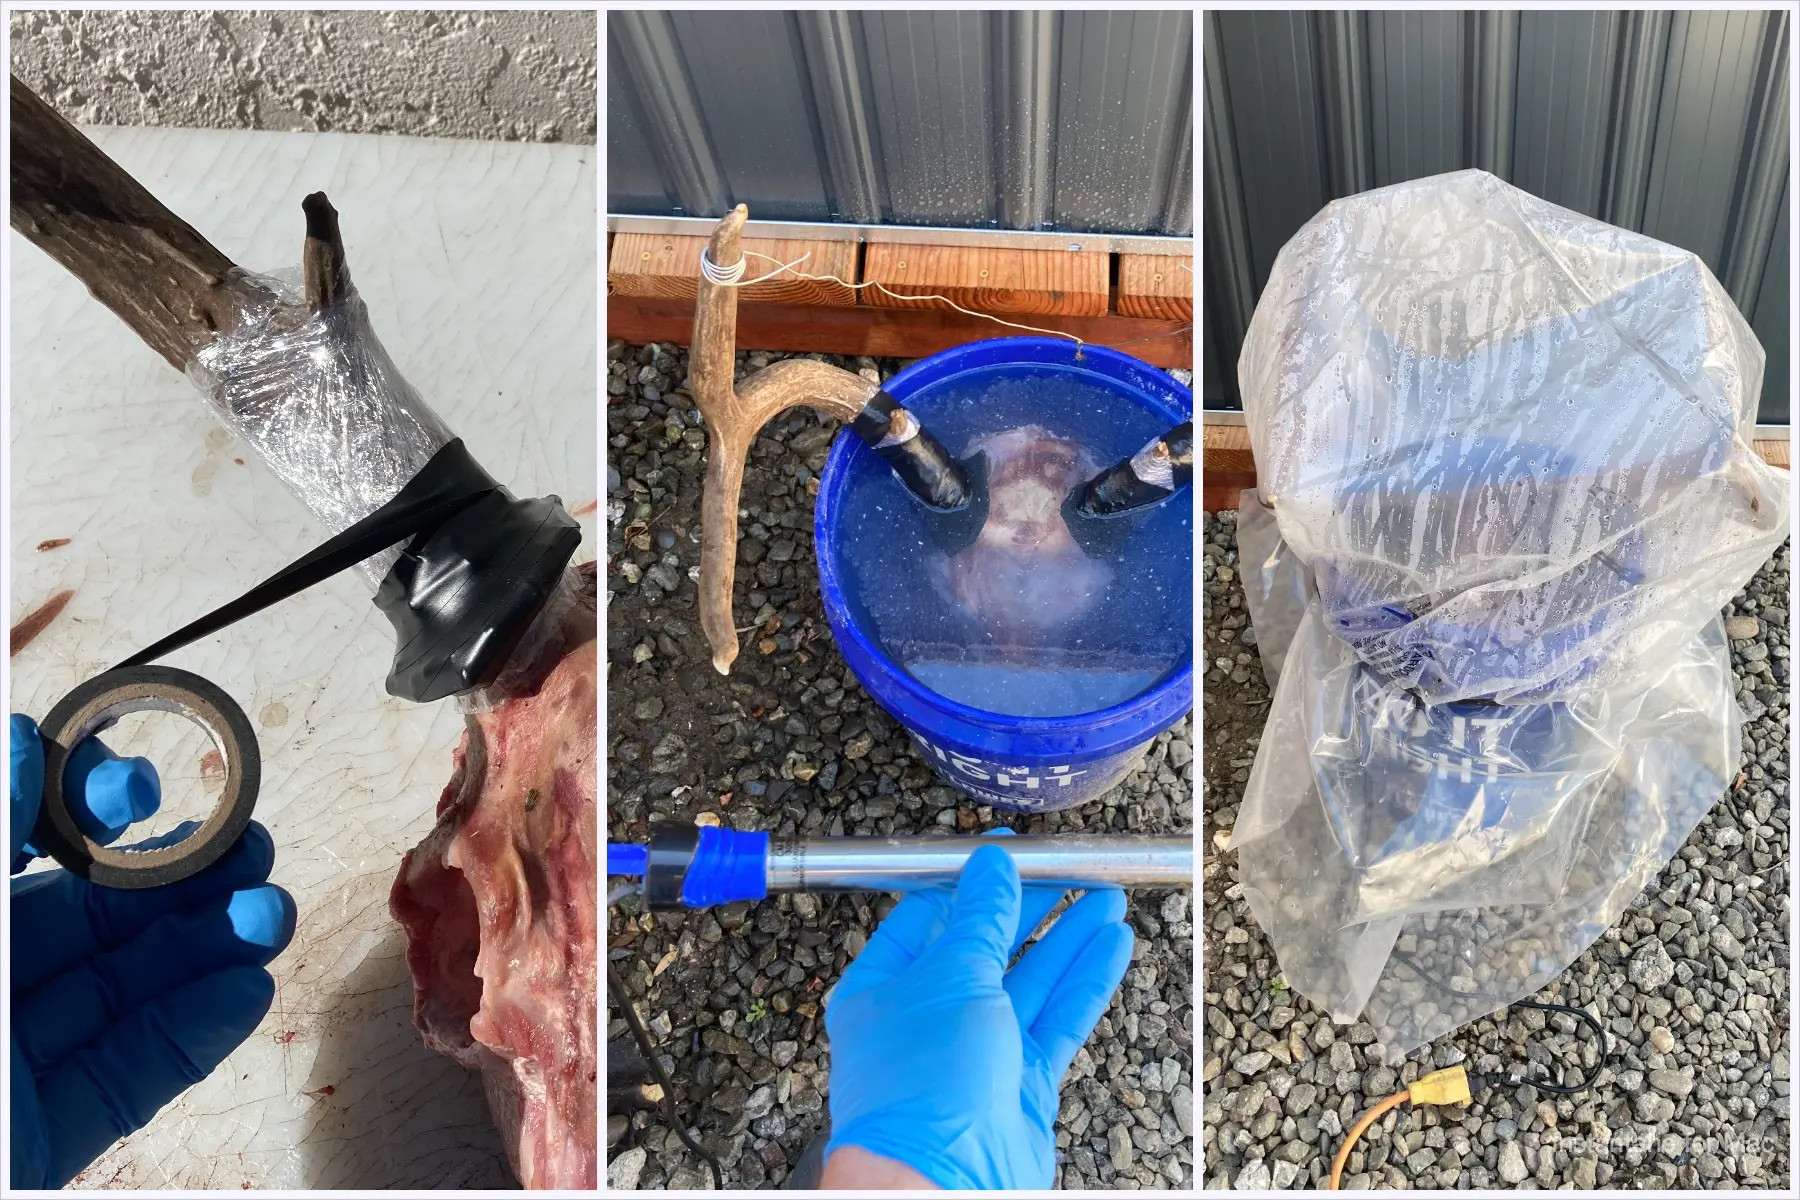
3.3.1. Setting Up the Maceration Container
- Obtain a watertight plastic container large enough to completely submerge the skull with water. A metal container will rust and discolor your skull.
- Place a stainless steel fish tank heater in the container that can be set for at least 80°F to maintain water temperatures for optimal bacteria growth.
- Wrap the antlers from the base near the skull up about 6 to 8” with clear plastic wrap, and then go over the plastic wrap with black electrical tape to create a water-tight seal. This will prevent you from losing any antler color during the macerating process.
- Place your maceration container somewhere that animals can’t get into it and the smell won’t bother anyone, as it can become quite strong. Also, be mindful that you need to be able to run electricity to the container.
3.3.2. The Maceration Process
- Place the skull in the container and fill it with water until it completely covers the skull. If your skull has antlers, fill about 1” above the antler burrs.
- Set your fish tank heater to 80°F and submerge it in the container. Make sure the heater will remain completely submerged in the water to prevent it from overheating.
- If possible, place a lid on the container to help reduce evaporation and contain some of the smell. If a lid won’t fit, you can pull a large plastic garbage bag over the container and wrap a bungee cord around it which will be better than nothing.
- Plug in your tank heater and wait. For a deer-sized animal, the process usually takes four to six days.
- Check the water level every two days and add water as necessary to ensure the skull stays submerged.
- After four to six days, you’ll start to notice all the meat and connective tissue has rotted and is falling off the skull. Once you see roughly 90% of the meat has rotted off the skull, it’s time to pull it out and complete the euro process.
 Maceration Process
3.4. Step 4: Degreasing
Following maceration, the skull often contains residual grease within the bone. Degreasing is essential to prevent long-term discoloration and ensure a pristine finish.
3.4.1. The Degreasing Process
- After maceration, rinse the skull thoroughly with warm water.
- Submerge the skull in a solution of warm water and a grease-cutting dish soap (such as Dawn). Use a concentration of approximately 1 tablespoon of soap per gallon of water.
- Maintain the water temperature between 110-120°F (43-49°C) using a submersible heater.
- Soak the skull for several days, changing the water and soap solution every 2-3 days, until the water remains clear. This may take 1-2 weeks, depending on the amount of grease present.
- After degreasing, rinse the skull thoroughly with clean water and allow it to air dry completely before moving on to the whitening stage.
3.5. Step 5: Skull Whitening
After maceration and degreasing, the skull is ready to be whitened. This step enhances the skull’s appearance and provides a clean, polished look.
3.5.1. Preparing the Whitening Solution
- For the whitening solution, use a mixture of hydrogen peroxide and water. Regular 3% hydrogen peroxide from your local store will work.
- Fill your pot 50 percent full with hydrogen peroxide, then place the skull inside, and next fill the rest of the pot with water until it completely covers the skull.
- Make sure that the antlers are still covered in tape and plastic so the whitening solution doesn’t come in contact with them.
3.5.2. The Whitening Process
- Bring the solution to a rolling boil and submerge the skull in the boiling solution for 5-10 minutes.
- Be sure that the solution never comes in contact with the uncovered part of the antler as it will whiten anything it touches.
- Periodically remove the skull to make sure the solution has not deteriorated any of the bone and to check for desired color.
- Keep in mind the skull will whiten up further as it dries, so don’t be afraid if it doesn’t look as white as you wanted when it first comes out of the pot.
- Follow the same process for any teeth or nasal bones that may have fallen off during the maceration process.
 Skull Whitening
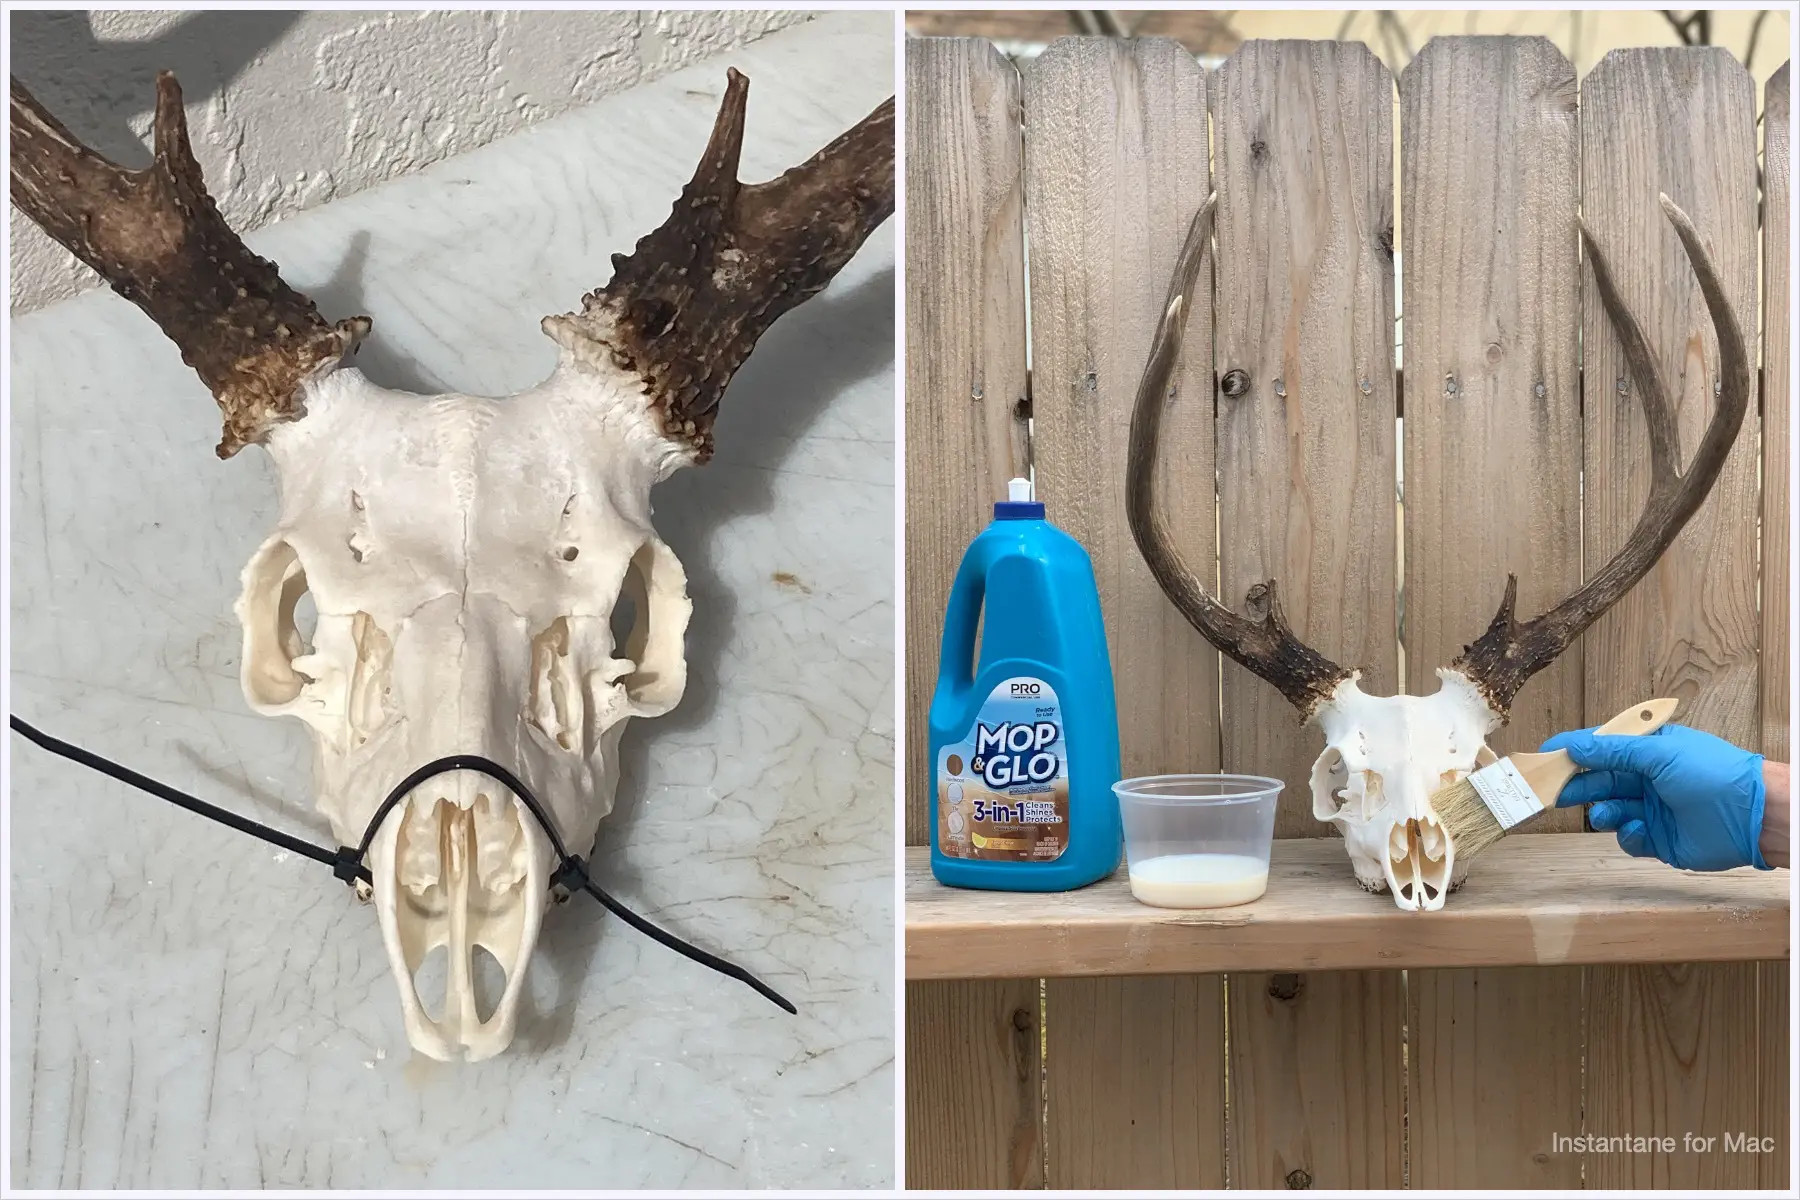
3.6. Step 6: Drying and Finishing Touches
Once the skull is whitened, the final steps involve drying and adding the finishing touches to complete your Euro mount.
3.6.1. Drying the Skull
- Fit any nasal bones in place while the bone is still wet and secure them with a rubber band. Oftentimes the nasal bones will separate as the skull dries so place a rubber band around the snout to hold everything together.
- If possible, place the skull in direct sunlight for drying. If the weather isn’t cooperating and the sun isn’t available, the same thing can be achieved with a space heater.
- Place the skull in front of a space heater until completely dry and no bones feel loose.
3.6.2. Final Assembly and Finishing
- Once the skull is dry, glue any teeth or nasal bones back in place that didn’t stick during the drying process. Use fast drying clear super glue for this.
- Remove the plastic and tape from the bases of the antlers. If any of the horn was whitened during the process, touch them up with Minwax provincial wood stain. Apply the stain very lightly with a Q-tip and repeat coats until the desired color is achieved.
- For the final touch, coat the finished skull with a thin layer of mop and glow from the cleaning supply aisle. This gives the skull a pleasant smell and seals the bone to prevent dust or dirt from settling in the porous bone.
 Drying and Finishing Touches
4. Advanced Techniques and Tips
To elevate your Euro mount, consider these advanced techniques and tips.
4.1. Air Compressor Cleaning
Use an air compressor to blow out any remaining debris from the nasal cavities and other hard-to-reach areas.
4.2. Borax Preservation
After drying, pack the nasal cavity with Borax to absorb any remaining moisture and prevent bacterial growth.
4.3. Artistic Touches
Consider adding artistic touches such as wood burning designs or painting the skull with unique patterns.
4.4. Display Options
Explore different display options such as custom-made stands or mounting the skull on a piece of reclaimed wood.
5. Safety Precautions
- Protective Gear: Always wear protective gloves, safety glasses, and a breathing mask when handling chemicals or working with potentially contaminated materials.
- Ventilation: Ensure adequate ventilation when working with chemicals like hydrogen peroxide.
- Waste Disposal: Dispose of biological waste properly, following local regulations.
- Sharp Objects: Use caution when handling sharp knives and tools to avoid injuries.
- Heat Safety: Be careful when working with boiling water and heat sources to prevent burns.
6. Common Mistakes to Avoid
- Over Boiling: Avoid boiling the skull for too long, as this can weaken the bone and damage the skull’s structure.
- Using Bleach: Do not use bleach to whiten the skull, as it can damage the bone and cause it to become brittle over time.
- Neglecting Degreasing: Failing to properly degrease the skull can lead to long-term discoloration and an unpleasant odor.
- Damaging Antlers: Take care to protect the antlers during the cleaning and whitening process to avoid damaging their color and texture.
- Rushing the Process: Allow sufficient time for each step of the process, as rushing can lead to unsatisfactory results.
7. Why Choose Eurodrip USA for Your Irrigation Needs?
While you’re preserving your hunting trophies, remember to take care of your land with efficient irrigation solutions from eurodripusa.net. As hunters and outdoor enthusiasts, we understand the importance of preserving natural resources and promoting sustainable practices.
7.1. Innovative Drip Irrigation Systems
Eurodrip USA offers a wide range of innovative drip irrigation systems designed to maximize water efficiency and promote healthy plant growth. Whether you’re managing a small garden or a large agricultural operation, our systems can help you conserve water, reduce costs, and improve yields.
7.2. Quality Products from Europe
We source our products from Europe’s leading manufacturers, ensuring that you receive the highest quality and most reliable irrigation solutions available. Our products are built to last and designed to withstand the rigors of outdoor use.
7.3. Expert Support and Guidance
Our team of irrigation experts is here to provide you with the support and guidance you need to select the right system for your specific needs. We can help you design a custom irrigation plan, troubleshoot any issues, and optimize your system for maximum efficiency.
7.4. Sustainable Solutions
At Eurodrip USA, we are committed to promoting sustainable practices that protect our environment and conserve natural resources. Our drip irrigation systems are designed to minimize water waste and reduce the environmental impact of agriculture.
8. Understanding the Science Behind Maceration
Maceration is a fascinating process driven by microbial activity. Understanding the science behind it can help you optimize your Euro mount creation.
8.1. The Role of Bacteria
Maceration relies on bacteria, which are microorganisms that break down organic matter. These bacteria produce enzymes that degrade proteins, fats, and other tissues, softening and eventually dissolving them.
8.2. Optimal Conditions for Maceration
Bacteria thrive in warm, moist environments. Maintaining a water temperature of 80-90°F (27-32°C) provides optimal conditions for bacterial growth. Proper hydration is also essential, so ensure the skull remains submerged in water throughout the process.
8.3. Managing Odor
Maceration can produce strong, unpleasant odors. To minimize odor, use a container with a tight-fitting lid and place the maceration container in a well-ventilated area away from living spaces. You can also add a small amount of odor-reducing agent, such as baking soda, to the water.
9. Legal Considerations for Harvesting and Mounting Deer
Before you begin your Euro mount project, it’s essential to understand the legal considerations surrounding harvesting and mounting deer.
9.1. Hunting Regulations
Ensure you comply with all applicable hunting regulations, including license requirements, hunting seasons, and bag limits. Contact your local fish and wildlife agency for specific information.
9.2. Interstate Transportation
If you plan to transport the skull across state lines, be aware of any regulations regarding the transportation of animal parts. Some states may require you to remove the hide and clean the skull before transporting it.
9.3. Protected Species
Make sure the animal you are mounting is not a protected species. Mounting a protected species may be illegal and could result in fines or other penalties.
10. Connecting Euro Mounts to Sustainable Practices with Eurodrip USA
Your passion for preserving hunting trophies can align with sustainable practices through efficient irrigation.
10.1. Eco-Friendly Drip Irrigation
Eurodrip USA’s drip irrigation systems minimize water waste, reduce energy consumption, and promote healthier plant growth. This not only conserves resources but also reduces the need for chemical fertilizers and pesticides.
10.2. Supporting Biodiversity
By using efficient irrigation systems, you can create healthier habitats for wildlife, including deer. Healthy ecosystems support biodiversity and contribute to the overall health of the environment.
10.3. Responsible Land Management
Efficient irrigation is an integral part of responsible land management. By conserving water and reducing environmental impact, you can help ensure the long-term sustainability of your land.
11. FAQ: Answers to Your Euro Deer Mount Questions
11.1. How long does it take to make a Euro deer mount?
The entire process can take anywhere from 2 to 4 weeks, depending on the method used and the amount of time required for maceration and drying.
11.2. What is the best way to clean a deer skull?
Maceration is considered the most effective method for cleaning a deer skull, as it preserves the delicate bone structure and ensures thorough tissue removal.
11.3. How do I prevent my Euro mount from smelling?
Proper maceration, degreasing, and drying are essential for preventing odors. Additionally, sealing the skull with a product like Mop & Glo can help lock in any remaining odors.
11.4. Can I use bleach to whiten a deer skull?
No, bleach should not be used to whiten a deer skull, as it can damage the bone and cause it to become brittle over time.
11.5. How do I protect the antlers during the whitening process?
Wrap the antlers tightly with plastic wrap and electrical tape to prevent the whitening solution from coming into contact with them.
11.6. What if the nasal bones fall out during the cleaning process?
Reattach the nasal bones with super glue after the skull has been thoroughly cleaned and dried.
11.7. How do I display my Euro deer mount?
There are several display options available, including custom-made stands, wall mounts, and mounting the skull on a piece of reclaimed wood.
11.8. What safety precautions should I take when making a Euro mount?
Always wear protective gloves, safety glasses, and a breathing mask when handling chemicals or working with potentially contaminated materials.
11.9. How do I degrease the skull properly?
Submerge the skull in a solution of warm water and grease-cutting dish soap, changing the water and soap solution every 2-3 days until the water remains clear.
11.10. What do I do if the antlers lose some color during the process?
Touch up the antlers with Minwax provincial wood stain, applying it lightly with a Q-tip until the desired color is achieved.
12. Conclusion: Preserving Your Trophy, Sustaining the Land
Creating a Euro deer mount is a rewarding way to honor your hunting success and showcase the beauty of nature. By following this comprehensive guide and incorporating sustainable practices, you can create a lasting tribute while also contributing to the health of our environment.
Ready to take your land management to the next level? Visit eurodripusa.net today to explore our wide range of innovative drip irrigation systems and discover how we can help you conserve water, reduce costs, and promote sustainable agriculture. Contact us at Address: 1 Shields Ave, Davis, CA 95616, United States, Phone: +1 (530) 752-1011, or visit our website at eurodripusa.net to learn more and get started today.