
Euro sham pillows offer a touch of elegance and comfort to any living space, and at eurodripusa.net, we believe in bringing European quality to your home projects. This guide provides a step-by-step approach on creating your euro shams, complete with expert tips and insights for a perfect finish, focusing on high-quality materials and innovative techniques. Embrace the opportunity to enhance your home decor with our Euro-inspired designs, tailored for the American lifestyle, emphasizing durable fabric, sewing techniques, and design choices.
1. What Is A Euro Sham and Why Make Your Own?
A euro sham is a large, square decorative pillow typically used to add height and style to a bed arrangement. Knowing How To Make A Euro Sham allows for complete customization, cost savings, and the satisfaction of creating a unique piece for your home. Euro shams are more than just decorative pillows; they’re statement pieces that can transform the look and feel of a room.
- Customization: Choose fabrics, colors, and embellishments that perfectly match your decor.
- Cost Savings: Making your own shams can be more economical than buying pre-made ones, especially if you use repurposed materials.
- Personal Satisfaction: There’s a unique joy in creating something beautiful and functional with your own hands.
- Unique Design: Craft a design tailored to your personal taste and interior decor, ensuring your euro shams are truly one-of-a-kind.
- Quality Control: Select high-quality materials and construction techniques, resulting in durable and long-lasting home décor pieces.
2. What Materials Do You Need to Make a Euro Sham?
Gathering the right materials is crucial for a successful euro sham project. High-quality fabrics, durable sewing tools, and the perfect insert will ensure your finished product looks professional and lasts for years. Here’s a detailed list of what you’ll need:
- Fabric: Choose a durable fabric like home decor cotton, linen, or a blend. The amount needed will depend on the size of your sham and whether you want a flange (more on that later).
- Sewing Machine: A reliable sewing machine is essential for creating clean, strong seams.
- Thread: Select a high-quality thread that matches your fabric.
- Scissors or Rotary Cutter: For precise fabric cutting.
- Measuring Tape or Ruler: Accurate measurements are key to a well-made sham.
- Pins: To hold fabric pieces together while sewing.
- Iron and Ironing Board: For pressing seams and creating crisp edges.
- Euro Sham Pillow Insert: Choose an insert that is slightly larger than your finished sham size for a plump, full look.
- Optional: Flange trim, piping, buttons, or other embellishments to customize your sham.
- Plastic Collar Stays: To prevent floppy flanges.
- Fabric Glue: To hold collar stays.
Eurodripusa.net recommends sourcing high-quality, European-made fabrics for superior durability and aesthetic appeal, ensuring your euro shams are not only beautiful but also long-lasting.
3. What Size Should My Euro Sham Be?
The standard size for a euro sham is 26 x 26 inches, but you can customize the size to fit your personal preference and the dimensions of your bed or seating area. Consider the overall aesthetic you’re trying to achieve when deciding on the size.
- Standard Size: 26 x 26 inches is the most common and works well on most beds.
- Larger Size: 28 x 28 inches can make a bolder statement on a larger bed or sofa.
- Smaller Size: 24 x 24 inches is suitable for smaller spaces or as an accent pillow.
- Consider the Insert: Always choose a pillow insert that is slightly larger than your finished sham size to ensure a full, plump look.
Choosing the right size euro sham can dramatically impact the overall look of your bedding arrangement, so take the time to measure your space and consider the proportions carefully.
4. How to Cut Fabric for a Euro Sham Pillow Cover
Accurate fabric cutting is essential for creating a euro sham that fits properly and looks professional. Follow these steps for precise cutting:
- Pre-wash your fabric: This will prevent shrinkage after the sham is sewn.
- Iron the fabric: Remove any wrinkles or creases.
- Measure and mark: Use a measuring tape or ruler and fabric chalk to mark the dimensions of your fabric pieces. For a basic euro sham without a flange, you will need two squares that are the desired finished size plus seam allowance (usually 1/2 inch on all sides). For example, for a 26 x 26 inch sham, cut two 27 x 27 inch squares.
- Cut the fabric: Use sharp scissors or a rotary cutter to cut along the marked lines.
- Double-check: Before you start sewing, double-check that all your pieces are the correct size.
For envelope closures, additional fabric pieces are needed. Precise cuts are the foundation of a professional-looking euro sham, so taking the time to measure and cut accurately is well worth the effort.
5. Sewing a Basic Euro Sham: Step-by-Step Guide
Creating a basic euro sham involves simple sewing techniques that even beginners can master. Follow these step-by-step instructions for a beautifully finished pillow cover:
- Place fabric right sides together: Place the two fabric squares on top of each other with the printed sides facing each other.
- Pin the edges: Secure the edges with pins to prevent the fabric from shifting while sewing.
- Sew around the edges: Using a sewing machine, sew around all four edges with a 1/2 inch seam allowance, leaving a 12-inch opening on one side for turning and inserting the pillow.
- Clip the corners: Clip the corners of the fabric to reduce bulk when turning the sham right side out.
- Turn right side out: Carefully turn the sham right side out through the opening.
- Press the seams: Use an iron to press the seams flat, paying special attention to the corners.
- Insert the pillow: Insert the euro sham pillow insert through the opening.
- Close the opening: Fold the edges of the opening inward and pin them together. Then, either hand-stitch the opening closed with an invisible stitch or machine-stitch close to the edge for a neat finish.
With these steps, you’ll have a professionally sewn euro sham that adds elegance and comfort to your home decor.
6. How to Create an Envelope Closure for a Euro Sham
An envelope closure is a simple and elegant way to finish a euro sham, allowing for easy removal and cleaning of the cover. Here’s how to create one:
- Cut the fabric: For a 26 x 26 inch euro sham, cut one 26 x 26 inch square for the front and two 26 x 18 inch rectangles for the back.
- Prepare the back pieces: On one long edge of each rectangle, fold over 1/2 inch to the wrong side and press with an iron. Fold over another 1/2 inch and press again to create a clean, finished edge.
- Sew the finished edges: Sew along the folded edges of both rectangles with a straight stitch.
- Assemble the sham: Place the front square right side up. Place one back rectangle on top, right side down, aligning one finished edge with the center of the square. Repeat with the other back rectangle, overlapping the finished edges in the center.
- Pin the edges: Secure all the edges with pins.
- Sew around the edges: Sew around all four edges with a 1/2 inch seam allowance.
- Clip the corners: Clip the corners to reduce bulk.
- Turn right side out: Turn the sham right side out through the envelope opening.
- Press the seams: Press the seams flat with an iron.
The envelope closure provides a seamless look while allowing easy access to the pillow insert for cleaning or replacement.
7. Adding a Flange to Your Euro Sham: A Detailed Guide
Adding a flange, which is a flat decorative border, to your euro sham can elevate its style and sophistication. This detailed guide will walk you through the process:
- Determine the flange width: Decide how wide you want your flange to be. A common width is 2 inches.
- Cut the fabric: Cut your fabric pieces as described above for a basic euro sham.
- Sew the basic sham: Sew the euro sham as described in the basic sewing guide, but do not close the opening.
- Mark the flange: Use a ruler and fabric chalk to mark a line around the perimeter of the sham, the desired width of the flange (e.g., 2 inches).
- Sew along the marked line: Sew along the marked line through all layers of fabric, creating the flange.
- Insert the pillow: Insert the euro sham pillow insert through the opening.
- Close the opening: Hand-stitch or machine-stitch the opening closed.
7. 1. Preventing Floppy Flanges with Collar Stays
To prevent your flanges from looking wilted, collar stays can be used.
- Prepare Collar Stays: Apply fabric glue to both sides of plastic collar stays.
- Attach to Inside of Cover: Position the glued collar stays on the inside of the euro sham cover, near the corners, and let them dry completely.
- Sew Around Pillow: Sew around the pillow cover, following your marked lines, ensuring the collar stays are securely in place.
By adding collar stays, you ensure that your euro sham maintains a crisp, tailored look that enhances the overall aesthetic of your bedding.
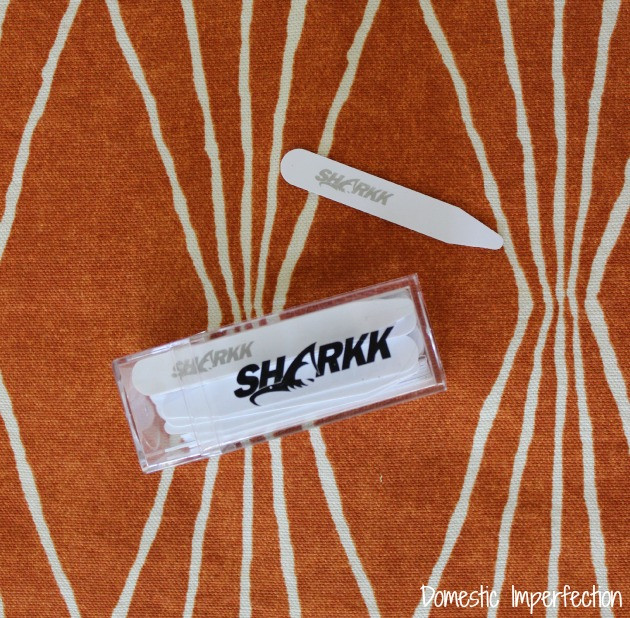 Collar stays for pillow corners
Collar stays ensure euro sham corners remain crisp and tailored.
8. Choosing the Right Fabric for Your Euro Sham
The fabric you choose for your euro sham can greatly impact its overall look, feel, and durability. Consider these factors when selecting your fabric:
- Durability: Choose a fabric that can withstand regular use and washing, especially if the sham will be used on a bed or sofa that gets a lot of traffic.
- Texture: Consider the texture of the fabric and how it will feel against your skin. Softer fabrics like cotton or linen are ideal for shams that you will be leaning against.
- Color and Pattern: Choose a color and pattern that complements your existing decor and personal style.
- Care Instructions: Consider the care instructions for the fabric and whether it is easy to clean and maintain.
- Weight: Heavier fabrics will create a more structured sham, while lighter fabrics will have a softer drape.
Eurodripusa.net offers a variety of high-quality, European-made fabrics that are perfect for euro shams, known for their durability, luxurious feel, and stylish designs.
9. Embellishing Your Euro Sham: Creative Ideas
Adding embellishments to your euro sham is a great way to personalize it and create a unique piece for your home decor. Here are some creative ideas:
- Piping: Add piping around the edges of the sham for a tailored, sophisticated look.
- Buttons: Sew decorative buttons onto the front of the sham for a touch of whimsy.
- Embroidery: Embroider a design or monogram onto the sham for a personalized touch.
- Appliqué: Add fabric appliqués in contrasting colors or patterns for a bold statement.
- Trim: Sew decorative trim, such as fringe or tassels, around the edges of the sham for a bohemian vibe.
These embellishments can transform a simple euro sham into a custom piece that reflects your personal style and enhances your home decor.
10. Pillow Insert Selection: Achieving the Perfect Plumpness
Choosing the right pillow insert is crucial for achieving the perfect plumpness and shape for your euro sham. Consider these factors when selecting your insert:
- Size: Choose an insert that is slightly larger than your finished sham size for a full, plump look. For example, for a 26 x 26 inch sham, use a 28 x 28 inch insert.
- Fill Material: Down and feather inserts are soft and luxurious but require more maintenance. Polyester fiberfill inserts are more affordable and easier to care for.
- Density: Choose an insert with a high fill density for a firmer, more supportive pillow.
- Shape: Ensure the insert is square and fills the corners of the sham evenly.
Investing in a high-quality pillow insert will ensure your euro sham looks its best and provides the desired level of comfort and support.
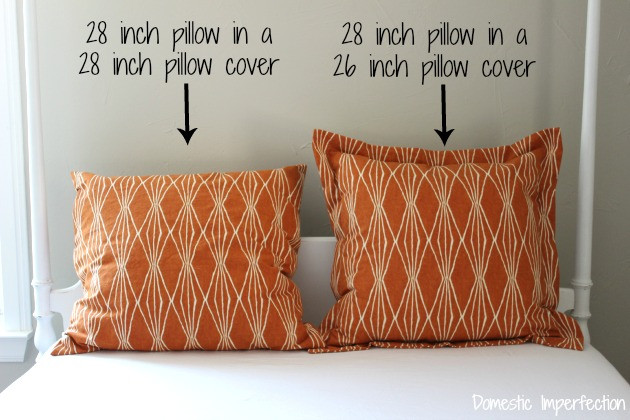 What size pillow insert should I use in my pillow
Selecting the right pillow insert ensures a full, perky pillow.
11. Where to Find Inspiration for Your Euro Sham Designs
Finding inspiration for your euro sham designs can spark creativity and help you create a unique piece that reflects your personal style. Here are some great sources of inspiration:
- Home Decor Magazines: Browse home decor magazines for ideas on color palettes, patterns, and embellishments.
- Online Platforms: Explore websites like Pinterest and Instagram for a wealth of inspiration from designers and home decor enthusiasts.
- Fabric Stores: Visit fabric stores and browse their selection of fabrics and trims to get ideas for your design.
- Travel: Draw inspiration from your travels, whether it’s the colors of a Moroccan market or the patterns of a Parisian textile.
- Nature: Look to nature for inspiration, such as the colors of a sunset or the patterns of a flower garden.
Gathering inspiration from a variety of sources will help you create a euro sham design that is both unique and reflective of your personal style.
12. Caring for Your Euro Shams: Maintenance Tips
Proper care and maintenance will ensure your euro shams stay looking beautiful for years to come. Follow these tips to keep your shams in top condition:
- Read the Care Label: Always read and follow the care instructions on the fabric label.
- Wash Regularly: Wash your euro shams regularly to remove dirt, dust, and allergens.
- Use a Gentle Detergent: Use a gentle detergent that is safe for the fabric.
- Avoid Bleach: Avoid using bleach, as it can damage the fabric and fade the colors.
- Tumble Dry Low: Tumble dry on low heat or hang to dry to prevent shrinkage and damage.
- Iron as Needed: Iron your euro shams as needed to keep them looking crisp and wrinkle-free.
- Fluff Regularly: Fluff your pillow inserts regularly to maintain their shape and plumpness.
By following these care and maintenance tips, you can keep your euro shams looking beautiful and fresh for years to come.
13. Advanced Techniques: Creating Quilted Euro Shams
For those with more sewing experience, creating quilted euro shams can add a luxurious and intricate touch to your home decor. Here’s how to approach this advanced technique:
- Choose Your Quilt Pattern: Select a quilt pattern that complements your fabric and style.
- Cut the Fabric: Cut the fabric pieces according to your quilt pattern.
- Piece the Quilt Top: Sew the fabric pieces together to create the quilt top.
- Layer the Quilt: Layer the quilt top with batting and backing fabric.
- Quilt the Layers: Quilt the layers together using a sewing machine or by hand.
- Bind the Edges: Bind the edges of the quilt with fabric binding.
- Assemble the Sham: Assemble the quilted sham as described in the basic sewing guide.
Creating a quilted euro sham requires patience and skill, but the result is a stunning and unique piece that will add warmth and texture to your home decor.
14. Making Euro Shams with Repurposed Fabrics: Sustainable Decor
Creating euro shams with repurposed fabrics is a great way to practice sustainable decor and create unique, one-of-a-kind pieces. Here are some ideas for repurposing fabrics:
- Vintage Linens: Use vintage linens, such as tablecloths or tea towels, to create charming and nostalgic euro shams.
- Old Clothing: Cut up old clothing, such as jeans or shirts, to create patchwork or appliquéd euro shams.
- Fabric Scraps: Use fabric scraps from other sewing projects to create colorful and eclectic euro shams.
- Curtains: Transform old curtains into stylish euro shams that coordinate with your window treatments.
Repurposing fabrics is not only environmentally friendly but also allows you to create unique and personalized euro shams that tell a story.
Sewing a euro sham requires careful attention to detail.
15. Euro Sham vs. Standard Sham: Understanding the Difference
Understanding the difference between euro shams and standard shams is essential for creating a cohesive and stylish bedding arrangement. Here’s a breakdown of the key differences:
| Feature | Euro Sham | Standard Sham |
|---|---|---|
| Size | Typically 26 x 26 inches or larger | Typically 20 x 26 inches |
| Shape | Square | Rectangular |
| Placement | Usually placed behind standard pillows | Usually placed in front of standard pillows |
| Purpose | Primarily decorative, adds height and style | Decorative, but also functional for propping up |
| Overall Aesthetic | More modern and European-inspired | More traditional and versatile |
Knowing the differences between euro shams and standard shams will help you create a well-balanced and visually appealing bedding arrangement.
16. Incorporating Euro Shams into Your Home Decor Style
Euro shams can be incorporated into a variety of home decor styles, from modern and minimalist to bohemian and eclectic. Here are some tips for incorporating euro shams into your decor:
- Choose Colors and Patterns: Select colors and patterns that complement your existing decor and personal style.
- Mix and Match: Mix and match euro shams with other pillows in different sizes, shapes, and textures for a layered look.
- Create a Focal Point: Use euro shams to create a focal point on your bed or sofa.
- Coordinate with Other Textiles: Coordinate your euro shams with other textiles in the room, such as curtains, rugs, and throws.
Whether you prefer a minimalist aesthetic or a more layered and eclectic look, euro shams can be a versatile addition to your home decor.
17. Euro Sham Projects for Different Skill Levels
Whether you’re a beginner or an experienced sewer, there are euro sham projects to suit your skill level. Here are some ideas:
- Beginner: Start with a basic euro sham with an envelope closure using a simple fabric.
- Intermediate: Try adding a flange or piping to your euro sham for a more tailored look.
- Advanced: Create a quilted euro sham or experiment with more complex embellishments.
No matter your skill level, there’s a euro sham project that will allow you to express your creativity and enhance your home decor.
18. Best Practices for Sewing Machine Maintenance for Euro Sham Projects
Maintaining your sewing machine is crucial for ensuring smooth and successful euro sham projects. Follow these best practices to keep your machine in top condition:
- Clean Regularly: Clean your sewing machine regularly to remove lint, dust, and thread scraps.
- Oil the Machine: Oil the machine according to the manufacturer’s instructions.
- Change the Needle: Change the needle regularly, especially when working with different types of fabric.
- Use Quality Thread: Use high-quality thread to prevent breakage and ensure smooth stitching.
- Adjust Tension: Adjust the tension as needed to achieve balanced stitches.
- Service Regularly: Have your sewing machine serviced by a professional technician on a regular basis.
Proper sewing machine maintenance will not only ensure your machine lasts longer but also improve the quality of your euro sham projects.
19. How to Make a No-Sew Euro Sham: Quick and Easy
For those who prefer not to sew, there are still ways to create beautiful euro shams using no-sew techniques. Here’s how to make a no-sew euro sham:
- Gather Your Materials: You’ll need fabric, fusible bonding tape, scissors, and an iron.
- Cut the Fabric: Cut the fabric to the desired size for your euro sham.
- Apply Fusible Bonding Tape: Apply fusible bonding tape to the edges of the fabric.
- Iron the Edges: Iron the edges of the fabric to bond them together, creating a finished edge.
- Assemble the Sham: Assemble the sham using fusible bonding tape to create an envelope closure or a simple square.
- Insert the Pillow: Insert the euro sham pillow insert through the opening.
While a no-sew euro sham may not be as durable as a sewn one, it’s a quick and easy way to add style to your home decor without any sewing required.
20. Shopping for Euro Sham Supplies: What to Look For
Shopping for euro sham supplies can be overwhelming, but knowing what to look for will help you make informed decisions and create beautiful, high-quality shams. Here are some tips:
- Quality Fabrics: Look for high-quality fabrics that are durable, easy to care for, and complement your decor.
- Durable Thread: Choose a strong, durable thread that matches your fabric.
- Sharp Scissors: Invest in a good pair of sharp scissors or a rotary cutter for precise fabric cutting.
- Comfortable Pillow Inserts: Choose pillow inserts that are comfortable, supportive, and the right size for your shams.
- Reliable Sewing Machine: If you plan to sew your euro shams, invest in a reliable sewing machine that is easy to use and maintain.
- European Quality: Consider eurodripusa.net for sourcing high-quality European materials that ensure durability and aesthetic appeal.
By following these tips, you can shop for euro sham supplies with confidence and create beautiful, long-lasting additions to your home decor.
21. Budget-Friendly Euro Sham Projects: Saving Money
Creating euro shams doesn’t have to break the bank. Here are some budget-friendly tips to help you save money on your projects:
- Use Affordable Fabrics: Opt for affordable fabrics like cotton or linen blends instead of more expensive options.
- Repurpose Materials: Repurpose old clothing, linens, or curtains to create unique and budget-friendly euro shams.
- Shop Sales and Discounts: Shop for fabrics and supplies during sales and discounts at fabric stores or online retailers.
- Make Your Own Pillow Inserts: Make your own pillow inserts using inexpensive materials like polyester fiberfill.
- Keep it Simple: Stick to simple designs and embellishments to minimize the cost of materials.
With these budget-friendly tips, you can create beautiful euro shams without spending a fortune.
22. Euro Sham Design Trends to Watch
Staying up-to-date on the latest euro sham design trends can help you create stylish and contemporary additions to your home decor. Here are some trends to watch:
- Bold Colors and Patterns: Embrace bold colors and patterns to add a pop of personality to your bedding or seating area.
- Textured Fabrics: Opt for textured fabrics like velvet, corduroy, or faux fur for a luxurious and tactile feel.
- Geometric Designs: Incorporate geometric designs for a modern and graphic look.
- Natural Materials: Choose natural materials like linen, cotton, or jute for a relaxed and organic vibe.
- Sustainable Fabrics: Look for sustainable fabrics like organic cotton or recycled polyester to create eco-friendly euro shams.
By keeping an eye on these design trends, you can create euro shams that are both stylish and on-trend.
23. Euro Sham Color Combinations for a Stylish Look
Choosing the right color combinations for your euro shams can greatly impact the overall look and feel of your decor. Here are some stylish color combinations to consider:
- Monochromatic: Use different shades of the same color for a subtle and sophisticated look.
- Complementary: Pair colors that are opposite each other on the color wheel, such as blue and orange or red and green, for a bold and vibrant contrast.
- Analogous: Choose colors that are next to each other on the color wheel, such as blue, green, and teal, for a harmonious and calming effect.
- Neutral: Use neutral colors like white, gray, and beige for a timeless and versatile look.
- Metallic: Incorporate metallic accents like gold, silver, or bronze for a touch of glamour.
Experimenting with different color combinations will help you create euro shams that perfectly complement your decor and personal style.
24. Perfecting Corners: Achieving Sharp, Crisp Edges on Your Euro Shams
Achieving sharp, crisp edges on your euro shams is essential for a professional and polished look. Here are some tips for perfecting your corners:
- Clip the Corners: Clip the corners of the fabric before turning the sham right side out to reduce bulk.
- Use a Point Turner: Use a point turner or a knitting needle to gently push out the corners from the inside.
- Press with an Iron: Press the corners with an iron to create a crisp, flat edge.
- Use Interfacing: Use interfacing to reinforce the corners and prevent them from rounding out.
- Hand-Stitch the Corners: Hand-stitch the corners for added stability and definition.
By following these tips, you can achieve sharp, crisp edges on your euro shams that will elevate the overall look of your projects.
25. Common Mistakes to Avoid When Making Euro Shams
Even experienced sewers can make mistakes when creating euro shams. Here are some common mistakes to avoid:
- Incorrect Measurements: Double-check your measurements to ensure your fabric pieces are the correct size.
- Skipping Pre-Washing: Pre-wash your fabric to prevent shrinkage after the sham is sewn.
- Using Dull Scissors: Use sharp scissors or a rotary cutter for precise fabric cutting.
- Uneven Seams: Sew straight, even seams for a professional finish.
- Forgetting to Clip Corners: Clip the corners to reduce bulk and achieve sharp edges.
- Rushing the Process: Take your time and pay attention to detail for the best results.
By avoiding these common mistakes, you can create euro shams that are both beautiful and well-made.
26. Addressing Specific Needs with Euro Shams for Back Support
Euro shams can serve a functional purpose beyond decoration, providing excellent back support when sitting in bed or on a sofa. To maximize support:
- Firm Inserts: Choose high-density foam or feather-down blend inserts for optimal support.
- Strategic Placement: Position euro shams strategically behind your back to promote good posture and alleviate strain.
- Custom Sizes: Tailor the size and shape of your euro shams to fit the contours of your back for personalized comfort.
- High-Quality Materials: Eurodripusa.net recommends using durable, European-made fabrics for covers that withstand frequent use and maintain their shape.
By considering these factors, euro shams can become both a stylish and functional addition to your living space.
27. Maximizing Longevity: Repairing and Restoring Euro Shams
Extending the life of your euro shams through proper repair and restoration not only saves money but also reduces waste. Here are some tips:
- Reinforce Weak Seams: Strengthen stressed seams with additional stitching to prevent tears.
- Patch Tears Promptly: Repair small tears with fabric patches that match the original material.
- Replace Worn Zippers: Upgrade old zippers with durable, high-quality replacements.
- Revive Faded Colors: Restore faded colors with fabric dyes or refresh the fabric with new covers.
- Fluff and Replace Inserts: Regularly fluff inserts and replace them when they lose their shape to maintain support and comfort.
Using eurodripusa.net’s quality fabrics, repair and restoration can enhance the look and prolong the lifespan of your euro shams.
28. Integrating Technology: Smart Fabric and Euro Shams
Emerging technology is bringing new innovations to home textiles, including smart fabrics for euro shams. Consider these advancements:
- Self-Cleaning Fabrics: Opt for fabrics treated with antimicrobial or stain-resistant coatings to reduce maintenance.
- Temperature-Regulating Materials: Choose fabrics that wick moisture and regulate temperature for enhanced comfort.
- Embedded Sensors: Explore fabrics with embedded sensors that monitor sleep patterns or provide personalized comfort adjustments.
- Eco-Friendly Options: Select smart fabrics made from recycled or sustainable materials to minimize environmental impact.
Eurodripusa.net monitors these technological advancements to offer cutting-edge, eco-friendly fabric options for your euro shams.
29. The Psychology of Color in Euro Sham Design
The colors you choose for your euro shams can significantly impact mood and ambiance. Here’s a brief guide to color psychology:
- Blue: Promotes calmness and relaxation.
- Green: Creates a sense of balance and harmony.
- Yellow: Evokes joy and optimism.
- Red: Stimulates energy and excitement.
- Purple: Conveys luxury and creativity.
- Neutral Tones: Offer versatility and sophistication.
Eurodripusa.net encourages thoughtful consideration of color to enhance the emotional atmosphere of your living spaces through your euro sham designs.
30. Euro Shams as Gifts: Personalized and Thoughtful
Creating personalized euro shams makes for thoughtful and cherished gifts. Ideas include:
- Monogrammed Shams: Add a personal touch with monogrammed initials.
- Themed Designs: Create designs tailored to the recipient’s hobbies or interests.
- Memory Fabrics: Use fabrics that hold sentimental value, such as old family textiles.
- Coordinated Sets: Design matching sets with other home décor items for a cohesive look.
Eurodripusa.net helps you select the perfect fabrics and materials to create unique, heartfelt gifts that will be treasured for years.
Making your own euro shams is a rewarding project that allows you to customize your home decor to your exact specifications. Whether you’re a beginner or an experienced sewer, there’s a euro sham project that’s perfect for you.
At eurodripusa.net, we are dedicated to providing you with the highest quality European-made products and information to enhance your home and garden. Visit our website today to explore our selection of irrigation systems and learn more about how we can help you achieve your gardening goals. Address: 1 Shields Ave, Davis, CA 95616, United States. Phone: +1 (530) 752-1011.
FAQ: Frequently Asked Questions About Making Euro Shams
1. What is the standard size for a euro sham?
The standard size for a euro sham is 26 x 26 inches, offering a substantial decorative element for your bedding or seating area. This size is widely used to create a visually appealing and luxurious look.
2. How much fabric do I need to make a euro sham?
For a basic 26 x 26 inch euro sham, you’ll need approximately 1 3/4 yards of fabric, ensuring you have enough material for both the front and back pieces. This amount may vary slightly depending on the fabric width and whether you’re adding a flange or other embellishments.
3. What is an envelope closure, and how do I make one for my euro sham?
An envelope closure is a simple, seamless way to close your euro sham, involving overlapping fabric pieces on the back that create a pocket to insert the pillow. To make one, cut two back pieces that overlap by several inches, then sew the edges of the sham together, encasing the back pieces.
4. What type of fabric is best for euro shams?
Durable, medium-weight fabrics like cotton, linen, or home decor fabrics are ideal for euro shams, offering both aesthetic appeal and longevity. These materials can withstand regular use and washing while maintaining their appearance.
5. How do I choose the right pillow insert for my euro sham?
Select a pillow insert that is slightly larger than your euro sham cover, typically 28 x 28 inches for a 26 x 26 inch cover, to ensure a plump, full look. The fill material, whether down, feathers, or synthetic, should also be considered for comfort and support.
6. Can I add a flange to my euro sham, and how is it done?
Yes, adding a flange is a great way to enhance the style of your euro sham. Simply extend the fabric beyond the seam allowance and create a border around the edges of the sham. Sew around the perimeter to define the flange.
7. How do I prevent the corners of my euro sham from being floppy?
To keep the corners of your euro sham crisp, reinforce them with interfacing or add small weights inside the corners before sewing the cover. This will give the corners structure and prevent them from drooping.
8. What are some creative embellishments I can add to my euro sham?
Creative embellishments include piping, buttons, embroidery, appliqué, and decorative trim, each offering a unique way to personalize your euro sham. These details can reflect your personal style and enhance your home decor.
9. How do I care for my euro shams to ensure they last long?
Care for your euro shams by washing them regularly in cold water with a gentle detergent and tumble drying on low or hanging them to dry, avoiding bleach and harsh chemicals. Regular fluffing and occasional spot cleaning will also help maintain their appearance.
10. Can I make euro shams from repurposed or recycled fabrics?
Yes, making euro shams from repurposed or recycled fabrics is a sustainable and creative way to add unique style to your home decor. Old clothing, linens, and fabric scraps can all be transformed into beautiful euro shams.