
What Size Is Euro 25 In Us? Euro size 25 equates to a US size 8.5 in kids’ shoes, but understanding the nuances of shoe sizing is crucial for ensuring a comfortable and accurate fit, especially when dealing with European products through sources like eurodripusa.net, your premier destination for high-quality European drip irrigation systems. To help make things easier, this guide will provide comprehensive conversion charts, measurement tips, and essential considerations for selecting the right size for your drip irrigation needs.
1. Understanding Shoe Size Conversion: Euro to US
Converting shoe sizes between European (EU) and United States (US) standards can be confusing, especially since shoe sizes may be different based on brand or manufacture, but it is important to ensure proper fit with agricultural irrigation or anything else. Here’s a detailed look at how to navigate these conversions accurately:
1.1. Key Considerations for Accurate Conversion
- Age and Gender: Shoe sizes vary between adults and children, as well as between men and women. Always specify the age group and gender when converting sizes.
- Brand Variations: Different brands may have slight variations in their sizing standards. Consulting a brand-specific size chart, when available, is always a good idea.
- Foot Measurement: The most accurate method is to measure the foot’s length in centimeters or inches and then refer to a conversion chart.
- Purpose: Make sure to be specific when you know if you are converting shoe sizes or agricultural components.
1.2. Euro Size 25 Conversion
Euro size 25 generally corresponds to the following US sizes:
- Kids’ Shoes: US size 8.5
- Insole Length: Approximately 14.7 centimeters (5.79 inches)
1.3. Comprehensive Conversion Chart
Below is a detailed shoe size conversion chart to help you find the right fit, whether for children or adults:
Kids’ Shoe Size Conversion Chart
| Euro Size | UK Size | US Size | Foot Length (approx. cm) | Foot Length (approx. inches) |
|---|---|---|---|---|
| 16 | 1 | 1.5 | 9.9 | 3.9 |
| 17 | 1.5 | 2 | 10.6 | 4.2 |
| 18 | 2 | 3 | 11.3 | 4.4 |
| 19 | 3 | 4 | 11.9 | 4.7 |
| 20 | 3.5 | 4.5 | 12.6 | 5.0 |
| 21 | 4.5 | 5.5 | 13.3 | 5.2 |
| 22 | 5 | 6 | 13.9 | 5.5 |
| 23 | 6 | 7 | 14.6 | 5.7 |
| 24 | 7 | 8 | 15.3 | 6.0 |
| 25 | 7.5 | 8.5 | 15.9 | 6.3 |
| 26 | 8.5 | 9.5 | 16.6 | 6.5 |
| 27 | 9 | 10 | 17.3 | 6.8 |
| 28 | 10 | 11 | 17.9 | 7.0 |
| 29 | 11 | 12 | 18.6 | 7.3 |
| 30 | 11.5 | 12.5 | 19.3 | 7.6 |
| 31 | 12.5 | 13.5 | 19.9 | 7.8 |
| 32 | 13 | 1 | 20.6 | 8.1 |
| 33 | 1 | 2 | 21.3 | 8.4 |
| 34 | 2 | 3 | 21.9 | 8.6 |
| 35 | 2.5 | 3.5 | 22.6 | 8.9 |
Adults’ Shoe Size Conversion Chart
| EU Size | US Men’s | US Women’s | UK Men’s | UK Women’s | Foot Length (approx. cm) | Foot Length (approx. inches) |
|---|---|---|---|---|---|---|
| 35 | 3.5 | 5 | 3 | 2 | 22.0 | 8.66 |
| 36 | 4 | 5.5 | 3.5 | 3 | 22.5 | 8.86 |
| 37 | 5 | 6.5 | 4 | 4 | 23.0 | 9.06 |
| 38 | 6 | 7.5 | 5 | 5 | 23.5 | 9.25 |
| 39 | 6.5 | 8 | 6 | 5.5 | 24.5 | 9.65 |
| 40 | 7 | 8.5 | 6.5 | 6 | 25.0 | 9.84 |
| 41 | 8 | 9.5 | 7 | 7 | 25.5 | 10.04 |
| 42 | 9 | 10.5 | 8 | 8 | 26.0 | 10.24 |
| 43 | 9.5 | 11 | 9 | 8.5 | 27.0 | 10.63 |
| 44 | 10 | 11.5 | 9.5 | 9 | 27.5 | 10.83 |
| 45 | 11 | 12 | 10.5 | 10 | 28.0 | 11.02 |
| 46 | 12 | 13 | 11.5 | 11 | 28.5 | 11.22 |
| 47 | 13 | 14 | 12.5 | 12 | 29.0 | 11.42 |
| 48 | 14 | 15 | 13.5 | 13 | 30.0 | 11.81 |
| 49 | 15 | 16 | 14.5 | 14 | 30.5 | 12.01 |
| 50 | 16 | 17 | 15.5 | 15 | 31.0 | 12.21 |
1.4. Why Accurate Sizing Matters
Accurate sizing is essential for:
- Comfort: Well-fitted shoes prevent blisters and discomfort.
- Foot Health: Proper sizing supports natural foot development and prevents issues like bunions or hammertoes.
- Performance: In activities or sports, correct shoe size enhances performance and reduces injury risk.
1.5. Tools and Resources
- Printable Foot Measuring Tools:
- Many websites offer printable foot measuring guides. These can be useful for getting an approximate measurement at home.
- Mobile Apps:
- Some apps use your smartphone’s camera to measure foot size accurately.
- Professional Fitters:
- Visiting a shoe store with professional fitters ensures the most accurate measurement and personalized advice.
2. Measuring Your Child’s Feet Accurately
Measuring your child’s feet accurately is crucial for ensuring a comfortable and supportive fit. Here’s a step-by-step guide to help you through the process:
2.1. What You’ll Need
- Paper: A piece of paper larger than your child’s foot
- Pencil or Pen: For tracing the foot
- Ruler or Measuring Tape: To measure the tracing
- Wall: To ensure the heel is properly aligned
- Socks: If your child will be wearing socks with the shoes, have them wear socks during the measurement
2.2. Step-by-Step Measuring Guide
- Prepare the Paper:
- Place the paper flat on the floor against a wall. Ensure the wall is straight and stable.
- Position Your Child’s Foot:
- Have your child stand on the paper with their heel against the wall. Make sure they are standing straight, with their weight evenly distributed on their foot.
- Trace the Foot:
- Using a pencil or pen, carefully trace around your child’s foot. Hold the pencil perpendicular to the paper to get an accurate outline.
- Measure the Length:
- Use a ruler or measuring tape to measure the distance from the heel (where it touched the wall) to the longest toe on the tracing. Record this measurement in both centimeters and inches.
- Measure the Width (Optional):
- Measure the widest part of the foot on the tracing. This can help when choosing between different shoe widths.
- Repeat for the Other Foot:
- Measure both feet, as they may not be the same size. Use the larger measurement when selecting the shoe size.
- Add Extra Space (If Necessary):
- For growing room, you can add about 0.5 to 1 centimeter (approximately 0.2 to 0.4 inches) to the measurement when selecting the shoe size. This allows for comfortable movement and growth.
2.3. Tips for Accuracy
- Measure at the End of the Day: Feet tend to swell throughout the day, so measuring in the late afternoon or evening will provide the most accurate size.
- Wear Socks: Have your child wear the type of socks they will typically wear with the shoes to ensure an accurate fit.
- Flat Surface: Ensure the paper is on a hard, flat surface to prevent any distortion of the measurement.
- Straight Posture: Make sure your child stands upright with their weight evenly distributed to get the most accurate tracing.
- Check the Fit: Whenever possible, have your child try on the shoes to ensure they fit comfortably and allow enough room for movement.
2.4. Using a Foot Measuring Device
If you prefer a more precise method, consider using a foot measuring device (such as a Brannock device), which is commonly found in shoe stores. This device measures both the length and width of the foot, providing a more accurate shoe size recommendation.
2.5. Measuring Tips for Infants
Measuring the feet of infants requires extra care and patience:
- Timing: Choose a time when the baby is calm and relaxed, such as after a nap or feeding.
- Position: Lay the baby on their back and gently straighten one leg at a time.
- Technique: Instead of tracing, try placing the baby’s foot on the paper and marking the heel and longest toe. Then, measure the distance between these marks.
- Safety: Always use a soft pencil and avoid any sharp objects near the baby.
3. How to Convert Foot Length to Shoe Size
Once you’ve measured your child’s feet, you’ll need to convert that length into the appropriate shoe size. This conversion can vary slightly between brands, but here’s a general guide to help:
3.1. Using Conversion Charts
The most reliable way to convert foot length to shoe size is by using a conversion chart specific to the region (US, EU, UK) and age group (infant, child, adult).
Example Conversion Chart (Kids)
| Foot Length (cm) | US Size | EU Size |
|---|---|---|
| 12.7 | 6 | 22 |
| 13.3 | 6.5 | 23 |
| 14.0 | 7 | 24 |
| 14.6 | 8 | 25 |
| 15.2 | 8.5 | 26 |
| 15.9 | 9 | 27 |
| 16.5 | 10 | 28 |
| 17.1 | 10.5 | 29 |
3.2. Steps to Convert Foot Length
- Measure Foot Length: Follow the steps in the previous section to measure your child’s foot length accurately.
- Consult Conversion Chart: Find a reliable shoe size conversion chart that includes US, EU, and UK sizes. Ensure the chart is specific to the age group (e.g., kids, adults).
- Locate Foot Length: Find the foot length measurement on the chart that is closest to your measured length. If your measurement falls between two sizes, it’s generally recommended to choose the larger size to allow for growing room.
- Determine Corresponding Shoe Size: Identify the corresponding US and EU shoe sizes for the foot length you located on the chart.
- Consider Width: If you measured the width of the foot, check if the shoe brand offers different width options. Choose the appropriate width to ensure a comfortable fit.
3.3. Tips for Accurate Conversion
- Use Brand-Specific Charts: Whenever possible, use the shoe size chart provided by the specific brand you are purchasing. Different brands may have slight variations in their sizing.
- Measure Both Feet: Since feet can be slightly different sizes, measure both feet and use the larger measurement when determining the shoe size.
- Account for Socks: If your child will be wearing socks with the shoes, measure their foot while they are wearing socks.
- Growing Room: For kids, add about 0.5 to 1 centimeter (0.2 to 0.4 inches) to the foot length when selecting the shoe size to allow for growing room.
3.4. Example Conversion
Let’s say you measured your child’s foot and found it to be 15.2 cm long. Using the example conversion chart above:
- Foot Length: 15.2 cm
- US Size: 8.5
- EU Size: 26
So, a foot length of 15.2 cm corresponds to a US size 8.5 and an EU size 26.
3.5. Online Conversion Tools
Numerous online tools can help convert foot length to shoe sizes. These tools typically require you to input the foot length in centimeters or inches and then provide the corresponding shoe sizes in different regions. Always cross-reference the results with a reputable conversion chart to ensure accuracy.
4. Factors Affecting Shoe Size
Several factors can influence shoe size, making it essential to consider these when selecting footwear. These factors include individual foot characteristics, brand variations, and the specific type of shoe.
4.1. Foot Shape and Volume
- Foot Shape: People have varying foot shapes, including narrow, wide, flat, or high-arched feet. The shape of the foot can impact how a shoe fits and the size needed for optimal comfort.
- Foot Volume: Foot volume refers to the overall size and fullness of the foot. Individuals with high-volume feet may require larger sizes or wider shoes to accommodate the extra bulk.
4.2. Brand and Style Variations
- Brand Sizing Differences: Shoe sizes can differ significantly between brands. For example, a size 7 in one brand might feel like a size 6.5 or 7.5 in another. Always consult the brand-specific size chart when available.
- Style-Specific Fit: The style of the shoe can also affect how it fits. For instance, a closed-toe shoe may fit differently than an open-toe sandal, and athletic shoes often have different sizing standards compared to dress shoes.
4.3. Foot Conditions and Swelling
- Foot Conditions: Certain foot conditions, such as bunions, hammertoes, or swelling, can impact shoe size and comfort. Individuals with these conditions may need to select shoes that offer additional width or depth.
- Swelling: Feet tend to swell throughout the day, especially in warm weather or after prolonged periods of standing or walking. Measuring feet at the end of the day can provide a more accurate size, accounting for any swelling.
4.4. Sock Thickness
- Sock Thickness: The thickness of socks worn with shoes can influence the fit. Thicker socks may require a slightly larger shoe size, while thinner socks may result in a looser fit. It’s best to measure feet while wearing the type of socks that will typically be worn with the shoes.
4.5. Age and Growth
- Children’s Growth: Children’s feet grow rapidly, so it’s essential to regularly measure their feet to ensure their shoes still fit properly.
- Adult Foot Changes: Even in adulthood, feet can change size and shape due to factors like weight gain, pregnancy, or the natural aging process.
4.6. Time of Day
- Evening Measurements: As mentioned earlier, feet tend to swell throughout the day. Measuring feet in the late afternoon or evening will provide a more accurate size, accounting for any swelling.
4.7. How to Accommodate These Factors
- Measure Regularly: Measure feet regularly, especially for children, to ensure shoes fit correctly.
- Try On Shoes: Whenever possible, try on shoes before purchasing to assess the fit and comfort. Walk around in the shoes to ensure they don’t pinch or rub.
- Consult Size Charts: Refer to brand-specific size charts to determine the appropriate size for each brand.
- Consider Shoe Width: If you have wide or narrow feet, look for shoes that offer different width options.
- Accommodate Foot Conditions: Choose shoes that provide extra room and support if you have foot conditions like bunions or hammertoes.
- Account for Socks: Wear the type of socks you plan to wear with the shoes when trying them on.
- Shop at the Right Time: Shop for shoes in the late afternoon or evening when your feet are at their largest.
5. Tips for Buying Shoes Online
Buying shoes online can be convenient, but it also comes with challenges, such as not being able to try them on before purchasing. Here are some tips to help you make informed decisions and minimize the risk of returns.
5.1. Measure Your Feet Accurately
- Follow Measuring Guide: Use a ruler or measuring tape to measure the length and width of your feet accurately. Refer to the steps outlined earlier in this guide for precise measurements.
- Measure Both Feet: Measure both feet, as they may not be the same size. Use the larger measurement when selecting the shoe size.
- Measure at the Right Time: Measure your feet in the late afternoon or evening when they are at their largest due to swelling.
5.2. Consult Size Charts
- Use Brand-Specific Charts: Whenever possible, use the shoe size chart provided by the specific brand you are purchasing. Different brands may have slight variations in their sizing.
- Cross-Reference Measurements: Compare your foot measurements with the size chart to determine the appropriate shoe size. Pay attention to both length and width measurements.
- Read Reviews: Check customer reviews for information about sizing accuracy. Look for comments about whether the shoes run small, large, or true to size.
5.3. Understand Return Policies
- Review Return Policy: Before making a purchase, carefully review the online retailer’s return policy. Check the time frame for returns, any associated fees, and the condition requirements for returned items.
- Keep Original Packaging: Retain the original packaging and tags until you are certain you want to keep the shoes. This will make the return process easier if needed.
5.4. Check Product Descriptions
- Read Detailed Descriptions: Carefully read the product descriptions for information about the shoe’s fit, materials, and construction.
- Look for Width Options: If you have wide or narrow feet, look for shoes that offer different width options.
- Consider Shoe Style: Consider how the style of the shoe may affect the fit. For example, a pointed-toe shoe may feel more snug than a rounded-toe shoe.
5.5. Use Virtual Try-On Tools (If Available)
- Explore Virtual Try-On: Some online retailers offer virtual try-on tools that use augmented reality (AR) to simulate how the shoes will look on your feet.
- Follow Instructions: Follow the instructions provided by the virtual try-on tool to ensure accurate results.
5.6. Read Customer Reviews
- Check Customer Feedback: Read customer reviews to gather insights about the shoe’s fit, comfort, and quality.
- Look for Sizing Information: Pay attention to comments about sizing accuracy. Look for patterns in the reviews to determine if the shoes tend to run small, large, or true to size.
5.7. Consider Buying from Reputable Retailers
- Choose Trusted Retailers: Purchase shoes from reputable online retailers with a history of good customer service and easy returns.
- Check for Secure Payment Options: Ensure the retailer offers secure payment options to protect your financial information.
5.8. Tips for Trying On Shoes at Home
- Try On Indoors: Try on the shoes indoors on a clean, carpeted surface to avoid damaging the soles.
- Wear Appropriate Socks: Wear the type of socks you plan to wear with the shoes when trying them on.
- Walk Around: Walk around in the shoes to assess the fit and comfort. Pay attention to any areas that pinch or rub.
- Check the Fit: Ensure there is enough room in the toe box for your toes to move comfortably. You should be able to wiggle your toes without feeling restricted.
6. Understanding Shoe Widths
Understanding shoe widths is crucial for ensuring a comfortable and proper fit, especially if you have feet that are wider or narrower than average. Here’s a detailed guide to help you navigate shoe width sizing:
6.1. Common Width Designations
Shoe widths are typically designated by letters, with each letter representing a different width. The most common width designations are:
- Narrow: Typically designated as 2A or AA.
- Medium: Also known as standard width, usually designated as B for women and D for men.
- Wide: Designated as D for women and 2E or EE for men.
- Extra Wide: Designated as 4E or EEEE.
6.2. Importance of Proper Width
Wearing shoes that are the correct width is essential for:
- Comfort: Shoes that are too narrow can cause pinching, rubbing, and blisters, while shoes that are too wide can lead to slippage and instability.
- Foot Health: Proper shoe width helps prevent foot problems such as bunions, hammertoes, and neuromas.
- Support: Shoes that fit well provide better support and stability, reducing the risk of injuries.
6.3. How to Determine Your Shoe Width
- Measure Your Feet: Use a ruler or measuring tape to measure the width of your feet at the widest point. Stand with your weight evenly distributed and measure from one side of your foot to the other.
- Consult a Size Chart: Refer to a shoe width chart to determine your shoe width based on your foot measurement. Keep in mind that width sizing can vary between brands, so it’s best to consult the specific chart provided by the brand you are considering.
- Consider the Fit: When trying on shoes, pay attention to how they feel on your feet. The shoes should feel snug but not tight, with enough room for your toes to move comfortably.
6.4. Factors Affecting Shoe Width
- Foot Shape: People with wide feet may need to choose wider shoe widths to accommodate their foot shape comfortably.
- Foot Conditions: Certain foot conditions, such as bunions or swelling, can affect the width of your feet and the shoe size you need.
- Shoe Style: The style of the shoe can also impact the width. For example, pointed-toe shoes may feel more snug than rounded-toe shoes.
6.5. Tips for Finding the Right Width
- Shop at Specialty Stores: Specialty shoe stores often carry a wider range of widths than standard retailers.
- Look for Brands with Width Options: Some brands specialize in shoes for wide or narrow feet and offer a variety of width options.
- Read Customer Reviews: Check customer reviews for information about sizing accuracy and width. Look for comments about whether the shoes run narrow, wide, or true to size.
- Try On Shoes: Whenever possible, try on shoes before purchasing to assess the fit and comfort. Walk around in the shoes to ensure they don’t pinch or rub.
6.6. Width Charts
Width charts can provide general guidelines for determining your shoe width based on your foot measurement. Here’s a sample chart for women:
Women’s Shoe Width Chart
| Foot Width (inches) | Width Designation |
|---|---|
| Under 3 1/8 | 2A (Narrow) |
| 3 1/8 to 3 3/8 | B (Medium) |
| 3 3/8 to 3 5/8 | D (Wide) |
| Over 3 5/8 | 2E (Extra Wide) |
Men’s Shoe Width Chart
| Foot Width (inches) | Width Designation |
|---|---|
| Under 3 11/16 | B (Narrow) |
| 3 11/16 to 4 1/16 | D (Medium) |
| 4 1/16 to 4 5/16 | 2E (Wide) |
| Over 4 5/16 | 4E (Extra Wide) |
6.7. Common Mistakes to Avoid
- Ignoring Width: Many people focus solely on shoe length and neglect the importance of width.
- Assuming Consistency: Don’t assume that your shoe width is the same across all brands.
- Buying Without Trying: Avoid buying shoes online without trying them on first, especially if you have wide or narrow feet.
7. Caring for Your Feet
Taking care of your feet is essential for overall health and well-being. Proper foot care can prevent discomfort, injuries, and long-term problems. Here are some essential tips for maintaining healthy feet:
7.1. Daily Foot Hygiene
- Wash Regularly: Wash your feet daily with soap and warm water. Pay attention to the areas between your toes, as these are prone to fungal infections.
- Dry Thoroughly: After washing, dry your feet thoroughly, especially between your toes. Moisture can create a breeding ground for bacteria and fungi.
- Moisturize: Apply a good quality moisturizer to your feet, especially after washing. This helps prevent dryness and cracking.
- Trim Nails Properly: Trim your toenails straight across and avoid cutting them too short. This helps prevent ingrown toenails.
- Wear Clean Socks: Wear clean, dry socks made of breathable materials such as cotton or wool. Change your socks daily or more often if your feet sweat excessively.
7.2. Choosing the Right Footwear
- Proper Fit: Choose shoes that fit well, with enough room for your toes to move comfortably. Avoid shoes that are too tight, too loose, or that pinch or rub.
- Support and Cushioning: Look for shoes that provide adequate support and cushioning, especially if you spend a lot of time on your feet.
- Breathable Materials: Choose shoes made of breathable materials such as leather or mesh to allow air to circulate and prevent excessive sweating.
- Avoid High Heels: Limit your wear of high heels, as they can put excessive strain on your feet and lead to foot problems such as bunions and hammertoes.
- Alternate Shoes: Alternate between different pairs of shoes to allow them to air out and to distribute the pressure on your feet more evenly.
7.3. Inspecting Your Feet Regularly
- Check for Abnormalities: Inspect your feet regularly for any signs of abnormalities such as blisters, cuts, sores, redness, swelling, or changes in nail color or thickness.
- Seek Professional Help: If you notice any concerning issues, seek professional help from a podiatrist or healthcare provider.
7.4. Addressing Common Foot Problems
- Blisters: Cover blisters with a bandage to protect them from further irritation. Avoid popping blisters, as this can increase the risk of infection.
- Corns and Calluses: Use a pumice stone or foot file to gently remove dead skin from corns and calluses. Avoid cutting them with a sharp object, as this can lead to infection.
- Fungal Infections: Treat fungal infections such as athlete’s foot with over-the-counter antifungal creams or powders. Keep your feet clean and dry, and avoid walking barefoot in public areas.
- Ingrown Toenails: Soak your feet in warm water and gently push the skin away from the ingrown nail. If the problem persists, seek professional help from a podiatrist.
- Bunions and Hammertoes: Wear shoes that provide plenty of room for your toes and avoid high heels or pointed-toe shoes. Consider using orthotic inserts to support and align your feet.
7.5. Home Remedies for Foot Pain
- Soaking in Epsom Salts: Soak your feet in warm water with Epsom salts to relieve pain and reduce swelling.
- Ice Packs: Apply ice packs to your feet for 15-20 minutes at a time to reduce inflammation and pain.
- Massage: Gently massage your feet to relieve tension and improve circulation.
- Stretching Exercises: Perform stretching exercises to improve flexibility and range of motion in your feet and ankles.
7.6. Professional Foot Care
- Regular Check-Ups: Schedule regular check-ups with a podiatrist to monitor your foot health and address any potential problems early on.
- Custom Orthotics: Consider getting custom orthotics if you have foot problems such as flat feet, high arches, or plantar fasciitis.
8. Drip Irrigation Systems from Eurodrip USA
eurodripusa.net provides top-quality drip irrigation systems designed to optimize water usage and enhance crop yields. Understanding shoe sizes might seem unrelated, but it underscores the importance of precision and attention to detail, values that Eurodrip USA brings to the world of irrigation.
8.1. Benefits of Drip Irrigation
- Water Efficiency: Drip irrigation delivers water directly to the root zone of plants, minimizing water loss through evaporation and runoff.
- Cost Savings: By using water more efficiently, drip irrigation can help reduce water bills and lower operating costs.
- Improved Crop Yields: Drip irrigation ensures that plants receive the right amount of water at the right time, leading to healthier plants and increased yields.
- Reduced Weed Growth: By keeping the soil surface dry, drip irrigation can help reduce weed growth, saving time and labor.
- Versatility: Drip irrigation can be used in a wide range of applications, from small gardens to large-scale agricultural operations.
8.2. Products Offered by Eurodrip USA
eurodripusa.net offers a comprehensive range of drip irrigation products, including:
- Drip Tape: High-quality drip tape for row crops and vegetable gardens.
- Drip Lines: Durable drip lines for orchards, vineyards, and landscaping.
- Emitters: A variety of emitters to suit different plant types and watering needs.
- Filters: Filters to remove debris and prevent clogging of drip lines and emitters.
- Fittings: Fittings for connecting drip lines, tape, and other components.
- Controllers: Irrigation controllers to automate watering schedules and optimize water usage.
8.3. Choosing the Right Drip Irrigation System
Selecting the right drip irrigation system depends on several factors, including:
- Crop Type: Different crops have different watering needs, so it’s essential to choose a system that is appropriate for the plants you are growing.
- Soil Type: Soil type affects water infiltration and drainage, so it’s important to consider the soil when designing your irrigation system.
- Water Source: The quality and availability of your water source will also influence your choice of irrigation system.
- Field Size: The size of your field or garden will determine the amount of drip tape, drip lines, and other components you need.
8.4. How to Get Started with Drip Irrigation
- Assess Your Needs: Determine the watering needs of your crops, the characteristics of your soil, and the availability of your water source.
- Design Your System: Design a drip irrigation system that meets your specific needs, taking into account the crop type, soil type, water source, and field size.
- Choose Your Products: Select high-quality drip irrigation products from eurodripusa.net to ensure optimal performance and reliability.
- Install Your System: Install your drip irrigation system according to the manufacturer’s instructions.
- Monitor and Maintain: Monitor your system regularly to ensure that it is functioning properly and make any necessary adjustments.
8.5. eurodripusa.net: Your Trusted Partner for Drip Irrigation
eurodripusa.net is committed to providing top-quality drip irrigation systems and exceptional customer service. Whether you are a small gardener or a large-scale agricultural operator, we have the products and expertise to help you optimize your water usage and enhance your crop yields. Visit our website today to learn more about our products and services.
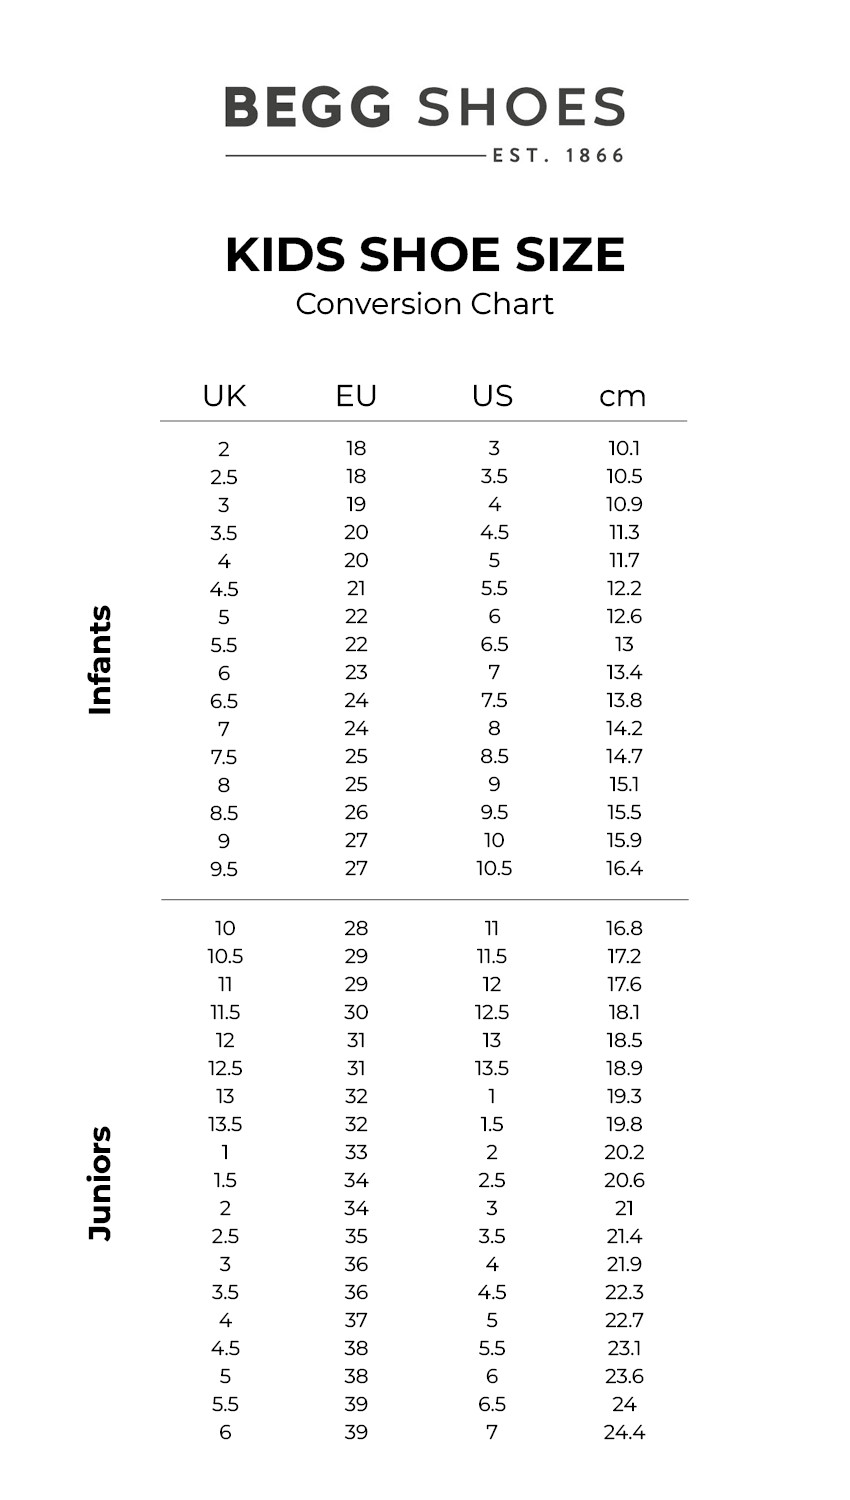 Kids Shoe Size Conversion Chart
9. FAQs: Euro Size 25 in US
9.1. What age group typically wears Euro size 25 shoes?
Euro size 25 shoes are generally worn by children around 2 to 3 years old, but this can vary depending on the child’s growth rate.
9.2. How do I convert Euro size 25 to US shoe size for kids?
Euro size 25 converts to a US size 8.5 for kids’ shoes.