
Looking for “Euro Mounts Near Me” to display your hunting trophies with pride? At eurodripusa.net, we understand the importance of preserving your hunting memories. We offer top-quality European mount services and supplies, alongside expert advice to help you create stunning displays. Let us help you showcase your trophies beautifully and respectfully. We’re dedicated to providing you with the best solutions for preserving your trophies with elegance and efficiency.
1. What are Euro Mounts and Why Choose Them?
Euro mounts, also known as European skull mounts, involve cleaning and preserving the skull of an animal, typically a game animal like deer, elk, or bear. Instead of a traditional shoulder mount, where the animal’s hide is preserved and attached to a mannequin, a Euro mount showcases the bare skull and antlers or horns. This style offers a clean, modern, and often more affordable way to display your trophies.
1.1. The Allure of Euro Mounts
- Affordability: Euro mounts are generally less expensive than traditional taxidermy.
- Space-Saving: They require less space compared to full-body or shoulder mounts.
- Aesthetic Appeal: Many hunters appreciate the minimalist and natural look of a Euro mount.
- DIY Option: With the right knowledge and tools, you can create your own Euro mount, adding a personal touch to your trophy.
1.2. Euro Mounts vs. Traditional Taxidermy: A Quick Comparison
| Feature | Euro Mount | Traditional Taxidermy |
|---|---|---|
| Cost | Lower | Higher |
| Space | Less | More |
| Aesthetics | Minimalist, natural | Realistic, detailed |
| Maintenance | Easier to clean and maintain | Requires more specialized care |
| Personalization | DIY options available | Limited DIY options |
| Turnaround Time | Typically faster, especially for DIY | Can take several months |
2. Finding “Euro Mounts Near Me”: What to Look For
When searching for “euro mounts near me,” you have a few options: professional taxidermists, DIY methods, or a combination of both.
2.1. Local Taxidermists
Taxidermists specializing in Euro mounts can provide professional cleaning, whitening, and mounting services.
- Expertise: Experienced in handling skulls and ensuring proper preservation.
- Equipment: Access to specialized equipment for thorough cleaning and whitening.
- Time-Saving: Saves you the time and effort of doing it yourself.
- Quality: Ensures a high-quality, finished product.
2.2. DIY Euro Mounts
If you’re a hands-on person, creating your own Euro mount can be a rewarding experience.
- Cost-Effective: Reduces the cost of professional services.
- Personal Satisfaction: Allows you to take pride in preserving your trophy yourself.
- Learning Experience: Provides valuable knowledge about anatomy and preservation techniques.
- Customization: Offers greater control over the final appearance of your mount.
2.3. EurodripUSA.net: Your Partner in Trophy Preservation
At eurodripusa.net, we not only provide information and resources for DIY Euro mounts but also connect you with local professionals and suppliers. Our goal is to help you find the best solution for your trophy preservation needs.
3. Preparing Your Trophy for a Euro Mount
Whether you’re hiring a taxidermist or doing it yourself, proper preparation is crucial.
3.1. Field Dressing
- Head Removal: Remove the head from the animal as soon as possible after the hunt. Cut the head off at the last vertebrae (atlas joint) where the base of the skull attaches to the neck. This minimizes meat waste and simplifies the cleaning process.
- Skinning: If you’re not crossing state lines, leave the hide on to prevent the skull from drying out. If required by law, carefully remove the hide using a replaceable scalpel blade knife. Start at the back of the head and run the knife along the top of the skull to the snout, keeping the blade away from the bone to avoid scoring.
- Antler Protection: If the skull has antlers, use a flat head screwdriver to pry the hide from around the antler burs, avoiding knife marks.
3.2. Removing Soft Tissues
- Lower Jaw: Remove the lower jaw by making incisions along the outside of the jaw bone and opening the mouth until the jaw detaches.
- Eyes: Make an incision around the eyeball, free the connective tissue, and pull the eye from the socket.
- Meat Removal: Remove as much meat as possible from the outside of the skull to speed up the cleaning process.
3.3. Brain Removal
- Drilling: Use a drill with a 5/8” flat spade wood bit to scramble the brains through the hole at the back of the skull. Alternatively, use a screwdriver or strong stick.
- Rinsing: Use a pressure washer or water hose to rinse out all brain matter. If in the field, a self-service car wash can be used.
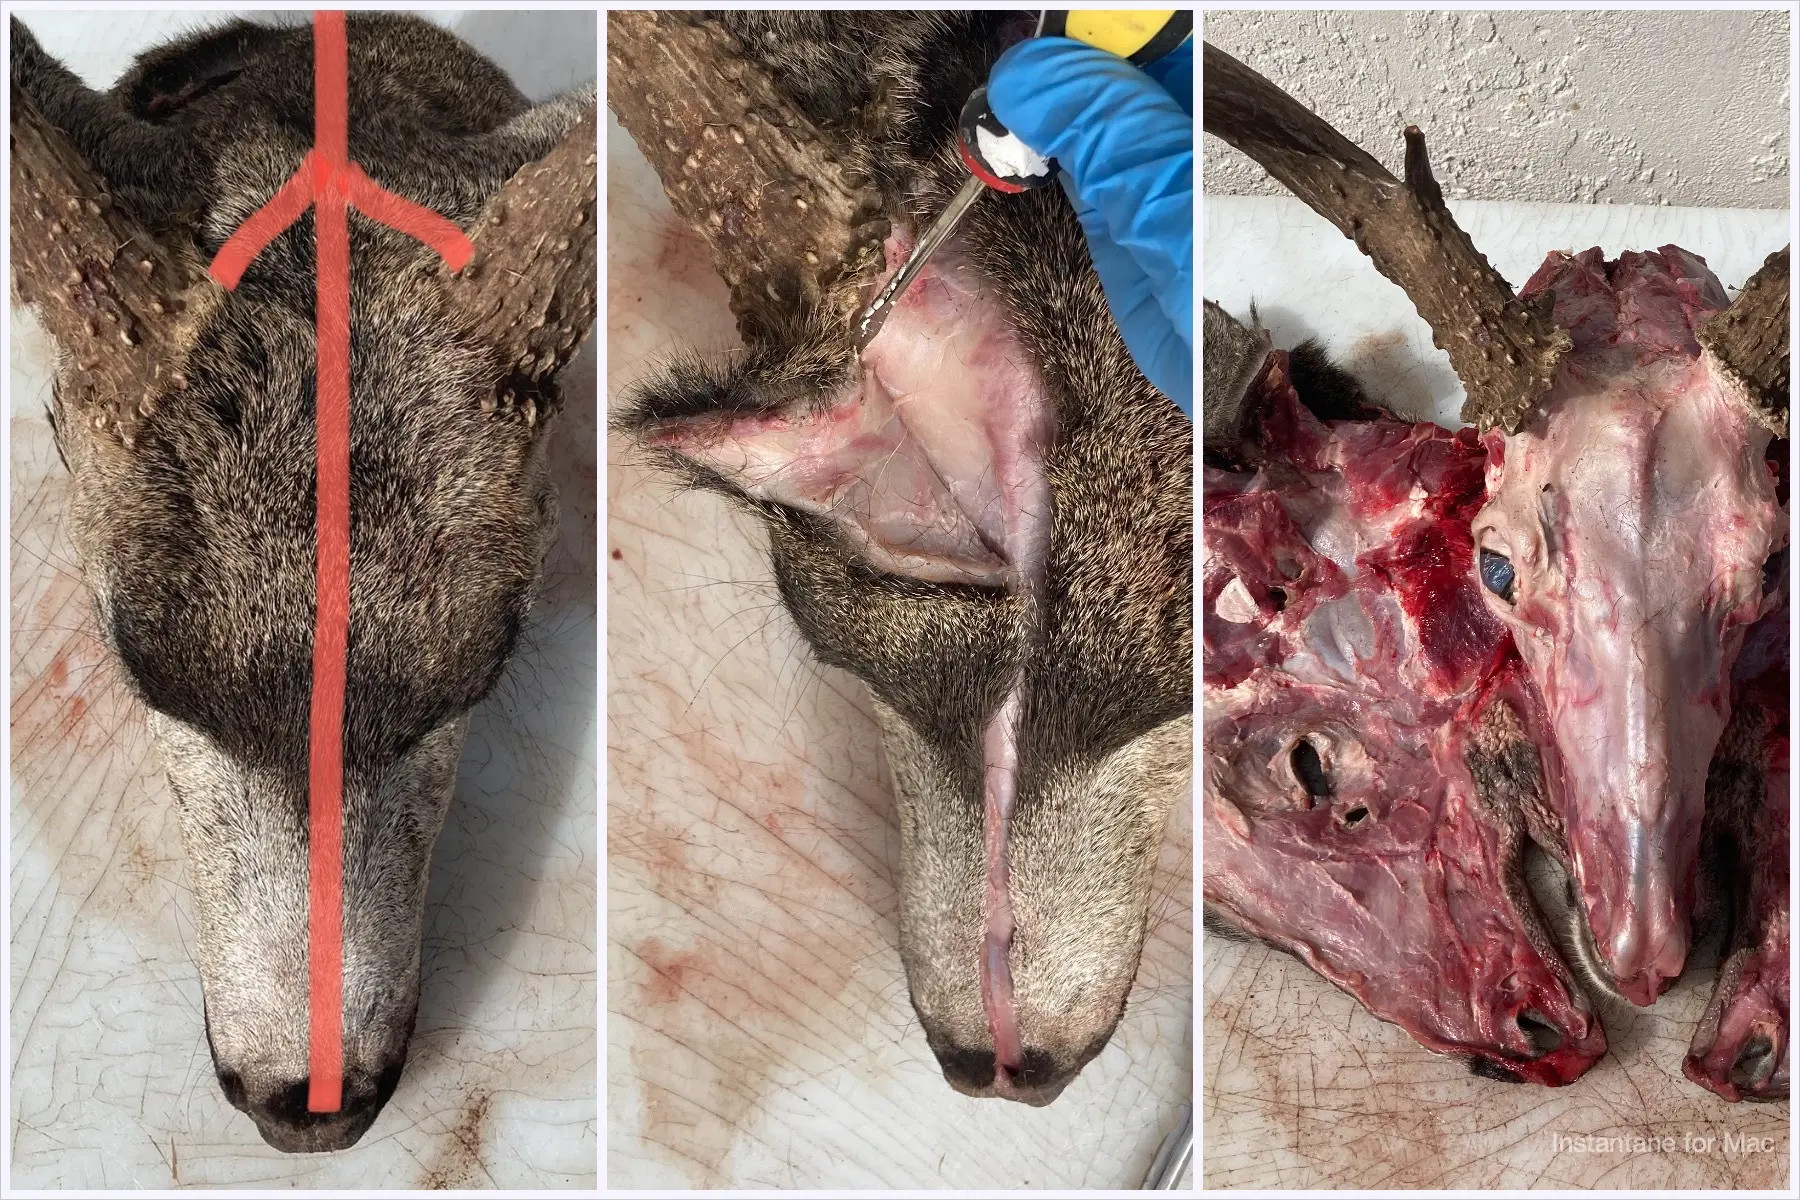
Alt: Hunter successfully prepares deer skull for Euro mount by carefully removing the head and skin.
4. The Maceration Process: A Deep Dive
Maceration is a preferred method for cleaning skulls, involving soaking the skull in water at a sustained temperature of 80-90 degrees Fahrenheit to promote bacterial growth. This method preserves small, intricate bones that can be lost during boiling.
4.1. Supplies for Maceration
- Watertight Plastic Container: A container large enough to completely submerge the skull in water. Metal containers should be avoided as they can rust and discolor the skull.
- Stainless Steel Fish Tank Heater: A heater that can maintain water temperatures at 80°F or higher to promote optimal bacteria growth.
- Plastic Wrap and Electrical Tape: Used to protect the bases of the antlers by wrapping them tightly to prevent color loss.
4.2. Step-by-Step Maceration
- Location: Place the container in a location where animals can’t access it and the smell won’t be a nuisance. Ensure electricity is available.
- Submerge the Skull: Place the skull in the container and fill it with water until it is completely covered. If antlers are present, fill the water about 1” above the antler burrs.
- Set the Heater: Submerge the fish tank heater and set it to 80°F. Ensure the heater remains fully submerged to prevent overheating.
- Cover the Container: Place a lid on the container to reduce evaporation and contain the odor. A plastic garbage bag secured with a bungee cord can also be used.
- Wait and Monitor: Allow the skull to macerate for four to six days for a deer-sized animal. Check the water level every two days and add water as needed to keep the skull submerged.
4.3. Post-Maceration
- Rinsing: After four to six days, remove the skull and rinse it thoroughly. Be gentle around the teeth, nasal passages, and sinus bones as they will be soft and easily damaged. A garden hose can be used for rinsing.
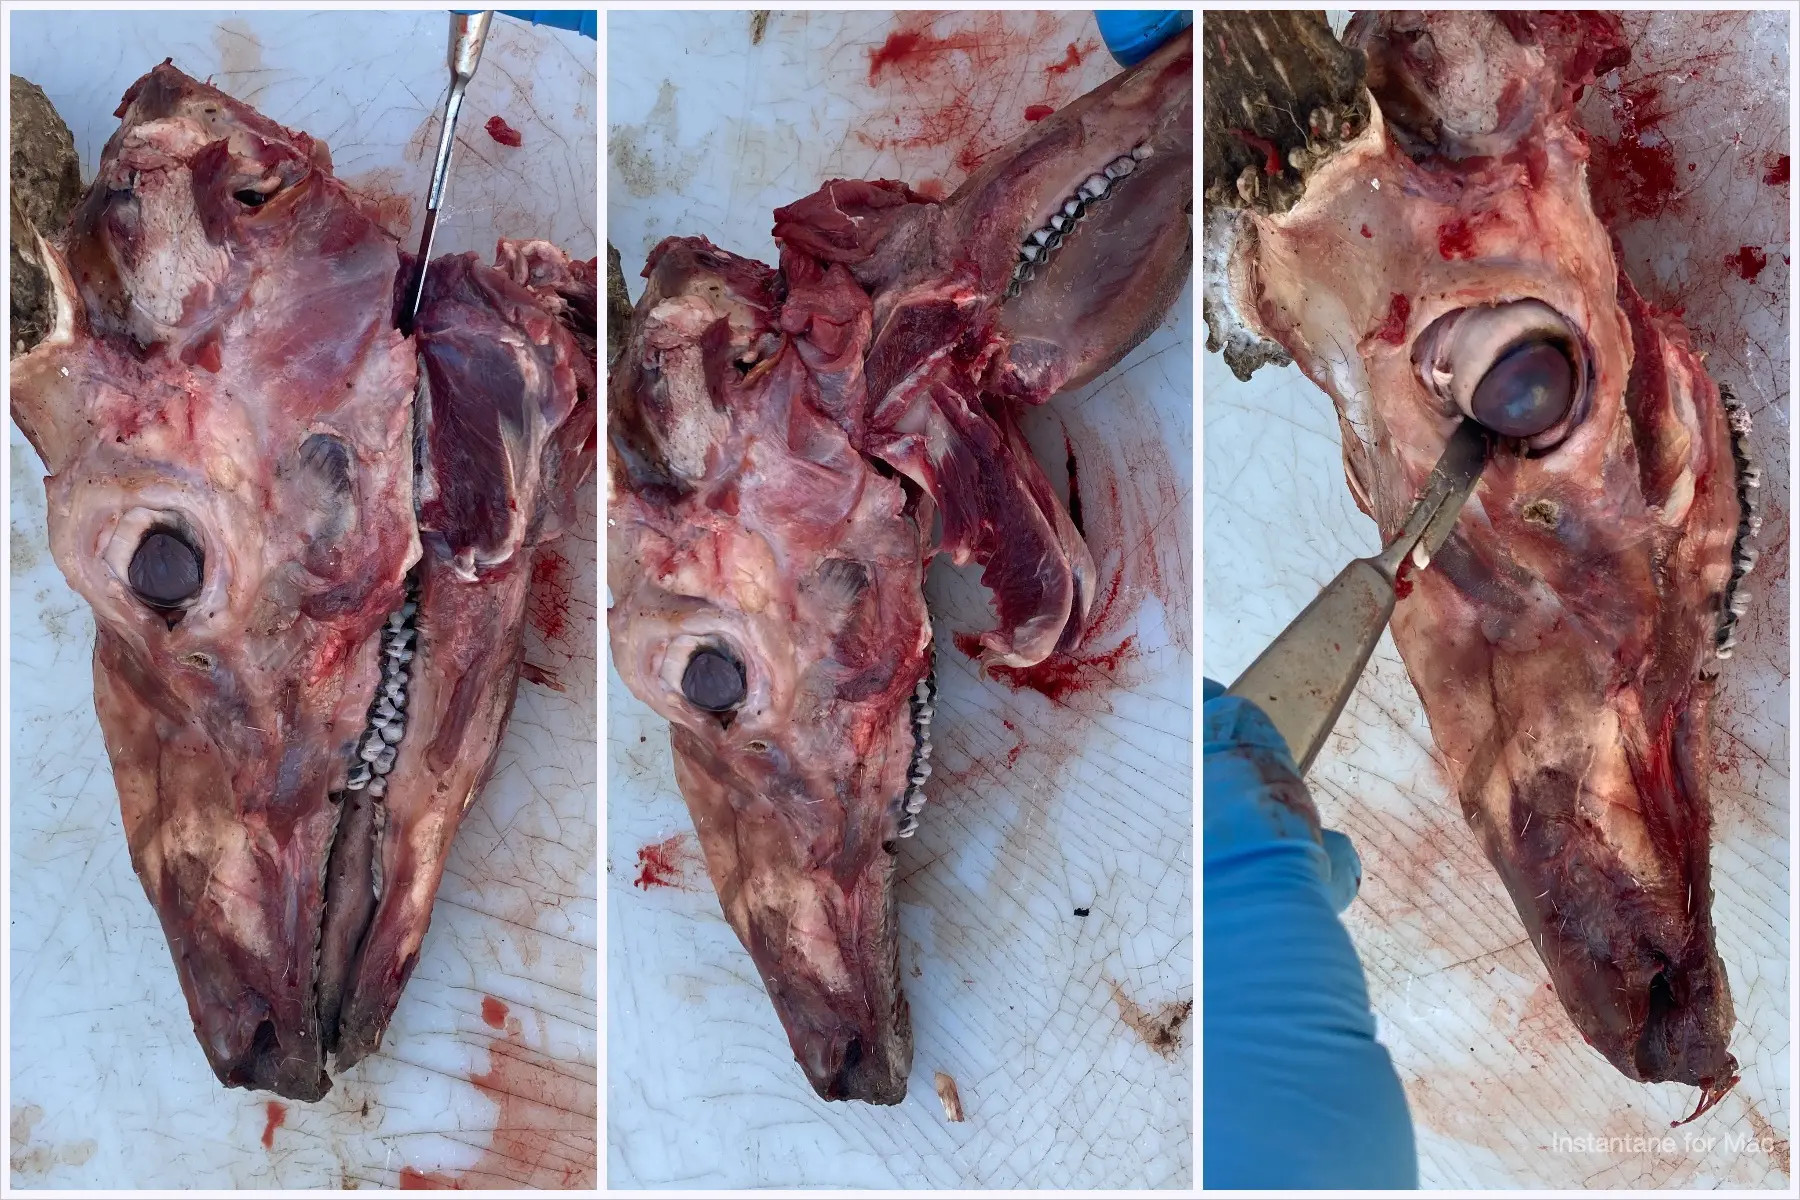
Alt: A hunter carefully removes the lower jaw and eyes from the deer skull as part of the Euro mount preparation process.
5. Skull Whitening: Achieving the Perfect Finish
Whitening the skull is an optional step to achieve a bright, clean look. Some prefer the natural bone color.
5.1. Supplies for Whitening
- Outdoor Burner: A turkey fryer or high-output BBQ burner.
- Large Pot: A pot large enough to completely submerge the skull in the whitening solution.
- Hydrogen Peroxide: Regular 3% hydrogen peroxide from a local store.
5.2. Step-by-Step Whitening
- Solution Preparation: Fill the pot 50% full with hydrogen peroxide, then add the skull, and fill the rest with water until the skull is completely covered. Ensure antlers are protected with tape and plastic.
- Boiling: Bring the solution to a rolling boil and submerge the skull for 5-10 minutes. Ensure the solution does not contact the uncovered part of the antlers.
- Monitoring: Periodically remove the skull to check the color and ensure the bone is not deteriorating. Remember the skull will whiten further as it dries.
- Loose Bones: Follow the same process for any loose teeth or nasal bones.
5.3. Safety Precautions
- Ventilation: Perform the whitening process in a well-ventilated area to avoid inhaling fumes.
- Protective Gear: Wear gloves and eye protection to prevent skin and eye irritation.
- Supervision: Never leave the boiling solution unattended.
6. Drying and Finishing Touches: The Final Steps
After whitening, proper drying and finishing touches are essential for a professional-looking Euro mount.
6.1. Drying
- Reassembly: Fit any nasal bones in place while the bone is still wet and secure them with a rubber band.
- Sunlight or Heat: Place the skull in direct sunlight or in front of a space heater until it is completely dry and no bones feel loose.
6.2. Finishing Touches
- Gluing: Once the skull is dry, glue any loose teeth or nasal bones back in place using fast-drying clear super glue.
- Antler Touch-Up: Remove the plastic and tape from the antler bases. If any horn was whitened, touch it up with Minwax provincial wood stain, applied lightly with a Q-tip until the desired color is achieved.
- Sealing: Coat the finished skull with a thin layer of Mop & Glo to seal the bone and prevent dust or dirt from settling. This also gives the skull a pleasant smell.
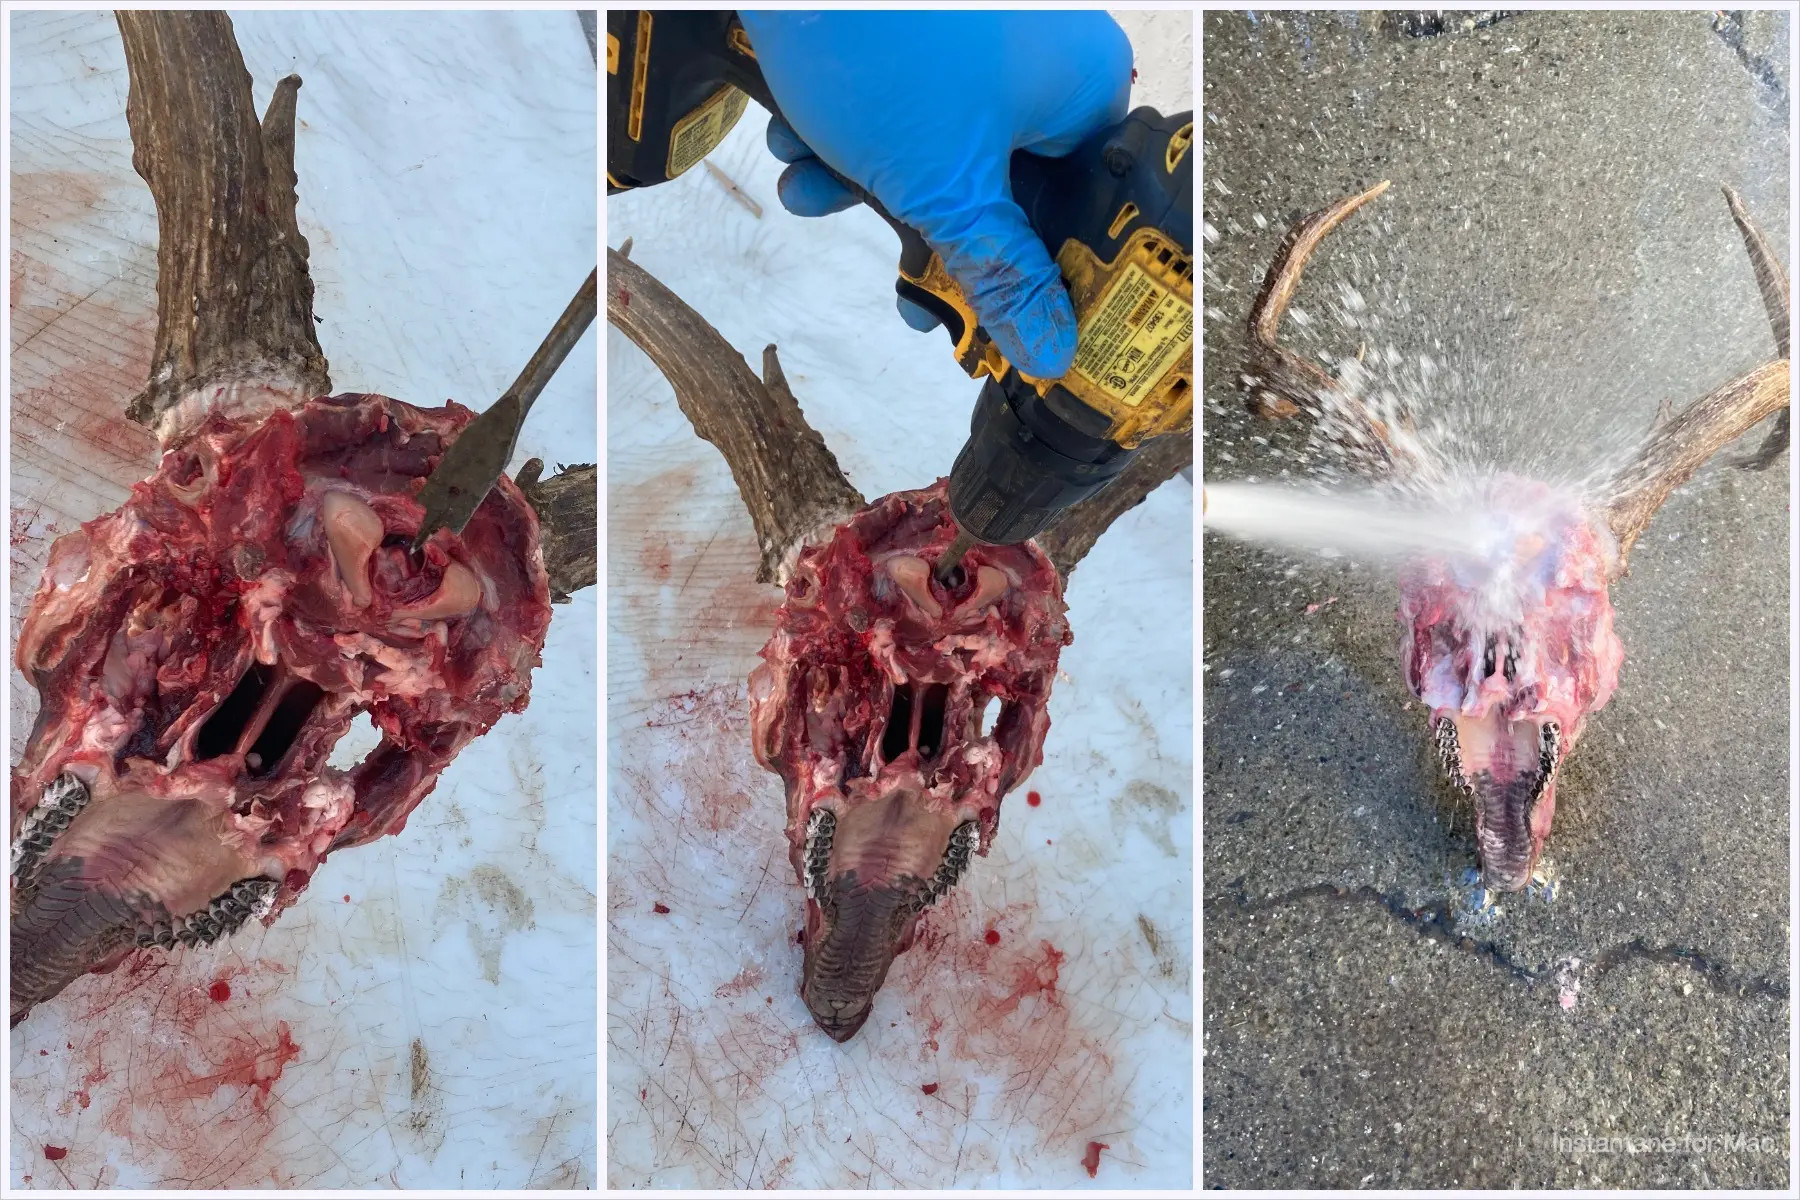
Alt: A hunter uses a drill to remove the brain from a deer skull, preparing it for the Euro mount process.
7. Euro Mount Display Ideas: Showcasing Your Trophy
Once your Euro mount is complete, it’s time to display it proudly.
7.1. Wall Mounting
- Dedicated Mounts: Use commercially available Euro mount brackets or mounts designed to securely hold the skull on the wall.
- Custom Displays: Create a custom wooden plaque or display board to mount the skull, adding a personalized touch.
7.2. Tabletop Displays
- Pedestals: Place the Euro mount on a decorative pedestal or stand for tabletop display.
- Shadow Boxes: Create a shadow box to showcase the skull along with other hunting memorabilia.
7.3. Creative Options
- Rustic Decor: Incorporate the Euro mount into a rustic decor theme, using natural elements like wood and stone.
- Modern Displays: Use minimalist shelves or metal stands to create a modern and sleek display.
7.4. Placement Tips
- Focal Point: Position the Euro mount in a location where it will be a focal point, such as above a fireplace or in a study.
- Lighting: Use accent lighting to highlight the details of the skull and antlers.
- Background: Choose a background that complements the Euro mount and enhances its visual appeal.
8. Common Mistakes to Avoid When Making a Euro Mount
- Improper Cleaning: Not removing all meat and tissue can lead to unpleasant odors and attract pests.
- Over-Boiling: Boiling the skull for too long can weaken the bone and cause it to crumble.
- Using Bleach: Bleach can damage the bone and cause it to become brittle.
- Neglecting Safety: Failing to wear protective gear during the whitening process can result in chemical burns or eye irritation.
- Rushing the Process: Rushing any step of the process can compromise the final result.
9. EurodripUSA.net: Your Resource for Quality Euro Mount Solutions
At eurodripusa.net, we’re committed to providing you with the best information, resources, and products for creating stunning Euro mounts.
9.1. Why Choose EurodripUSA.net?
- Expert Advice: Our team of experts can provide guidance and support throughout the Euro mount process.
- Quality Products: We offer a range of high-quality cleaning and whitening products.
- Local Connections: We connect you with local taxidermists and suppliers to meet your specific needs.
- Comprehensive Resources: Our website features detailed guides, tutorials, and tips for creating professional-looking Euro mounts.
9.2. Addressing Customer Challenges
We understand the challenges customers face when looking for Euro mount solutions:
- Finding Reliable Information: We provide accurate and up-to-date information on Euro mount techniques.
- Sourcing Quality Products: We offer a curated selection of high-quality products.
- Connecting with Local Professionals: We help you find trusted taxidermists in your area.
- Saving Time and Money: We provide DIY resources to help you save on professional services.
9.3. Call to Action
Ready to create a stunning Euro mount that showcases your trophy with pride? Visit eurodripusa.net today to explore our products, resources, and local connections. Contact us for personalized advice and support. Let us help you preserve your hunting memories beautifully and respectfully.
10. Frequently Asked Questions (FAQs) About Euro Mounts
10.1. What is a Euro mount?
A Euro mount is a method of preserving and displaying an animal’s skull, typically a game animal, showcasing the bare skull and antlers or horns. It offers a clean, modern, and affordable alternative to traditional taxidermy.
10.2. How much does a Euro mount cost?
The cost of a Euro mount can vary. DIY Euro mounts are generally more affordable, while professional services can range from $100 to $300, depending on the size and complexity of the skull.
10.3. How long does it take to make a Euro mount?
The time required to create a Euro mount varies depending on the method used. Maceration can take 4-6 days, while the entire process, including preparation, cleaning, whitening, and finishing, can take 1-2 weeks for DIY projects or slightly longer with a professional.
10.4. Can I do a Euro mount myself?
Yes, you can create your own Euro mount with the right knowledge, tools, and patience. DIY Euro mounts are a cost-effective and rewarding way to preserve your trophies.
10.5. What is the best way to clean a skull for a Euro mount?
Maceration is often considered the best method for cleaning skulls, as it preserves small, intricate bones and ensures thorough cleaning without damaging the skull.
10.6. How do I whiten a skull for a Euro mount?
A common method for whitening skulls involves using hydrogen peroxide. The skull is submerged in a solution of hydrogen peroxide and water, then gently boiled to achieve the desired whiteness.
10.7. What should I do to protect the antlers during the cleaning process?
To protect the antlers, wrap them tightly with plastic wrap and electrical tape before submerging the skull in water or whitening solutions. This prevents color loss or damage.
10.8. How do I display my Euro mount?
Euro mounts can be displayed on walls using dedicated mounts or custom plaques, or on tabletops using pedestals or stands. Creative options include incorporating the mount into rustic or modern decor themes.
10.9. What are some common mistakes to avoid when making a Euro mount?
Common mistakes include improper cleaning, over-boiling, using bleach, neglecting safety precautions, and rushing the process.
10.10. Where can I find Euro mount services near me?
You can find Euro mount services near you by searching online for local taxidermists or contacting EurodripUSA.net for connections to trusted professionals and suppliers.
By following these guidelines and utilizing the resources available at eurodripusa.net, you can create a stunning Euro mount that beautifully preserves your hunting memories.